Volkswagen Golf Service & Repair Manual: Overview of fitting locations - auxiliary heater components, Golf Variant
| 1 - |
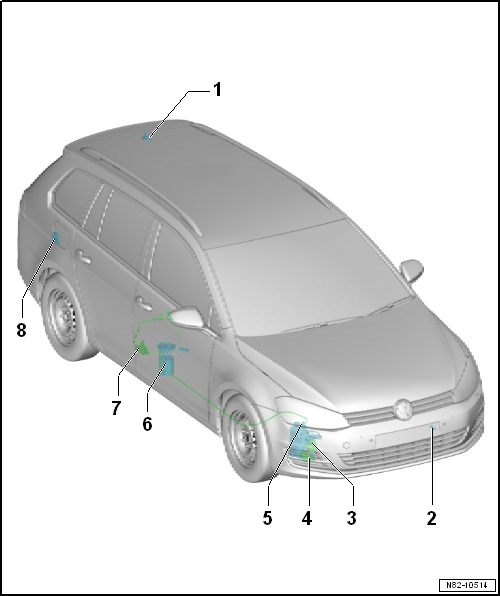
Auxiliary heater aerial -R182- |
| For vehicles with auxiliary heater and remote control. |
| Removing and installing auxiliary heater aerial -R182-
→ Communication; Rep. gr.91. |
| 2 - |
Ambient temperature sensor -G17- |
| Checking: with vehicle diagnostic tester |
| Removing and installing
→ Chapter |
| 3 - |
Exhaust system of auxiliary heater |
| Removing and installing
→ Chapter |
| 4 - |
Circulation pump -V55- |
| Fitting location: on auxiliary/supplementary heater |
| Removing and installing
→ Chapter |
| With auxiliary heater control unit -J364-. |
| Location: behind front bumper cover on right |
| Removing and installing
→ Chapter |
| With fuel gauge sender -G- |
| Removing and installing
→ Rep. gr.20 |
| Check fuel supply to auxiliary heater
→ Chapter. |
| The metering pump -V54- might tick audibly but fail to deliver fuel
because there is air in the suction hose. The control unit will then
switch off permanently. Read event memory using vehicle diagnostic
tester, auxiliary heater self-diagnosis. Erase event memory and perform
final control diagnosis for auxiliary heater. |
| Removing and installing
→ Chapter |
| Testing quantity of fuel delivered
→ Chapter |
| 8 - |
Remote control receiver for auxiliary coolant heater -R149- |
| Removing and installing
→ Chapter |
Note
The illustration shows a Golf.
1 -
Auxiliary heater aerial -R182-
For veh ...
© 2016-2026 Copyright www.vwgolf.org

 Overview of fitting locations - auxiliary heater components, Golf and Golf
GTE
Overview of fitting locations - auxiliary heater components, Golf and Golf
GTE Auxiliary heater