Volkswagen Golf Service & Repair Manual: Assembly overview - intake manifold
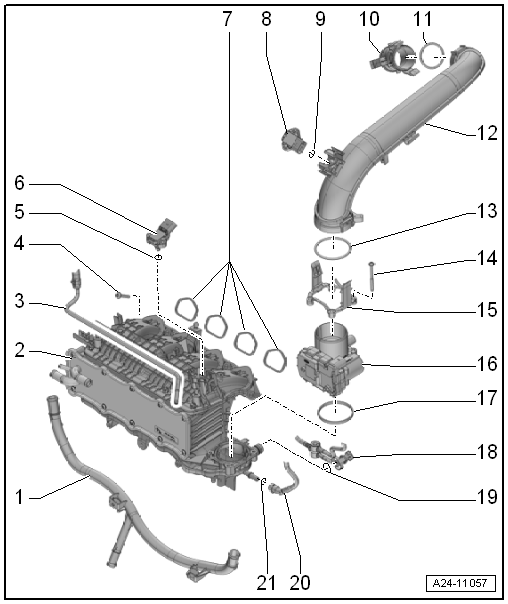
| Clipped onto intake manifold. |
| Removing and installing coolant pipe
→ Chapter |
| Combined in one unit with charge air cooler |
| Removing and installing
→ Chapter |
| Clipped onto intake manifold. |
| Specified torque and tightening sequence
→ Fig. |
| 6 - |
Intake manifold sender -GX9- |
| |
Intake air temperature sensor 2 -G299- |
| |
Intake manifold pressure sender -G71- |
| Removing and installing
→ Chapter |
| 8 - |
Charge air pressure sender -GX26- |
| |
Charge air pressure sender -G31- |
| |
Intake air temperature sender -G42- |
| Removing and installing
→ Chapter |
| For removal, use release tools -T10527- and -T10527/1- |
| Fit and screw in bolt by hand so that it screws into old thread Then
tighten bolt to torque |
| 16 - |
Throttle valve module -GX3- |
| |
Throttle valve module -J338- |
| |
Throttle valve drive for electronic power control -G186- |
| |
Throttle valve drive angle sender 1 for electronic power control
-G187- |
| |
Throttle valve drive angle sender 2 for electronic power control
-G188- |
| Removing and installing
→ Chapter |
| After throttle valve control module -GX3- has been replaced, it must
be re-adapted to engine control unit -J623-. Use vehicle diagnostic
tester for this. |
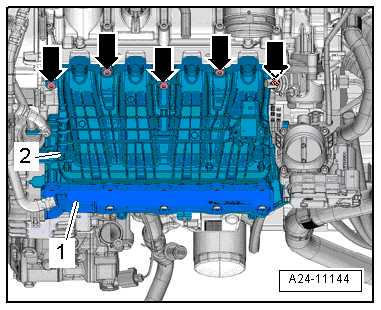
| Intake manifold - specified torque and tightening sequence |
| – |
Tighten bolts in stages as follows: |
|
|
|
| Stage |
Bolts |
Specified torque |
| 1 |
-arrows- |
Starting in centre, screw in
bolts alternately by hand until they make contact |
| 2 |
-arrows- |
Starting in centre, screw in
bolts alternately: 8 Nm |
Special tools and workshop equipment
required
Release tool -T10527-
Release tool -T10527/1-
...
© 2016-2026 Copyright www.vwgolf.org

 Intake manifold
 Removing and installing intake manifold