Volkswagen Golf Service & Repair Manual: Removing and installing plenum chamber cover

Note
| The removal and installation procedures for the plenum chamber
covers may have to be modified slightly depending on model variants. |
| – |
Remove wiper arms
→ Electrical system; Rep. gr.92. |
| – |
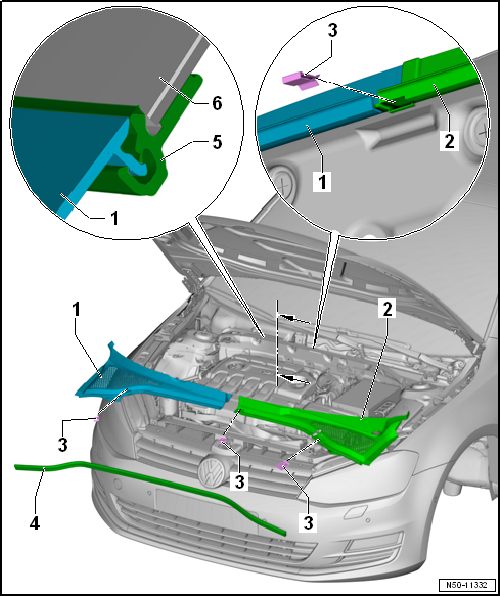
Pull off entire length of seal -4- from
plenum chamber covers -1- and
-2-. |
 Caution
| The windscreen -6- could be
destroyed. The plenum chamber cover must not be levered off with
a tool (screwdriver, wedge). The windscreen will be damaged and
may subsequently crack. |
|
| – |
Loosen clips -3- (qty. 3) at bottom. |
| – |
First pull plenum chamber cover -2-,
starting from middle, upwards from windscreen seal
-5-. |
| – |
Pull plenum chamber cover -2-
frontwards out of wing and remove it. |
| – |
Then pull plenum chamber cover -1-,
starting from middle, upwards from windscreen seal
-5-. |
| – |
Pull plenum chamber cover -1-
frontwards out of wing and remove it. |
Caution
| The windscreen -6- could be
destroyed. |
| Striking or banging the plenum chamber cover into the
windscreen seal may crack the windscreen. |
|
Note
- An insert is fitted in windscreen seal of new windscreens. Remove
this insert before installing plenum chamber cover.
- Push the plenum chamber cover into the windscreen seal by hand using
only slight force. Never force it in by hitting or using tools.
| – |
Spray windscreen seal -5- with a soapy
solution so that plenum chamber covers -1-
and -2- are easier to press in. |
| – |
First insert plenum chamber cover -1-
into wing. |
| – |
Place plenum chamber cover -1- on
beading -5-. Starting from the outside,
press into beading -5- by applying light
pressure. |
| – |
Then insert plenum chamber cover -2-
into wing. |
| – |
Place plenum chamber cover -2- on
beading -5-. Starting from the outside,
press into beading -5- by applying light
pressure. |
| – |
Attach clips -3- (qty. 3) at bottom. |
| – |
Fit seal -4- to plenum chamber covers
-1- and -2-. |
| – |
Install wiper arms
→ Electrical system; Rep. gr.92. |
Special tools and workshop equipment
required
Torque wrench -V.A.G 1783-
...
© 2016-2024 Copyright www.vwgolf.org

 Removing and installing plenum chamber bulkhead