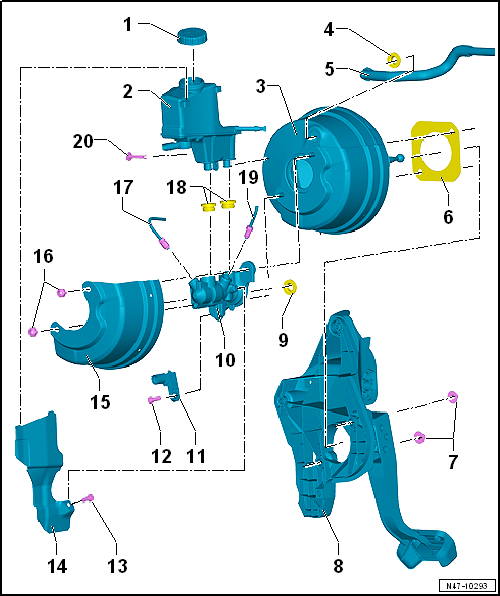
Volkswagen Golf Service & Repair Manual: Assembly overview - brake servo/brake master cylinder, RHD vehicles
 Note Note
| Only use new brake fluid conforming to VW standard (VW 501 14). |
|
|
|

| 2 - |
Brake fluid reservoir |
| With brake fluid level warning contact -F34- |
| Removing and installing
→ Chapter |
| – |
With engine switched off, depress brake pedal firmly several times
(to exhaust vacuum in unit). |
| – |
Now step on and hold brake pedal with medium pressure and start
engine. If the brake servo is functioning properly, the brake pedal will
be felt to go down as the servo takes effect. |
| Replace completely in the event of a fault (before doing so, check
brake servo vacuum system)
→ Chapter |
| Vacuum hose for brake servo |
| Always renew after removing |
| Bonded (only when originally assembled at factory) |
| Bonded joint at brake servo and plenum chamber bulkhead does not
have to be renewed |
| 8 - |
Mounting bracket with brake pedal |
| Removing mounting bracket
→ Chapter |
| Removing brake pedal
→ Chapter |
| Separating brake pedal from brake servo
→ Chapter |
| Connecting brake pedal to brake servo
→ Chapter |
| Ensure that seals are correctly seated |
| Between brake master cylinder and brake servo |
| 10 - |
Brake master cylinder |
| Removing and installing
→ Chapter |
| Connecting brake line
→ Chapter |
| When attaching brake master cylinder to brake servo, make sure
plunger rod is properly positioned in brake master cylinder. |
| 11 - |
Brake light switch -F- |
| Removing and installing
→ Chapter |
| Always renew after removing |
| From secondary piston circuit of brake master cylinder to hydraulic
unit. |
| Repairing brake lines
→ Chapter |
| Ensure that seals are correctly seated |
| Moisten sealing plugs with brake fluid before pressing brake fluid
reservoir into brake master cylinder |
| Between brake master cylinder and brake fluid reservoir |
| From primary piston circuit of brake master cylinder to hydraulic
unit. |
| Repairing brake lines
→ Chapter |
| For securing brake fluid reservoir |
Note
Only use new brake fluid conforming to VW standard (VW 501 14).
1 -
Self-locking ...
Removing
Vehicles with diesel engine:
–
Remove air hose from air filter housin ...
© 2016-2024 Copyright www.vwgolf.org

 Note
Note
 Assembly overview - brake servo/brake master cylinder, LHD vehicles
 Removing and installing brake light switch, LHD vehicles