Volkswagen Golf Service & Repair Manual: Assembly overview - drive shaft, constant velocity joint VL107
| Loosening and tightening
→ Chapter |
| Before fitting, clean the threads in the CV joint using a thread
tap. |
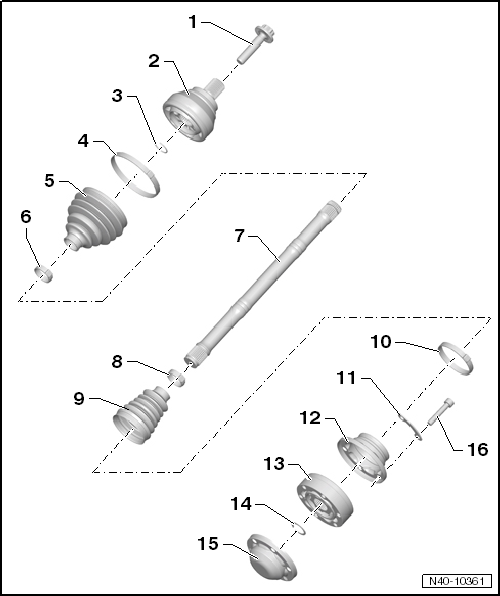
| 2 - |
Outer constant velocity joint |
| Renew only as complete unit |
| Installing: drive onto shaft to stop using plastic hammer |
| Insert in groove in shaft |
| Check for splits and chafing |
| Material: Hytrel (polyester elastomer) |
| 9 - |
Boot for constant velocity joint |
| Material: Hytrel (polyester elastomer) |
| Check for splits and chafing |
| Drive off constant velocity joint with a drift |
| Coat sealing surface of constant velocity joint with -D 454 300 A2-
before installing. |
| Drive off carefully with drift |
| Coat sealing surface of constant velocity joint with -D 454 300 A2-
before installing. |
| Adhesive surface must be free of oil and grease! |
| 13 - |
Inner constant velocity joint |
| Renew only as complete unit |
| Remove and install with circlip pliers -VW 161 A-. |
| 16 - |
Multi-point socket head bolt |
| Initially tighten diagonally to 10 Nm and then tighten diagonally to
specified torque. |
1 -
Outer constant velocity joint
Renew only as complete unit
Removing
→ Anchor.
Installing: drive onto sha ...
1 -
Bolt
Renew after removing
Loosening and tightening
→ Chapter
Before fitting, clean the threads in the C ...
Other materials:
1-pack test paint
Designation:
1-pack test paint -LLS MAX 005-, black
Issued 10.2008
Product description
The 1-pack test paint -LLS MAX 005- is a one-pack product
based on special NC resin com ...
Outer shoulder wear
Unsuitable use of self-levelling adjustments on pneumatic
suspension system
The use of the offroad level is recommended only for driving
offroad. Permanent use of the offroad level during normal road
operation can lead to increased tyre ...
Starting the engine
First read and observe the introductory information
and safety warnings
The steps should only be carried out in the specified
order.
Step
Vehicles without Keyless Access
Vehicles with Keyless Access
1.
...
© 2016-2024 Copyright www.vwgolf.org

 Assembly overview - drive shaft, constant velocity joint VL100
 Assembly overview - drive shaft, triple roller joint AAR3300i