Volkswagen Golf Service & Repair Manual: Removing and installing air filter housing
| – |
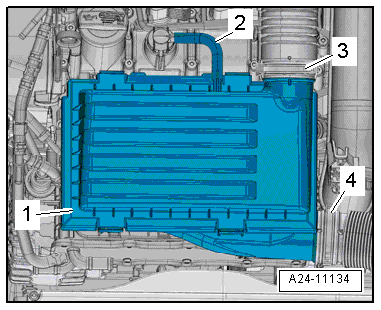
Lift air cleaner housing -1-
off ball studs. |
| – |
Release hose clips -3- and
-4- and remove air ducts. |
 Note Note
| If the air filter element is very dirty or wet, particles of
dirt or water may reach the components and falsify the measured
air mass value. This would lead to loss of power, since a
smaller injection quantity is calculated. |
| Always use genuine part for air filter element. |
| A clean air filter housing is essential. |
| Before fitting the air filter housing, the ball pins on the
intake manifold must be moistened with water without additives. |
| Hose unions and air intake pipes and hoses must be free of
oil and grease before installation. |
| Use a silicone-free lubricant when installing air hoses. |
| Secure all hose connections with the same type of hose clips
as original equipment
→ Electronic Parts Catalogue. |
| To prevent malfunctions, cover critical parts of the engine
air intake (air pipes etc.) with a clean cloth when blowing out
the air cleaner housing with compressed air. |
| Observe disposal regulations! |
| – |
Extract salt residues, dirt or leaves from upper or lower
part of air filter housing. |
| – |
Blow out water drain with compressed air. |
| → Chapter „Assembly overview - air filter housing“ |
|
|
|
1 -
Air duct (bottom section)
On lock carrier
2 -
Air duct (top section)
On lock carrier
3 -&n ...
Other materials:
Overview of fitting locations – controls in roof trim
Note
The illustration shows fitting locations for LHD vehicles. Fitting
locations for RHD vehicles are similar.
1 -
Driver vanity mirror contact switch -F147-
The vanity mirror contact switch is as integral part of the sun
v ...
Renewing wiper motor
Special tools and workshop equipment
required
Release lever -80-200-
Torque wrench -V.A.G 1410-
...
Fitting wheel, fitting instructions for Volkswagen
Vehicles with tyre pressure sensor
If the wheels are changed (e.g. switch from summer to winter
tyres), the wheel electronics transmit data as soon as the speed
of the new wheels exceeds 25 km/h. The new wheel electronics' ID
numbers are ...
© 2016-2026 Copyright www.vwgolf.org

 Assembly overview - air filter housing
 Intake manifold