Volkswagen Golf Service & Repair Manual: Removing and installing belt height adjuster, 4-door model and estate
| – |
Press belt height adjuster button and move slider of belt
height adjuster to lowest position. |
| – |
Detach upper B-pillar trim
→ Chapter. |
| – |
Place B-pillar trim with belt webbing attached to one side. |
|
|
|
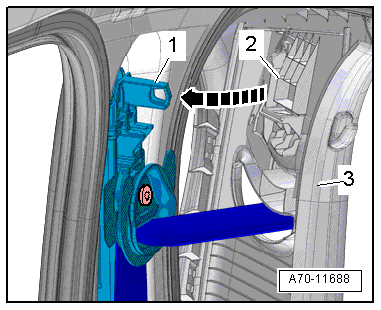
| – |
Initially, fit B-pillar trim -3-
upwards into mounting in roof. |
| |
Mounting -2- of sliding part on
B-pillar trim must engage in retaining pin
-1- on belt height adjuster -arrow-. |
| – |
If a new belt height adjuster is installed, firmly push
sliding part upwards after B-pillar trim has been installed. |
| |
This will release the installation guard of the belt height
adjuster. |
| – |
Check the following functions: |
| |
Belt height adjuster must engage audibly in each of the 3
possible positions (including top position). |
| |
Belt height adjuster button must return to top position
after any operation. |
| |
Belt guide fitting must move to vertical position or
operated position on its own. |
| If one of the requirements is not fulfilled, check belt
height adjuster for correct installation and renew it if
necessary. |
| |
→ Chapter „Assembly overview - front three-point seat belt,
4-door model and estate“ |
|
|
|
Removing
–
Press belt height adjuster button and move slider of belt
height adjuster to lowest position.
–&nbs ...
Removing
–
Remove bench seat / single seats
→ Chapter.
Right side: belt buckle with belt end fitting
...
Other materials:
Removing and installing speed sensor on rear axle -G44-/-G46-
Note
Removal and installation is described for the rear left
speed sensor. Removal and installation of the rear right speed
sensor is analogous.
Rear left speed sensor -G46--1-.
...
Removing and installing underbody covers – petrol/diesel
Note
The removal and installation procedures may have to be modified
slightly depending on engine fitted.
Removing
–
Remove centre underbody panels
→ Chapter.
–
Release retaining tab and pull out front co ...
Button for the driver assist systems
Fig. 18 On the turn signal and main beam
lever: button for driver assist systems
First read and observe the introductory information
and safety warnings You can switch the driver assist systems listed in the
Assistant menu on and off with the button on the turn signal and main beam lever
...
© 2016-2024 Copyright www.vwgolf.org

 Note
Note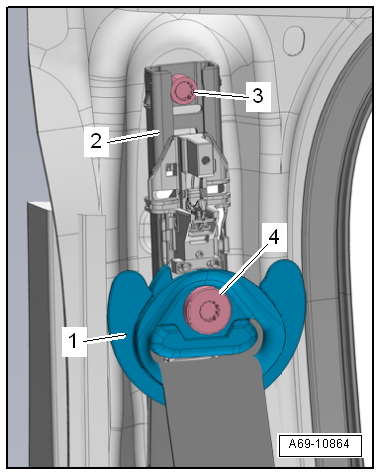
 Removing and installing belt height adjuster, 2-door model
 Removing and installing rear belt buckle