Volkswagen Golf Service & Repair Manual: Removing and installing windscreen
 Note Note
| |
The removal of a bonded window is described using the
Removal kit for flush bonded windows -V.A.G 1474 A-. |
| |
Alternatively, you can also use the cutting tool for bonded
windows -VAS 6452-. |
| |
Another alternative is to use the window removal set -VAS
6888-. |
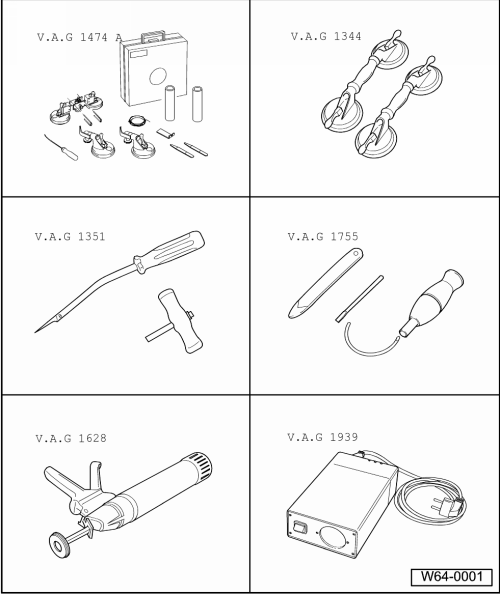
| Special tools and workshop equipment
required |
| |
Removal kit for flush bonded windows -V.A.G 1474 A- or
Removal kit for flush bonded windows -VAS 6452- |
| |
Suction lifter -V.A.G 1344- |
| |
Cutting tool -V.A.G 1351- |
| |
Windscreen removal kit -V.A.G 1755- |
| |
Cartridge gun -V.A.G 1628- |
|
|
|
| |
Cartridge heater -V.A.G 1939- |
| |
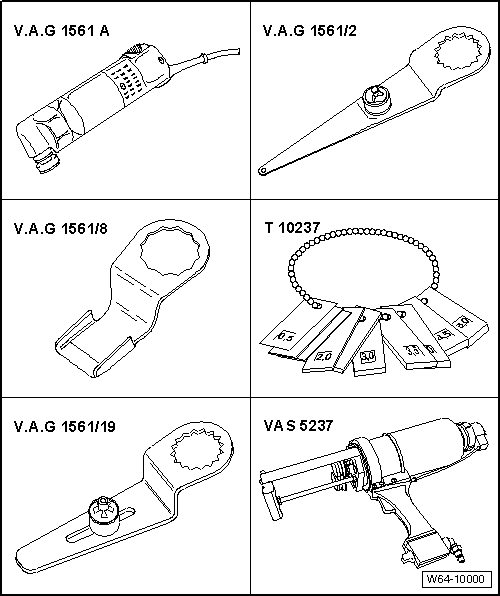
Electric cutter -V.A.G 1561 A- |
| |
Cutting blade -V.A.G 1561/2- |
| |
Cutting blade -V.A.G 1561/8- |
| |
Cutting blade -V.A.G 1561/19- |
|
|
|
| |
Double cartridge gun -VAS 5237- |
| – |
Remove A-pillar upper trims on left and right
→ General body repairs, interior; Rep. gr.70. |
| – |
Remove left and right sun visors
→ General body repairs, interior; Rep. gr.68. |
| – |
Remove interior mirror
→ General body repairs, interior; Rep. gr.68. |
| – |
For vehicles with front camera for driver assist systems
-R242- remove front camera
→ Electrical system; Rep. gr.96 |
| – |
Lower moulded headliner in area of windscreen
→ General body repairs, interior; Rep. gr.70. |
| – |
Moulded headliner can now be lowered sufficiently to allow
windscreen to be cut out without damage occurring to moulded
headliner. |
| – |
Removing plenum chamber cover
→ Chapter. |
|
|
|
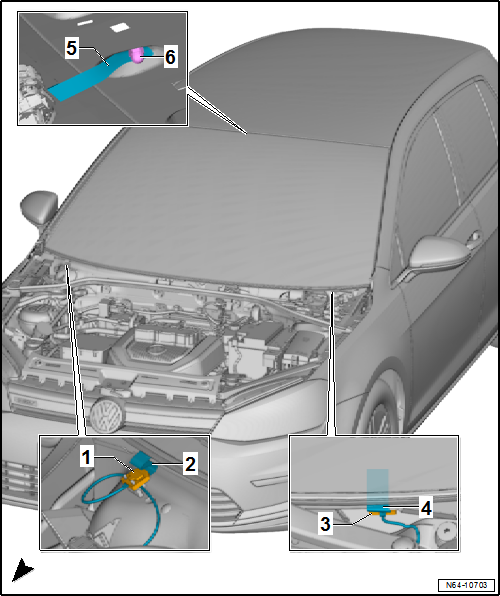
| On vehicles with heated windscreen |
| – |
Unscrew hexagon nut -6-, and bond line
-5- to windscreen. |
| – |
Disconnect connectors -1 and 3-. |
| – |
Bond lines -2 and 4- to windscreen. |
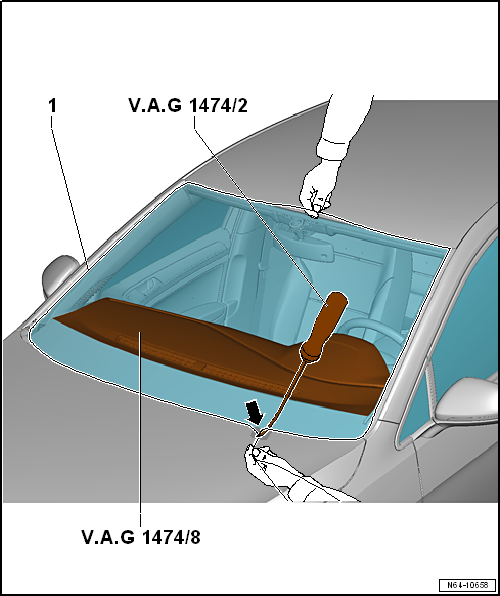
| – |
Slide suitable covering film -V.A.G 1474/8- between windscreen and
dash panel. |
| – |
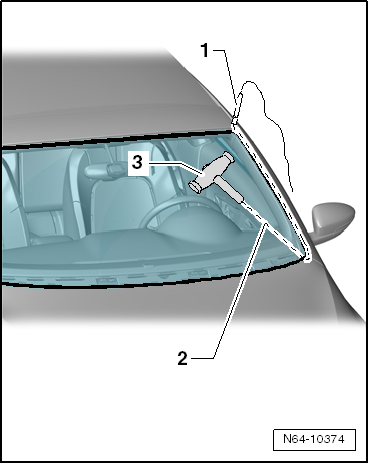
Pull cutting cord -1- through adhesive
sealing material into inside of vehicle using awl -V.A.G 1474/2-. |
| – |
Secure inside end of cutting cord against falling out using
Pull toggle -V.A.G 1351/1--3-. |
| – |
Insert cutting cord -2- into
window flange using tube -1-. |
| – |
Place cutting cord around the front windscreen. |
| – |
Ensure that cutting cord lies under front windscreen in
corners. |
|
|
|
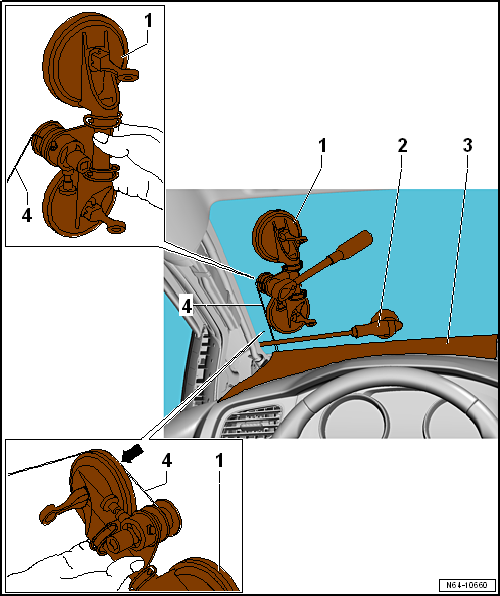
| – |
Attach the ends of cords -4- on removal
kit for flush bonded windows -VAS 6452--1-. |
| – |
Put cutting cord around suction cups of reel device
-arrow-. |
| – |
Use plastic wedge -2- to press cutting
cord against windscreen while cutting in order to have clearance at
window flange and dash panel. |
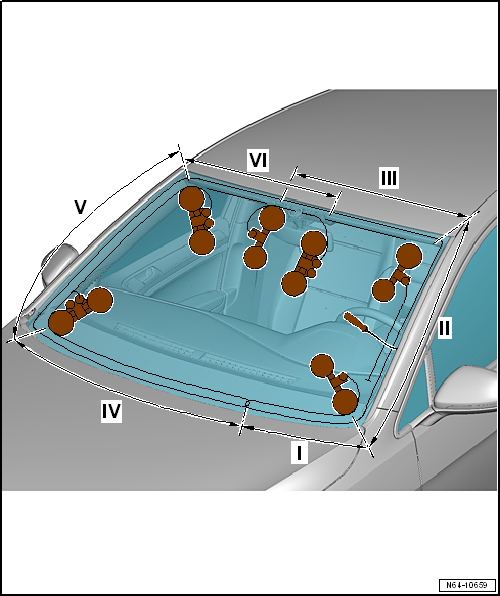
| – |
Position removal kit for flush bonded windows -VAS 6452- at lower
corners of windscreen. |
| – |
Change permanently position of left removal kit for flush bonded
windows -VAS 6452- from “position I”to “position III” and cut windscreen
free. |
| – |
Change permanently position of right removal kit for flush bonded
windows -VAS 6452- from “position IV”to “position VI” and cut windscreen
free. |
| – |
Use two suction lifters -V.A.G 1344- to lift the windscreen from the
vehicle. |
Note
| |
The windscreen as a genuine replacement part is delivered with
spacers. |
| |
In vehicles without panorama sliding sunroof, the spacers
-1- remain installed. |
| |
In vehicles with panorama sliding sunroof, the seal
-4- must be installed. |
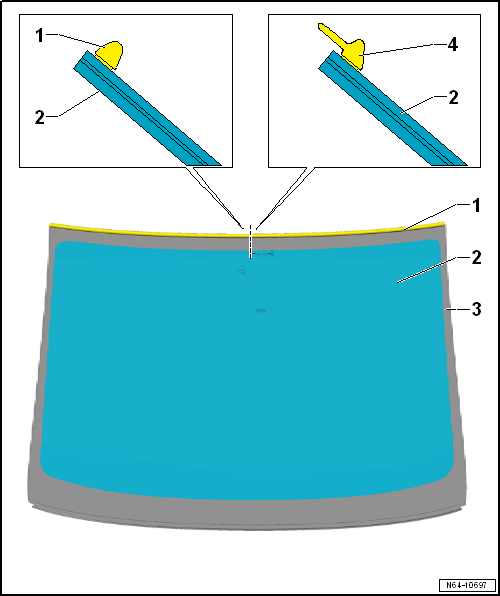
| – |
Separate spacers -1- with a suitable
tool. |
| – |
Bond seal -4- to edge of windscreen. |
| – |
For vehicles with front camera for driver assist systems
-R242- install front camera
→ Electrical system; Rep. gr.96 and calibrate front
camera
→ Running gear, axles, steering; Rep. gr.44. |
| – |
Preparing old undamaged window for glazing
→ Chapter. |
| – |
Preparing new window for glazing
→ Chapter. |
| – |
Preparing body flange for glazing
→ Chapter. |
| – |
Installation instructions
→ Chapter |
| – |
Minimum curing period
→ Chapter |
|
|
|
| Removing broken windscreen |
| Removal of a broken windscreen is performed in the same
manner as the removal a broken rear window
→ Chapter. |
|
|
|
1 -
Windscreen
Removing and installing
→ Chapter
2 -
PUR adhesive sealant
Cross section of bead: -width b- = 7 m ...
© 2016-2025 Copyright www.vwgolf.org

 Assembly overview - windscreen
 Rear window