Volkswagen Golf Service & Repair Manual: Removing and installing window channel
 Note Note
-
| |
The removal and installation sequence is only for the
left window channel. Removal and installation of the right
window channel are similar. |
-
| |
Do not bend window channel when removing! |
|
|
|
| – |
Remove inner window slot seal
→ Chapter. |
| – |
Remove window slot outer seal
→ Chapter. |
| – |
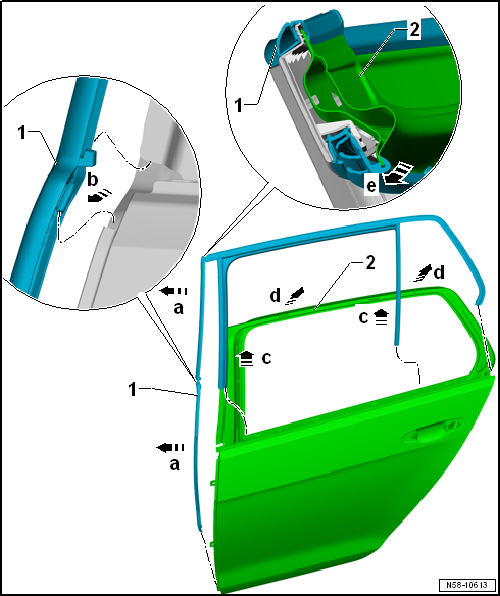
Peel sealing lip of window channel -1-
off the door flange -2- from the inside
-arrow e-. |
| – |
Pull window channel -1- out of
mountings on door -arrows c-. |
| – |
Pull window channel of front metal flange
-arrows a- and in area of overlap out of holding device
-arrow b-. |
| – |
Pull window channel -1--arrows c- off
flange -2- uniformly all around it. |
| – |
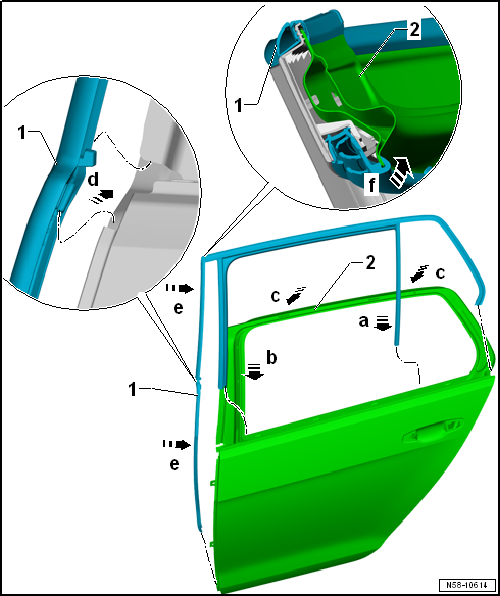
Spray window channel with soapy water to facilitate installation. |
| – |
Insert window channel -1- into
mountings on door -arrows a and b-. |
| – |
Insert window channel at front flange into holding device
-arrow d- and fit onto metal flange
-arrows e-. |
| – |
Push window channel -1- from rear
towards front onto door flange -2--arrows c-. |
| – |
Fold sealing lip of window channel onto door flange from the inside
-arrow f-. |
Note
| To prevent wind noise, ensure window channel
-1- seats evenly when installing. |
| Further installation is performed in the reverse order of
removal. |
Special tools and workshop equipment
required
Torque wrench -V.A.G 1331-
...
Note
The core of the window slot outer seal is a metal
insert.
If it is bent o ...
Other materials:
Assembly overview - FS III front brake
Note
After every brake pad change, depress brake pedal firmly several
times with vehicle stationary, so that brake pads are properly seated in
their normal operating position.
Use the brake filling and bleeding equipment -VAS 5234- to draw off
brake ...
Removing and installing heater and air conditioning unit
Special tools and workshop equipment
required
Torque wrench -V.A.G 1331/- (5…50 Nm)
Hose clamps up to 25 mm -3094-
...
Remote control
Fig. 185 Auxiliary heater: remote control
Fig. 186 Auxiliary heater: battery cover
for the remote control
First read and observe the introductory information
and safety warnings
Meaning
Switches on the auxiliary heater.
...
© 2016-2026 Copyright www.vwgolf.org

 Removing and installing door lock
 Removing and installing window slot outer seal