Volkswagen Golf Service & Repair Manual: Removing and installing track rod
| Special tools and workshop equipment required |
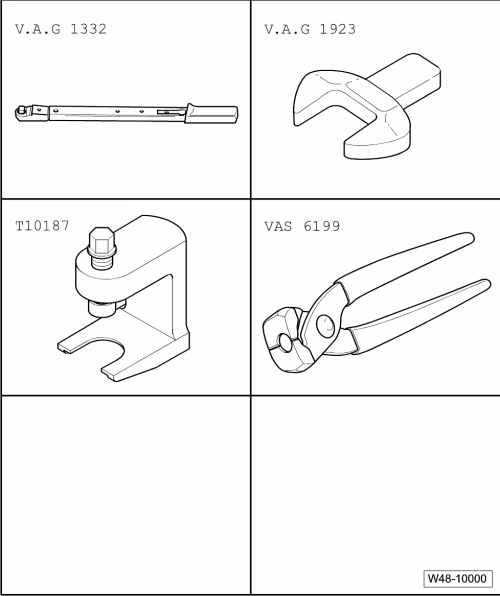
| Torque wrench -V.A.G 1332- |
| Open-end insert, 38 mm -V.A.G 1923- |
| Ball joint puller -T10187- |
| Locking pliers for Phaeton steering rack -VAS 6199- |
| Carry out the following work: |
| – |
Turn steering wheel to straight-ahead position. |
| – |
Clean outside of steering rack in vicinity of boot. |
| – |
Loosen nut on track rod ball joint but do not remove
completely. |
|
|
|
| – |
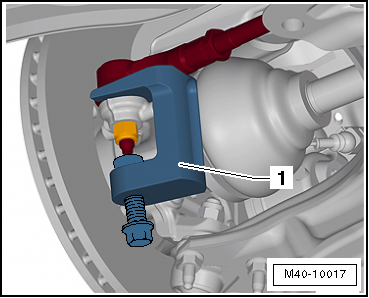
Using ball joint puller -T10187--1-,
press track rod ball joint off wheel bearing housing, and
unscrew nut. |
 Caution
| Leave nut screwed on a few turns to protect thread
on pin. |
|
| – |
Open clamps and push boot back. |
| – |
Turn steering as follows: |
| |
- For left track rod, turn steering to full right lock |
| |
- For right track rod, turn steering to full left lock. |
|
|
|
| 1 - |
Open-end spanner attachment -V.A.G 1923- |
| 2 - |
Torque wrench -V.A.G 1332- |
 Note Note
| If the steering rack shows signs of corrosion, damage, wear
or soiling, renew the complete steering rack. |
| Likewise, if there is no film of grease on the steering
rack, the steering rack must be renewed. |
| Install in reverse order of removal, observing the
following: |
Caution
| Do not grease steering rack. |
|
|
|
|
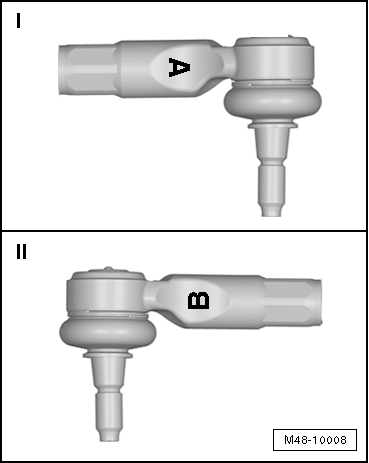
| – |
Make sure that correct track rod ball joint is installed on
each side. |
| I - |
Track rod ball joint on right marked with an “A” |
| II - |
Track rod ball joint on left marked with a “B” |
| – |
Turn steering wheel to straight-ahead position. |
| – |
Thread new clamps and rubber boot onto track rod. |
|
|
|
| – |
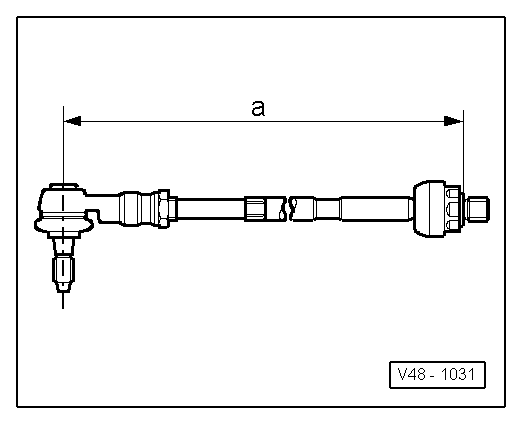
Screw track rod into track rod ball joint until dimension
-a- is attained. |
| Dimension -a- = 373 ± 1 mm |
|
|
|
| 1 - |
Open-end spanner attachment -V.A.G 1923- |
| 2 - |
Torque wrench -V.A.G 1332- |
| – |
Lightly grease sealing surface between boot and track rod
with grease -G 052 168 A1- from repair kit. |
|
|
|
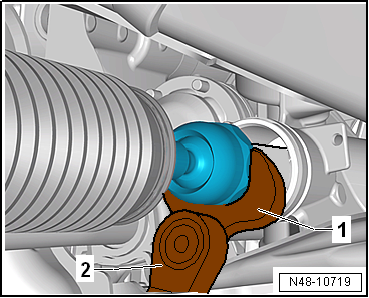
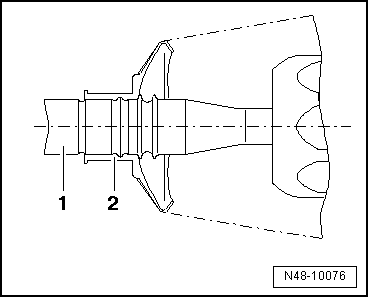
| – |
Push rubber boot -2- onto track
rod -1-, making sure that boot is
correctly positioned. |
| – |
Secure spring-type clip on rubber boot using hose clip
pliers -V.A.G 1275-. |
| – |
Lightly grease sealing surface between boot and steering
rack housing with grease -G 052 168 A1- from repair kit. |
| – |
Push rubber boot onto steering rack housing as far as it
will go. |
|
|
|
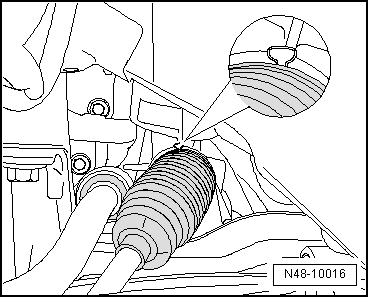
| – |
Install new clamp, as shown in figure, with locking pliers
for Phaeton steering rack -VAS 6199-. |
| – |
Check wheel alignment
→ Chapter. |
| – |
If both track rods have been exchanged, basic setting must
be carried out for steering angle sender -G85-
→ Vehicle diagnostic tester. |
| – |
Then carry out basic setting of steering
→ Vehicle
diagnostic tester |
| → Chapter „Assembly overview - steering rack“ |
| → Chapter „Repairing steering rack“ |
| → Chapter „Torque settings for wheel bolts“ |
|
|
|
Special tools and workshop equipment required
Hose clip pliers -V.A.G 1275-
Torque wrench -V.A.G 1332-
Tool insert 24 mm -V.A.G 133 ...
Special tools and workshop equipment
required
Ball joint puller -T10187-
...
Other materials:
Paintwork in Aftersales
Panels galvanised on both sides
Earlier attempts at flanged pairings have resulted in the
fact that only panels that are galvanised on both sides are used
now. Only in this way can the cathodic protection and the
barrier effect of the zi ...
Removing and installing brake caliper
Special tools and workshop equipment required
Vehicle diagnosis, testing and information system -VAS 5051-
Tool set for brake bleeding -VAS 6564-
Insert tool with ratchet -VAS 6784-
Bit attachment (7 mm) -T10503-
...
Contact surface cleaning set -VAS 6410-
Using contact surface cleaning set -VAS 6410-
The contact surface cleaning set -VAS 6410- allows optimal
repair quality to be achieved in the area of vehicle electrics.
The tools allow performing repair work in the area of the sensor
in wiring harnesses for t ...
© 2016-2024 Copyright www.vwgolf.org

 Removing and installing boot
 Removing and installing track rod ball joint