Volkswagen Golf Service & Repair Manual: Removing and installing steering column switch module, Kostal
| – |
Move steering wheel to rearmost and lowest position. Use the
entire range of adjustment of the steering column for this
purpose. |
| – |
Remove steering wheel
→ Running gear, axles, steering; Rep. gr.48. |
| – |
Remove lower steering column trim
→ General body repairs, interior; Rep. gr.68. |
 WARNING
| Risk of damage to the electronic components due to
electrostatic discharge. |
| Before disconnecting the electrical connector, the
mechanics must electrostatically discharge themselves by
briefly grasping hold of door striker plate or similar. |
|
|
|
|
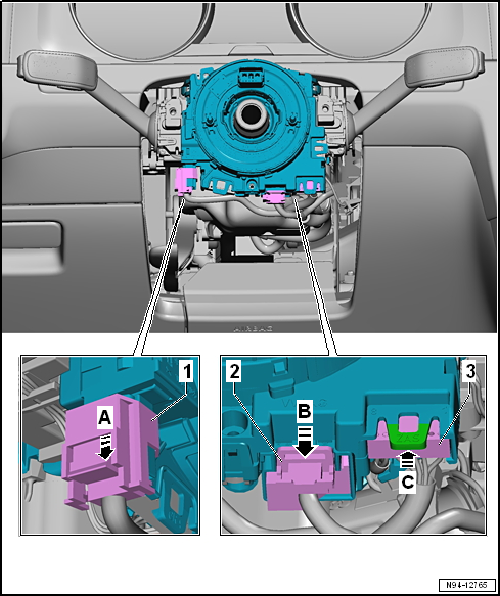
| – |
Pull out connector lock in direction of arrow
-A- and press it down. |
| – |
Disconnect electrical connector -1-. |
| – |
Pull out connector lock in direction of arrow
-B- and press it down. |
| – |
Disconnect electrical connector -2-. |
| – |
Press connector lock in direction of arrow -C-
and disconnect electrical connector -3-. |
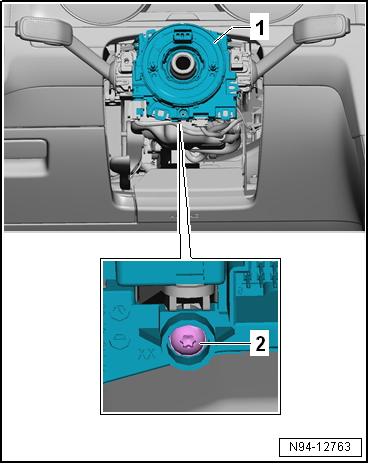
| – |
Unscrew bolt -2- on underside. |
| – |
Pull off steering column switch module
-1-. |
| Install in the reverse order of removal, observing the
following: |
|
|
|
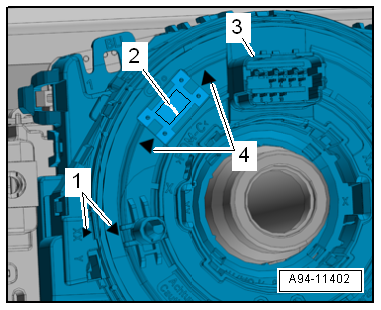
| – |
Before pushing on steering column switch module, ensure the
following for steering column electronics control unit -J527--3-: |
| The “arrows”-1- must align. |
| Coil connector -2- must be
visible through window between “arrows”-4-. |
| → Chapter „Assembly overview - steering column switch module“ |
|
|
|
Removing
–
Remove lower steering column trim
→ General body repairs, interior; Rep. gr.68.
& ...
Removing
–
Move steering wheel to rearmost and lowest position. Use the
entire range of adjustment of the steering column for this
...
© 2016-2024 Copyright www.vwgolf.org

 Removing and installing ignition/starter switch
 Removing and installing steering column switch module, Valeo