Volkswagen Golf Service & Repair Manual: Removing and installing sealing flange on pulley end
| Special tools and workshop equipment
required |
| Sealant
→ Electronic Parts Catalogue |
| – |
Remove noise insulation
→ General body repairs, exterior; Rep. gr.66. |
| – |
Remove air conditioner compressor with refrigerant lines
connected, and tie it up on the right side
→ Heating, air conditioning; Rep. gr.87. |
| – |
Remove toothed belt
→ Chapter. |
|
|
|
| – |
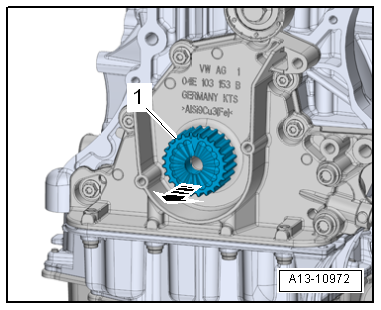
Detach crankshaft pulley -1--arrow-. |
Risk of damage to engine caused by incorrect valve timing.Do not turn
crankshaft out of TDC position.
|
|
|
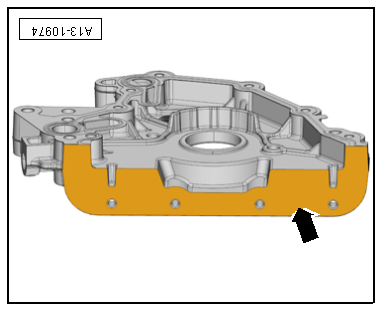
| – |
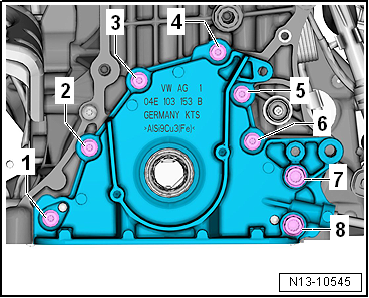
Unscrew bolts -1 … 8- and
carefully remove sealing flange from the glued joint. |
| – |
Drive out seal with sealing flange removed. |
| Installation is carried out in the reverse order; note the
following: |
| The lubrication system can be soiled by sealant residue. |
| Cover open section of sump with clean clothes. |
| – |
Remove sealant residue from sealing flange and sump (top
section). |
| – |
Remove any oil and grease from sealing surfaces. |
 Note Note
|
|
|
| Observe use-by-date of sealant. |
| – |
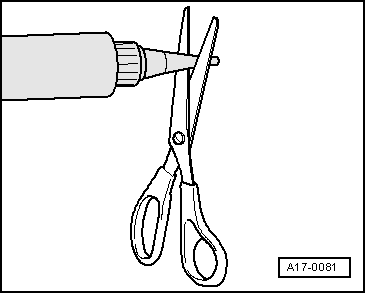
Cut off nozzle on tube at front marking (diameter of nozzle
approx. 2 mm). |
|
|
|
| – |
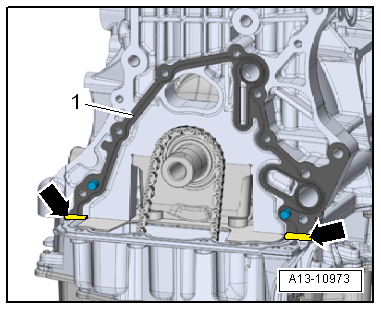
Slide gasket -1- onto dowel
pins in cylinder block. |
| – |
Apply a thin bead of sealant at the edge of the joint
between the cylinder block and the sump
-arrows-. |
|
|
|
| – |
Thinly coat lower sealing surface
-arrow- of sealing flange with sealant. |
Note
| Install the sealing flange within 5 minutes after the
sealant has been applied. |
| – |
Carefully fit gasket sealing flange onto dowel pins on
cylinder block. |
| – |
Tighten bolts for sealing flange
→ Fig.. |
| – |
Install crankshaft oil seal on belt pulley end
→ Chapter. |
|
|
|
| – |
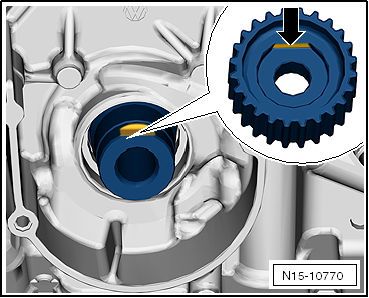
Fit crankshaft sprocket onto crankshaft. |
| The contact surface between vibration damper and crankshaft
pulley must be free of oil and grease. |
| The machined surface -arrow- of
crankshaft pulley must be positioned over the machined surface
of the crankshaft journal. |
| – |
Install toothed belt (adjust valve timing)
→ Anchor. |
| – |
Install air conditioner compressor
→ Heating, air conditioning; Rep. gr.87. |
| – |
Install noise insulation
→ General body repairs, exterior; Rep. gr.66. |
| → Fig. „“Sealing flange at belt pulley end - Prescribed torque
and tightening sequence”“ |
| → Heating, air conditioning; Rep. gr.87 |
|
|
|
Special tools and workshop equipment
required
Assembly tool -T10485-
...
Other materials:
Round connector systems
Note
If necessary, any housing catches in place (secondary
locking mechanisms) must be released or removed prior to
disengaging the contacts using the prescribed tool
→ Chapter.
...
Spraying the evaporator with the suction feed spray-gun -V.A.G 1538- and
spray lance
Spray the evaporator with Contra Sept directly using a spray
lance (approx. 10 bar). Contra Sept neutralises microbes and
bacteria directly at the evaporator.
In order to enable access to the evaporator, some
preliminary work and differe ...
Electrical controls on the front seats
Fig. 44 Moving the front left seat forwards
and backwards, adjusting the backrest and the seat cushion for height and tilt
Fig. 45 Adjusting the lumbar support.
First read and observe the introductory information
and safety warnings The layout of the controls on the front right-hand seat ...
© 2016-2024 Copyright www.vwgolf.org

 Renewing crankshaft oil seal - belt pulley end