Volkswagen Golf Service & Repair Manual: Removing and installing rear underbody cover – petrol/diesel

Note
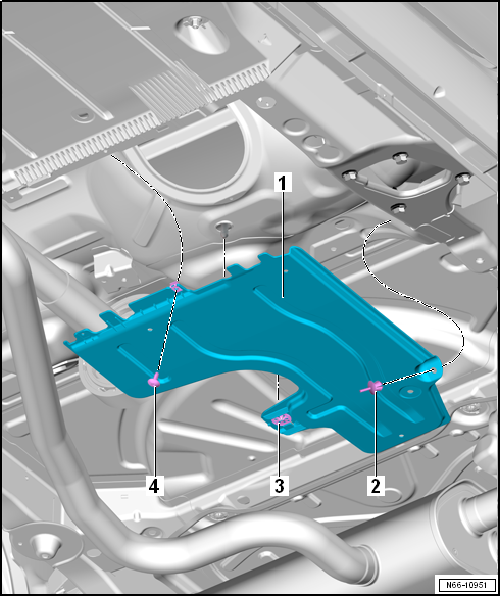
| The removal and installation procedures may have to be modified
slightly depending on engine fitted. |
| – |
Loosen lock washer -3-. |
| – |
Unclip spreader rivet -2- and remove
bolt -4-. |
| – |
Remove rear underbody panel -1-. |
| Install in the reverse order of removal observing the following: |
Removing
–
Remove bolts -2-.
–
Unscrew nuts -3-.
–
Remove underbody cover -1-.
Installing
...
Removing
–
Remove bolts -2-.
–
Unscrew nuts -3-.
–
Remove underbody cover -1-.
Installing
...
Other materials:
Checklist
Carry out the steps in the specified order :
To ensure that the engine oil reading
is correct, park the vehicle on a level surface with the engine at operating
temperature.
Switch off the engine and wait a few
minutes for the engine oil to flow back into the sump.
Open t ...
Introduction
This chapter contains information on the following subjects:
→ Jump lead connection point (earth connection)
→ How to start the engine using jump leads
If the engine fails to start because the vehicle battery is flat, the flat battery
can be connected to the battery of another ...
Undercoated areas, body overview indicating differing coat thicknesses
Note
Undercoating (stone-chipping protection) applied during repair work
must be identical in appearance and thickness to the original
undercoating.
Water drainage holes must remain clear.
All threaded studs and welded nuts with metric ...
© 2016-2024 Copyright www.vwgolf.org

 Removing and installing centre underbody cover – e-Golf
 Removing and installing rear underbody cover – e-Golf