Volkswagen Golf Service & Repair Manual: Removing and installing mounting bracket
| Special tools and workshop equipment
required |
|
|
 Note
| Removal and installation are only described for the left
door handle bracket. The right side is similar. |
|
|

Torque wrench -V.A.G 1783- |

| – |
Remove front door trim
→ General body repairs, interior; Rep. gr.70. |
| – |
Remove lock cylinder cover cap
→ Chapter and lock cylinder
→ Chapter depending on version. |
| – |
Or remove cover cap without lock cylinder
→ Chapter. |
| – |
Remove door handle
→ Chapter. |
| – |
Remove inner door cover
→ Chapter. |
| – |
Remove door handle
→ Chapter. |
| – |
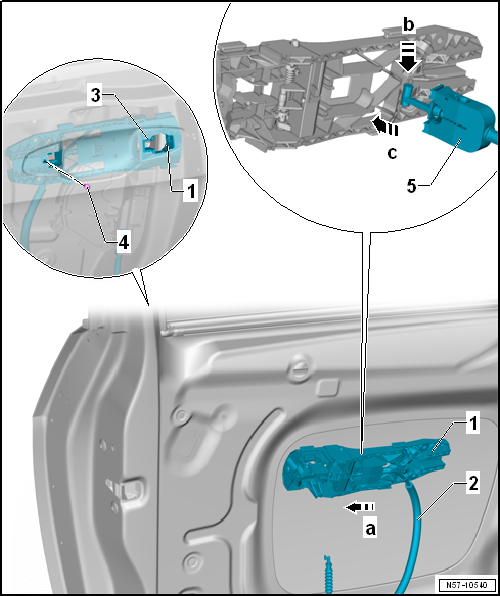
Unscrew bolt -4- and remove base
-1-. |
| – |
Remove door handle bracket -1- from
front door -arrow d-. |
| – |
Release holding device -5- and swivel
it out of mounting in door handle bracket -arrow
a-. |
| – |
Lift cable bolt out of mounting -arrow b-. |
| – |
Take cable -2- out of door handle
bracket -1--arrow c-. |
| – |
Insert cable -2- into door handle
bracket -1-. |
| – |
Slide cable bolt into mounting -arrow b-. |
| – |
Swivel holding device -5- into mounting
of door handle bracket -arrow c- and
engage. |
| – |
Guide door handle bracket -1- at front
into door -arrow a-. |
| – |
Insert base -1- and tighten bolts
-4-. |
| |
Bolts
→ Chapter „Assembly overview - door handle and door lock“ |
Removing
Note
Removal and installation are described only for the right
door handle. The left side is similar.
...
Special tools and workshop equipment
required
Torque wrench -V.A.G 1331-
...
Other materials:
O-ring
Use only O-rings that are resistant to refrigerant R134a and
related refrigerant oils. O-rings are no longer colour-coded.
Coloured and black O-rings are used.
Check that the O-rings used have the correct internal
diameters.
...
Removing and installing rain and light sensor, vehicles without front camera
for driver assist systems
Note
The rain and light sensor has a silicon layer (coupling pad)
which forms the contact surface to the windscreen.
The rain and light sensor has been designed so that it can
be used again. A prerequisite for re-use ...
Knee airbags
Fig. 75 On the driver side: location of
the knee airbag
Fig. 76 Deployment zone of the knee airbag
First read and observe the introductory information
and safety warnings The knee airbag on the driver side is located in the
lower part of the dash panel . The airbag location is identi ...
© 2016-2024 Copyright www.vwgolf.org

 Removing and installing door handle
 Removing and installing door lock