Volkswagen Golf Service & Repair Manual: Removing and installing head restraint
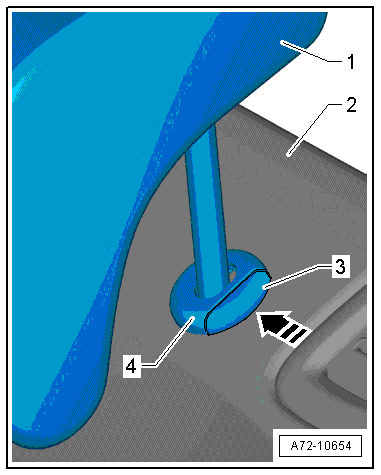
| – |
Press release button -3- for
height adjustment on head restraint guide
-4- in -direction of arrow-. |
| – |
At the same time pull head restraint
-1- out of rear seat backrest -2-
as far as stop. |
|
|
|
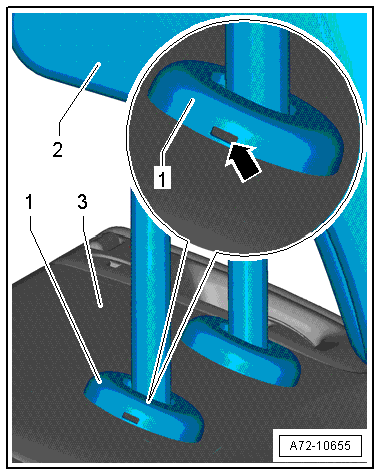
| – |
Insert a small flat-bladed screwdriver into opening
-arrow- of head restraint guide
-1- and press in locking spring as
far as stop. |
 Note Note
| The aperture in the head restraint guide
-arrow- may be on
»right« or
»left« as seen from direction of travel. |
| – |
At the same time pull head restraint
-2- out of rear seat backrest -3-
and remove it. |
| Installation is carried out in reverse order. |
|
|
|
Special tools and workshop equipment
required
Torque wrench -V.A.G 1410-
...
Note
2 commercially available screwdrivers with a blade height of
0.4 mm and a blade width of 8 mm are required for removal.
...
Other materials:
Upgrade kit -VAS 1978/50-
Upgrade kit -VAS 1978/50- is required to bring the
“old”wiring harness repair set -VAS 1978- up to the latest
standard of wiring harness repair set -VAS 1978A-. The upgrade
kit comprises of 4 assembly and 10 release tools, a new set of
crimping plier ...
Assembly overview - interior monitoring, LHD vehicles
1 -
Anti-theft alarm system sensor -G578-
Removing and installing
→ Chapter
Needs parameterisation after renewal
→ Chapter
2 -
Bolt
Qty. 4
Specified ...
Renewing Lambda probe
Note
Do not repair Lambda probe wires, since this can result in
malfunctions.
If necessary, replace attachment parts, cable ties or
marking rings to match the uniform probe to the defective probe
as specified. ...
© 2016-2024 Copyright www.vwgolf.org

 Removing and installing centre armrest
 Removing and installing head restraint guide