Volkswagen Golf Service & Repair Manual: Removing and installing fuel line for auxiliary/supplementary heater
| – |
Observe safety precautions
→ Chapter. |
| – |
Observe rules for cleanliness
→ Chapter. |
| – |
Fuel tank must not be more than 3/4
full. This ensures that the fill level is below the flange of
the fuel delivery unit. |
| – |
Draining fuel tank
→ Chapter |
| – |
Remove rear bench seat
→ General body repairs, interior; Rep. gr.72. |
|
|
|
| – |
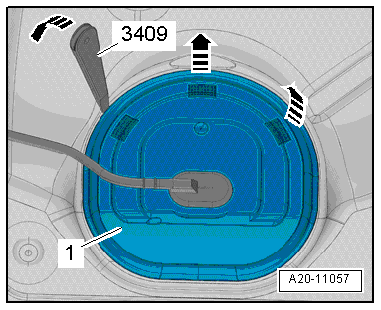
Unclip cover -1- for flange at
retaining tabs -arrows-, using
removal wedge -3409-. |
|
|
|
| – |
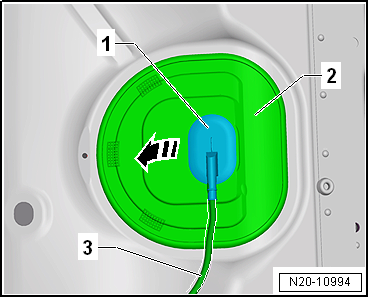
Unclip sealing grommet -1-
downwards from cover -2-. |
| – |
Push cover -2- back along
wiring harness -3-. |
|
|
|
| Vehicles with front-wheel drive |
| – |
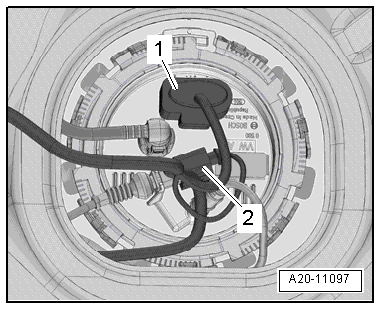
Release and pull off connector -1-
on sealing flange. |
| – |
If fitted, detach connector -2-
for metering pump -V54- of auxiliary heater on sealing flange
and lay connector aside. |
|
|
|
| Vehicles with four-wheel drive: |
| – |
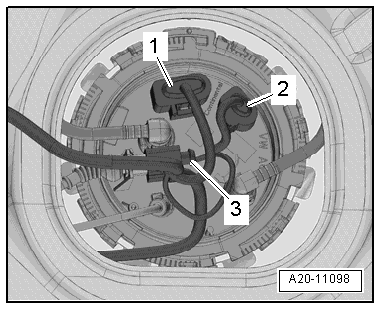
Release and pull off connectors -1-
and -2- on sealing flange. |
| – |
If fitted, detach connector -3-
for metering pump -V54- of auxiliary heater on sealing flange
and lay connector aside. |
|
|
|
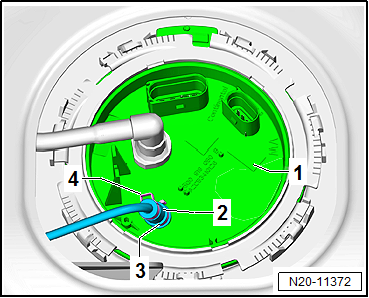
| If the fuel line for metering pump
-V54- is to be disconnected from fuel delivery unit: |
| – |
Open lower clamp -3- on sealing
flange -1-. |
The fuel system is pressurised.Risk of injury due to fuel which may
spurt out.Wear eye protection.Wear protective gloves.Release pressure:
place clean cloth around connection and carefully open connection.
| – |
Do not open upper clamp -4-. |
| – |
Pull fuel line -2- together
with grommet off sealing flange. |
| If a new fuel delivery unit is installed: |
| – |
Remove fuel line
→ Anchor. |
|
|
|
| – |
Remove fuel delivery unit
→ Chapter. |
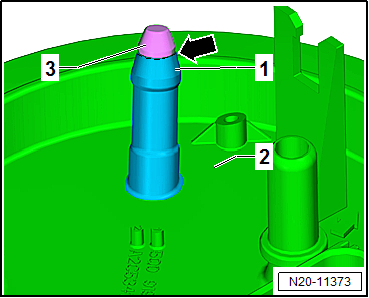
| – |
The connection on the fuel delivery unit
-2- must be opened. |
| – |
To do this, cut off sealing piece -3-
on connection -1-. |
| – |
Cut it off on the respective marking line
-arrow-. |
| – |
Deburr edges of cutting point. |
| – |
Prevent any dirt or swarf from entering the fuel delivery
unit. |
| – |
Check fuel delivery unit for soiling, and clean it as
necessary. |
| – |
Install fuel delivery unit
→ Chapter. |
|
|
|
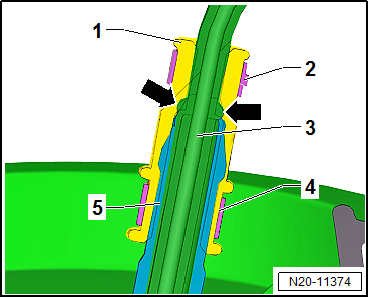
| – |
Insert fuel line -3- in
connection -5-. |
| – |
Insert fuel line to stop -arrow-. |
| – |
While doing this, fit grommet -1-
over connection. |
| – |
If the fuel line or grommet has been renewed, the upper
clamp must be renewed as well. |
| – |
Renew clamps -2- and
-4-, if they have been opened. |
| – |
Secure hose connections with the hose clips corresponding to
original equipment. |
| → Chapter „Assembly overview - fuel delivery unit and fuel gauge
sender“ |
|
|
|
Special tools and workshop equipment
required
Special wrench -T10202-
...
© 2016-2026 Copyright www.vwgolf.org

 Removing and installing fuel delivery unit/fuel gauge sender, vehicles with
four-wheel drive
Removing and installing fuel delivery unit/fuel gauge sender, vehicles with
four-wheel drive