Volkswagen Golf Service & Repair Manual: Removing and installing fuel gauge sender 2 -G169
| Special tools and workshop equipment
required |
|
|
|
| – |
Observe safety precautions
→ Chapter. |
| – |
Observe rules for cleanliness
→ Chapter. |
| – |
Move front seats to foremost position. |
| – |
Remove rear bench seat
→ General body repairs, interior; Rep. gr.72. |
| – |
Draining fuel tank
→ Chapter |
|
|
|
| – |
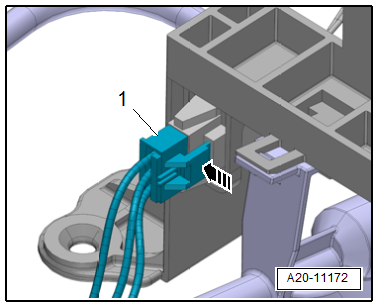
Unclip cover -1- for sealing
flange on left from retaining tabs
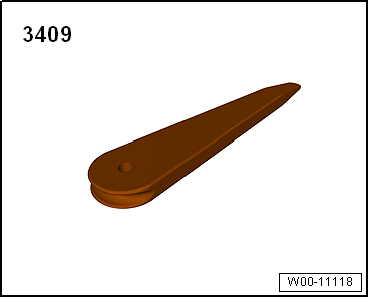
-arrows- using removal wedge -3409-. |
|
|
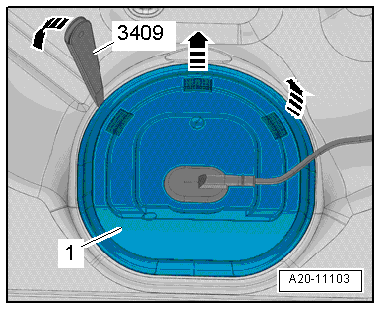
|
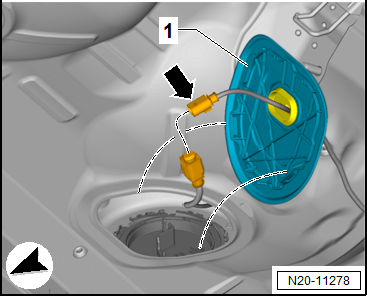
| – |
Disconnect electrical connector
-arrow-. Lay cover -1- with
wiring harness to one side. |
|
|
|
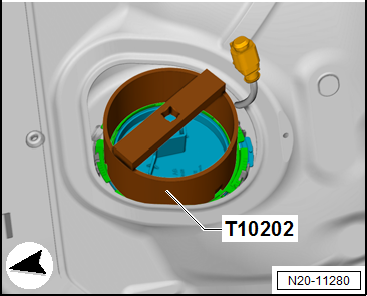
| – |
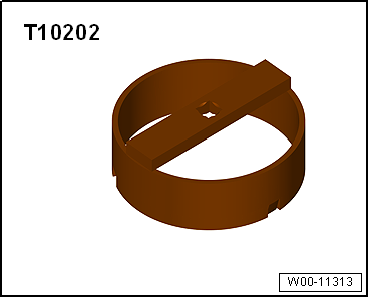
Open locking ring using wrench -T10202-. |
| – |
Remove flange and seal from opening in fuel tank. |
|
|
|
| – |
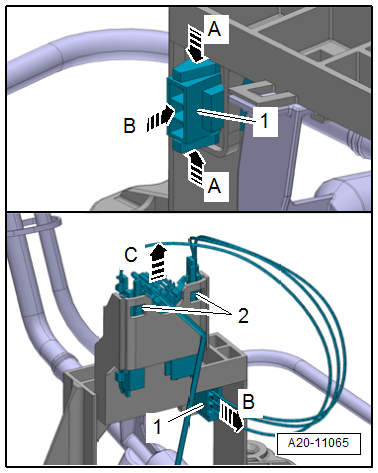
Reach through opening into fuel tank. Release connector
catches -arrow-, and disconnect
connector -1-. |
|
|
|
| – |
Grasp through opening in fuel tank., release connector
catches -arrows A-, and push
connector -1- out of retainer
-arrow B-. |
| – |
Grasp through opening in fuel tank, release retaining tab at
lug -2-, and at the same time pull
out fuel gauge sender 2 -G169- upwards
-arrow C-. |
| Installation is carried out in the reverse order; note the
following: |
| → Chapter „Assembly overview - fuel delivery unit and fuel gauge
sender“ |
 Note Note
| Note installation position of flange. |
| Ensure that the connectors are engaged correctly. |
|
|
|
Removing
–
Remove fuel delivery unit
→ Chapter.
–
Disconnect connector -4- from
r ...
Removing
Note
The tank pressure sensor -G400- is located in the pressure
regulating valve on the activated charcoal filter
→ ...
Other materials:
Rear brakes
The type of brake system installed in the vehicle is
indicated among other things by the corresponding PR number on
the vehicle data sticker.
The vehicle data sticker can be found in the spare wheel
well and in the service schedule.
...
Assembly overview - rear child seat anchors
1 -
ISOFIX child seat anchor
Qty. 4
Welded to underbody
2 -
Guide
For ISOFIX child seat anchor
Qty. 4
Removing and installing
→ Chapter
Must be seated firmly on child seat anchor
3 -
Li ...
Seam seals, front body
Note
Seam seals made during repair work must be identical in
appearance and thickness to the original seam seals.
To avoid damage or faulty operation, brush seam seals smooth
near attachments which must be attached.
...
© 2016-2024 Copyright www.vwgolf.org

 Removing and installing fuel gauge sender -G-, vehicles with four-wheel
drive
Removing and installing fuel gauge sender -G-, vehicles with four-wheel
drive Removing and installing tank pressure sensor -G400