Volkswagen Golf Service & Repair Manual: Removing and installing fog light, Golf
 Note Note
| Removal and installation are described for the left side.
Removal and installation on the right side are carried out in
the same way. |
| – |
Remove ignition key, if inserted. |
| – |
Turn light switch to “0” position. |
| – |
Remove wheel housing liner
→ General body repairs, exterior; Rep. gr.66. |
|
|
|
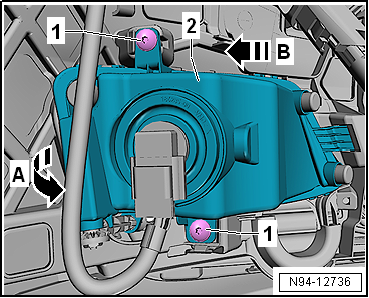
| – |
Swing fog light -2- in
direction of arrow -A-. |
| – |
Pull fog light -2- out of
bumper cover in direction of arrow -B-. |
| – |
Disconnect electrical connector. |
| Install in the reverse order of removal, observing the
following: |
| – |
Adjusting fog lights
→ Booklet36.1 |
| → Chapter „Assembly overview - fog lights, Golf“ |
|
|
|
1 -
Bolt
Specified torque: 2 Nm
2 -
Bolt
Specified torque: 2 Nm
3 -
Fog lights
...
Note
Removal and installation are described for the left side.
Removal and installation on the right side are carried out in
the same way.
...
© 2016-2024 Copyright www.vwgolf.org

 Assembly overview - fog lights, GTI and GTD
 Removing and installing fog light, GTI and GTD