Volkswagen Golf Service & Repair Manual: Removing and installing dash panel insert -KX2-
| Special tools and workshop equipment
required |
| Vehicle diagnostic tester |
 Note Note
| All indicator lamps in the dash panel insert -KX2- are
equipped with LEDs. LEDs cannot be renewed separately if
defective. The dash panel insert must be renewed. |
| The dash panel insert -KX2- must not be dismantled. |
| For greater clarity, the steering wheel is not shown.
However, it is not necessary to remove the steering wheel before
removing the dash panel insert -KX2-. |
| If the dash panel insert -KX2- with control unit in dash
panel insert -J285- is to be renewed, data must be read using
vehicle diagnostic tester. |
| Following components are integrated in the dash panel insert
-KX2-: |
| Control unit in dash panel insert -J285- |
| Coolant temperature gauge -G3- |
| – |
Move steering wheel to rearmost and lowest position. Use the
entire range of adjustment of the steering column for this
purpose. |
| – |
Remove ignition key, if inserted. |
| – |
Remove upper steering column trim
→ General body repairs, interior; Rep. gr.68. |
|
|
|
| – |
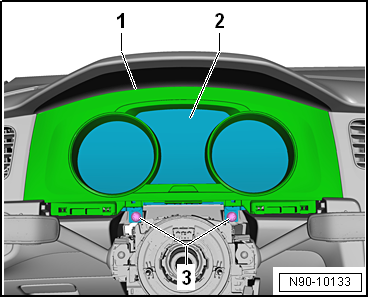
Remove dash panel insert trim -1-
→ General body repairs, interior; Rep. gr.70. |
Note
| The dash panel insert -KX2- is engaged in the dash panel.
Therefore, a greater force is necessary to remove it. |
| – |
Pull out dash panel insert -KX2--2-
until it makes contact with steering wheel. |
| – |
Disconnect electrical connector. |
|
|
|
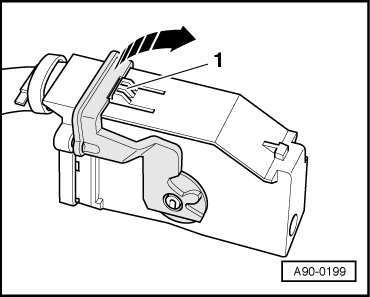
| – |
Press locking detent -1- to
disconnect connector. |
| – |
Swing retainer in -direction of arrow-
and pull off connector. |
| – |
Remove dash panel insert -KX2- towards front passenger side
between steering wheel and dash panel. |
| Install in the reverse order of removal, observing the
following: |
| → Chapter „Assembly overview - dash panel insert“ |
|
|
|
1 -
Electrical connector
For dash panel insert
2 -
Dash panel insert -KX2-
With control unit in dash panel inser ...
© 2016-2024 Copyright www.vwgolf.org

 Assembly overview - dash panel insert
 Horn
Horn