Volkswagen Golf Service & Repair Manual: Removing and installing condensation drain (RHD)
| – |
Remove right centre console trim in footwell
→ General body repairs, interior; Rep. gr.68. |
| – |
Carefully push floor covering aside and cover it in area
under condensation drain hose with impermeable sheeting and
water absorbing paper. |
| – |
Remove footrest
→ General body repairs, interior; Rep. gr.70. |
Risk of damage to airbag control unit. Connectors may corrode if
moisture enters.After disconnecting, cover or seal off connectors to
prevent the ingress of moisture.
| – |
Pull connector off airbag control unit -J234--5-. |
|
|
|
| – |
Cover airbag control unit -J234- and connector
-5- with impermeable sheeting. |
| – |
Carefully push floor covering aside and cover it in area
under condensation drain hose with impermeable sheeting and
water absorbing paper. |
| – |
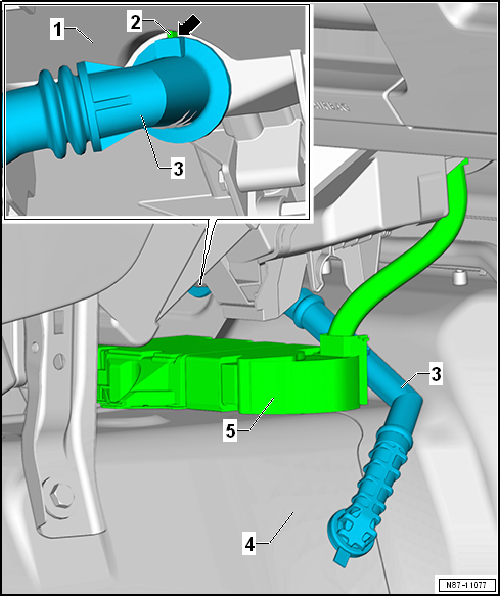
Carefully pull condensation drain hose
-3- off heater and air conditioning unit
-1- and off body
-4-. |
| Installation is carried out in the reverse order. When
installing, note the following: |
|
|
|
| The condensation drain hose -3-
can be properly pushed onto heater and air conditioning unit
-1- to stop in only one position. |
| Lug -arrow- on connecting piece
must engage in guide -2-. |
| If a commercially available cable tie was installed to
retain the condensation drain -3-,
then renew it. |
| The condensation drain hose must be routed below the wiring
harness of the airbag control unit -J234--5-
in the figure. |
|
|
|
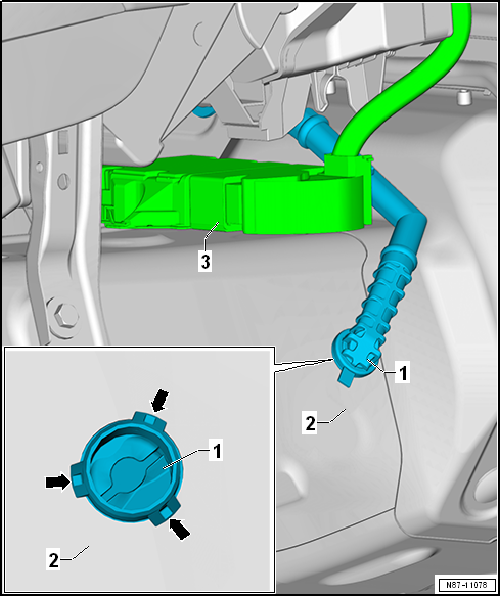
| The bracket -1- for the
condensation drain hose must be properly clipped into the
aperture in the body -1- under
tension. |
| The sealing lip must not be loosely seated on the body
aperture. |
| The retainer tabs -arrows- must
be fully engaged. |
| If the tension is insufficient, seal joint between body and
bracket using, e.g., silicon adhesive sealant
→ Electronic Parts Catalogue. |
 Note Note
| Install the condensation drain hose so that it is not
twisted or pinched. |
| When installing floor covering, ensure that the condensation
drain hose is not pinched by floor covering. |
| If the condensation drain hose is loose on the heater and
air conditioning unit connection, secure it, for example, with a
hose clip to prevent its slipping. Hose clip
→ Electronic Parts Catalogue. |
| Centre console; Assembly overview - centre console
→ General body repairs, interior; Rep. gr.68 |
|
|
|
Removing
–
Remove right centre console trim in footwell
→ General body repairs, interior; Rep. gr.68.
Risk o ...
Removing
–
Depending on version, remove plastic bolt or plug
-2- and remove baffle plate
-1 ...
Other materials:
Checking pressures
Switch off ignition.
–
Connecting air conditioner service station
→ Chapter.
–
Read pressure from pressure gauges; two results may be
displayed.
...
Service and disposal of belt tensioners
First read and observe the introductory information
and safety warnings Seat belts may become damaged during any work on the
belt tensioners or while removing or refitting any vehicle parts in conjunction
with any other repair work. This damage will not always be noticeable. The consequence ...
Introduction
This chapter contains information on the following subjects:
→ Displays
→ Description
ProActive occupant protection is an assistance system that initiates action to
protect vehicle occupants in dangerous situations. However, the system cannot prevent
a collision.
Add ...
© 2016-2026 Copyright www.vwgolf.org

 Removing and installing condensation drainage (LHD)
 Removing and installing baffle plate, LHD vehicles