Volkswagen Golf Service & Repair Manual: Removing and installing bumper cover
| Volkswagen R GmbH, optional equipment, “R Line” and “R” |
 Note
| The removal and installation procedures for the bumper cover
may vary slightly, depending on vehicle model. |
| Special tools and workshop equipment
required |
|
|
|
|
|
|
Torque wrench -V.A.G 1783- |
| – |
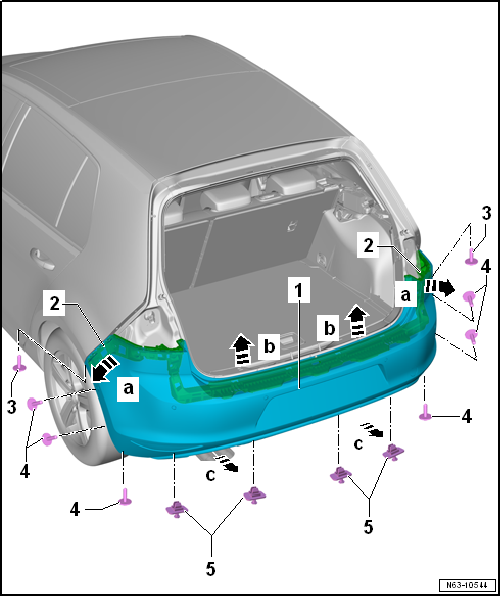
Remove tail lights in side panel
→ Electrical system; Rep. gr.94. |
| – |
Undo bolts -3- in wheel housing
(pointing upwards) on left and right. |
| – |
Remove bolts -4- on left and right
sides in area of wheel housing liner. |
| – |
Remove spreader rivets -5- from
underneath. |
| Further dismantling requires the assistance of a second mechanic. |
| – |
Pull bumper cover -1- out of guide
fasteners on left and right -2- of side
panel -arrows a-. |
| – |
Release bumper cover -1- upwards from
fasteners -arrows b-. |
| – |
Pull bumper cover -1- off vehicle in
parallel movement -arrows c-. |
| – |
Unplug connectors to electrical components (where installed). |
| General information and work instructions for the parking aid can be
found in
→ Electrical system; Rep. gr.94. |
| General information and work instructions for the Park Assist system
can be found in
→ Electrical system; Rep. gr.94. |
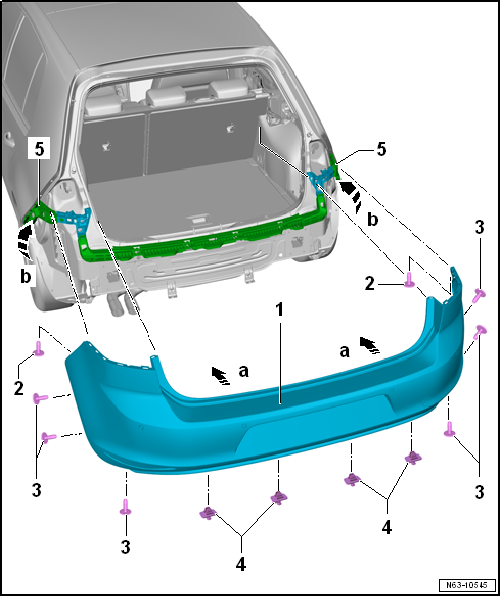
| Further installation requires the assistance of a second mechanic. |
| – |
If present, connect connectors of electrical components. |
| – |
Guide bumper cover -1- onto vehicle in
a parallel movement -arrows a-. |
| – |
Press bumper cover -1- onto guides on
left and right -5- of side panel until they
engage with each other -arrow b-. |
| – |
Observe gaps/shut lines
→ Rep. gr.00. |
| – |
Clip in spreader rivets -4- from
underneath. |
| – |
Install tail lights in side panel
→ Electrical system; Rep. gr.94. |
| – |
Additional work step for models GTI and GTD
→ Anchor. |
| – |
Additional work step for models “R Line” and “R”
→ Chapter |
| |
→ Chapter „Assembly overview - bumper cover“ |
| Removing and installing adapter |
|
|
|
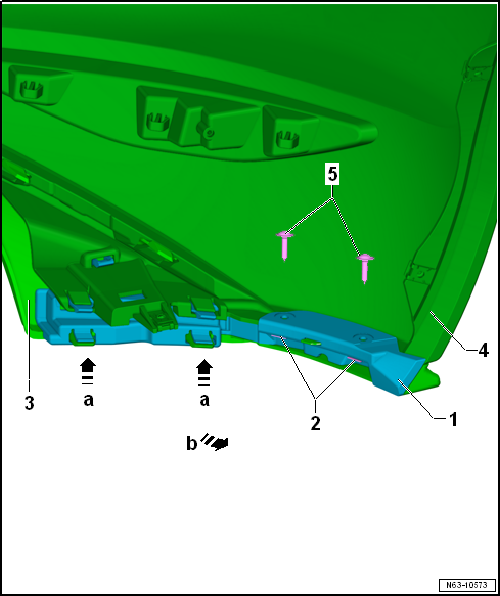
| – |
Release fasteners -arrows a-, and pull
adapter -1- off spoiler
-3- and bumper cover
-4--arrow b-. |
| – |
Push adapter -1- onto bumper cover
-4- and engage it in spoiler
-3-. |
| |
Bumper cover GTI/GTD
→ Chapter. |
Volkswagen R GmbH, optional equipment, “R Line” and “R”
1 -
Impact bar
Different versions, al ...
Volkswagen R GmbH, optional equipment, “R Line” and “R”
Removing
...
© 2016-2024 Copyright www.vwgolf.org

 Assembly overview - impact bar
 Removing and installing impact bar