Volkswagen Golf Service & Repair Manual: Removing and installing boot
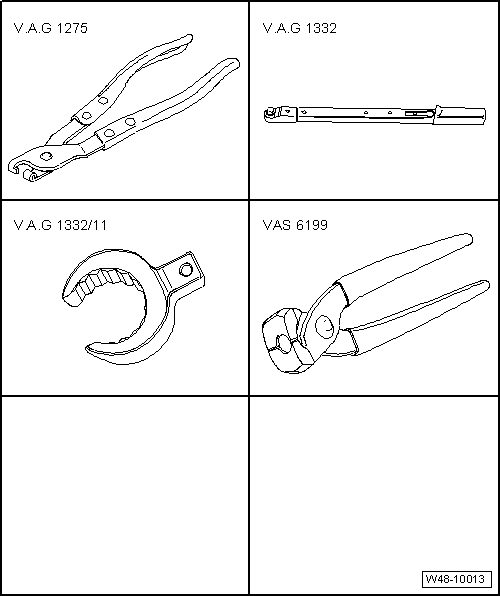
| Special tools and workshop equipment required |
| Hose clip pliers -V.A.G 1275- |
| Torque wrench -V.A.G 1332- |
| Tool insert 24 mm -V.A.G 1332/11- |
| Locking pliers for Phaeton steering rack -VAS 6199- |
 Note Note
| If boot is defective, moisture and dirt will enter steering
rack. There must be a palpable film of grease in the area of the
teeth on the steering rack. If there is no film of grease, the
steering rack must be renewed. |
| The steering rack must be renewed: |
| In the event of corrosion. |
| In the event of excessive wear |
| In the event of soiling on the steering rack. |
| – |
Turn steering wheel to straight-ahead position. |
| – |
Mark position of nut on track rod. |
| – |
Remove track rod ball joint
→ Chapter. |
| – |
Clean outside of steering rack in vicinity of boot. |
| No dirt must be allowed to enter the steering rack through a
defective rubber boot during this operation. |
| – |
Pull boot off steering rack housing and track rod. |
Note
| If the steering rack shows signs of corrosion, damage, wear
or soiling, renew the complete steering rack. |
| Likewise, if there is no film of grease on the steering
rack, the steering rack must be renewed. |
| Install in reverse order of removal, observing the
following: |
 Caution
| Do not grease steering rack. |
|
| – |
Turn steering wheel to straight-ahead position. |
| – |
Thread new clamps and rubber boot onto track rod. |
| – |
Lightly grease sealing surface between boot and track rod
with grease -G 052 168 A1- from repair kit. |
|
|
|
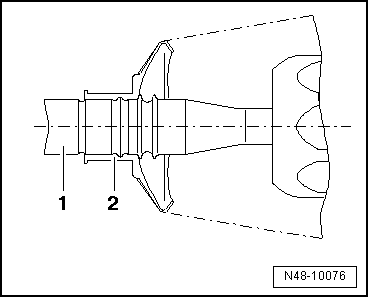
| – |
Push rubber boot -2- onto track
rod -1- as shown in figure. |
| – |
Secure spring-type clip on rubber boot using hose clip
pliers -V.A.G 1275-. |
| – |
Lightly grease sealing surface between boot and steering
rack housing with grease -G 052 168 A1- from repair kit. |
| – |
Push rubber boot onto steering rack housing to stop. |
|
|
|
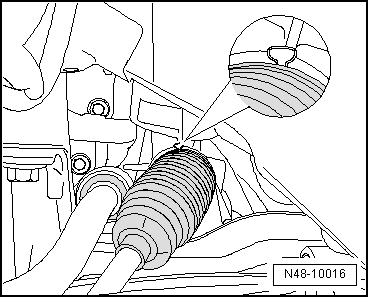
| – |
Use locking pliers for Phaeton steering rack -VAS 6199- to
install new clamp, as shown in figure. |
| – |
Screw in track rod ball joint up to mark made during removal
and install
→ Chapter. |
| – |
Install front wheel and tighten. |
| – |
Check wheel alignment
→ Chapter. |
| – |
If both track rods have been exchanged, basic setting must
be carried out for steering angle sender -G85-
→ Vehicle diagnostic tester. |
| – |
Then carry out basic setting of steering
→ Vehicle
diagnostic tester |
| → Chapter „Assembly overview - steering rack“ |
| → Chapter „Repairing steering rack“ |
| → Chapter „Torque settings for wheel bolts“ |
|
|
 |
Special tools and workshop equipment required
Ball joint puller -T10187-
Torque wrench -V.A.G 1331-
Torque wrench -V.A.G 1332-
...
Special tools and workshop equipment required
Torque wrench -V.A.G 1332-
Open-end insert, 38 mm -V.A.G 1923-
Ball joint puller -T10 ...
Other materials:
General information
The drive is provided by the test rig.
For vehicles with a manual gearbox, ensure that the gear
lever is in neutral for the test. For vehicles with an automatic
gearbox, ensure that the selector lever is in
»N«.
...
Removing and installing seat trim on sill side, standard seat
Note
Removal and installation are described for the left vehicle
side. Follow same instructions for the right side as
appropriate.
Special tools and workshop equipment
required
...
Leak detection in refrigerant circuit using compressed air or nitrogen
Note
A leak in the refrigerant circuit can be detected, for
example, by pressurising the circuit to a maximum of 15 bar
using cleaned and dried compressed air or nitrogen
→ Chapter. If the leak is large, the leakage point
...
© 2016-2024 Copyright www.vwgolf.org

 Removing and installing steering rack, RHD vehicles, except for e-Golf
 Removing and installing track rod