Volkswagen Golf Service & Repair Manual: Removing and installing battery, vehicles with high-voltage system
| Special tools and workshop equipment
required |
|
|
|
| Torque wrench -V.A.G 1331- |
|
|
|
| Torque wrench -V.A.G 1783- |
 WARNING
| Always make sure to comply with the warning notices
and safety regulations when working on the battery
→ Electrical system, General information; Rep. gr.27. |
|
| – |
Remove ignition key, if inserted. |
| – |
Remove luggage compartment floor from vehicle towards rear. |
|
|
|
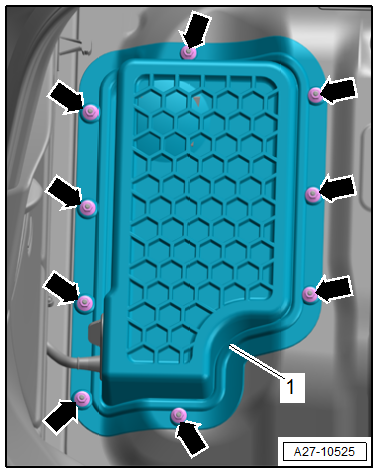
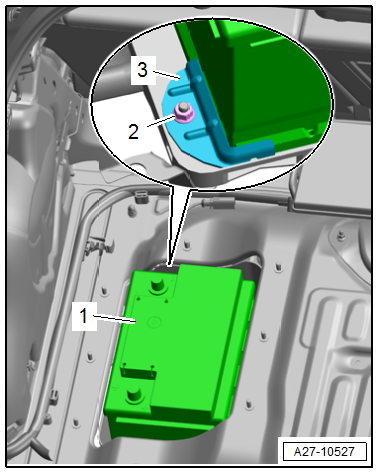
| – |
Unscrew nuts -arrows- for
battery cover -1-. |
| – |
Swing cover -1- upwards as far
as it will go. |
|
|
|
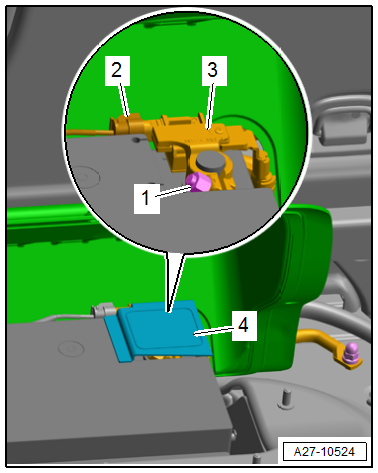
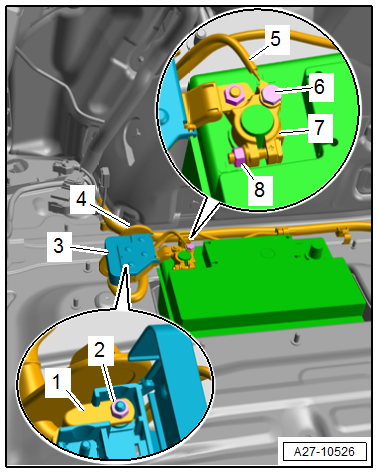
| – |
Open cover -4- for negative
battery terminal. |
| – |
Unplug electrical connector -2-
at battery monitor control unit -J367--3-. |
| – |
Loosen nut -1- several turns,
and disconnect battery terminal clamp of earth cable from
battery negative terminal. |
|
|
|
| – |
Unscrew bolt -6-, and lay
electrical wire -5- to one side. |
| – |
Open cover -3-, unscrew nut
-2-, and lay positive wire
-1- to one side. |
| – |
Press grommet -4- in cover
towards outside as far as it will go. |
| – |
Guide out positive wire -1-
with wiring harness through opening in cover. |
| – |
Loosen nut -8- several turns
and disconnect battery terminal clamp -7-
of positive cable from positive battery terminal. |
 Note Note
| Cover for battery compartment is not shown in illustration. |
|
|
|
| – |
Insert battery -A- into battery tray
-1- so that battery base strip lies against stop at back
and sides -arrows-. |
| It should no longer be possible to move battery -A- towards
rear or sides. |
|
|
|
| – |
Fit securing bracket -3- for
battery -1-. |
| – |
Tighten nut -2- for securing
bracket -3-. |
| – |
Ensure that battery -A- is seated securely. |
|
|
|
Special tools and workshop equipment
required
Torque wrench -V.A.G 1331-
...
Caution
Observe the following instructions and precautions
on safety when working on pyrotechnic components:
...
© 2016-2024 Copyright www.vwgolf.org

 Caution
 Removing and installing battery, vehicles without high-voltage system
 Disconnecting and connecting battery, vehicles without high-voltage system