Volkswagen Golf Service & Repair Manual: Removing and installing air distribution flap control motor -V428-, RHD
vehicles
| Special tools and workshop equipment
required |
| Vehicle diagnostic tester |
| First carry out the following work: |
| – |
Switch off all electrical consumers. |
| – |
Remove glove compartment
→ General body repairs, interior; Rep. gr.68. |
|
|
|
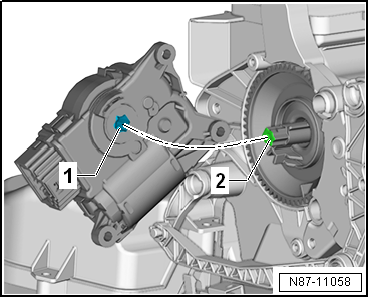
| – |
Pull off front air distribution flap control motor -V426--1-
and remove it. |
| – |
Disconnect electrical connector -3-. |
| Installation is carried out in the reverse order. When
installing, note the following: |
 Note Note
| Check operation of flaps and hinge mechanism before fitting. |
| Make sure levers and shafts are properly fitted in the
mounts. |
|
|

|
Special tools and workshop equipment
required
Vehicle diagnostic tester
Removing
–
...
Removing
–
Remove dash panel
→ General body repairs, interior; Rep. gr.70.
–
Remov ...
Other materials:
Fastening and unfastening seat belts
Fig. 64 Inserting the seat belt latch plate
into the buckle
Fig. 65 Removing the latch plate from the
buckle
First read and observe the introductory information
and safety warnings During an accident or braking manoeuvre, correctly worn
seat belts hold the vehicle occupants in position ...
Removing and installing emergency call module control unit and communication
unit -J949-, eGolf
The emergency call module control unit and communication
unit -J949--1- is fitted behind the
dash panel insert.
Set emergency call module control unit and communication
unit -J949- to workshop mode ...
Anti-corrosion wax (in aerosol can)
Designation:
Anti-corrosion wax -D 308 SP5 A1-
Issued 04.2009
Product description
Anti-corrosion wax -D 308 SP5 A1- offers ideal corrosion
protection for areas of the body th ...
© 2016-2024 Copyright www.vwgolf.org

 Removing and installing air distribution flap control motor -V428-, LHD
vehicles
Removing and installing air distribution flap control motor -V428-, LHD
vehicles Removing and installing front air distribution flap actuation unit, heater
and air conditioning system with electric/manual controls, LHD vehicles
Removing and installing front air distribution flap actuation unit, heater
and air conditioning system with electric/manual controls, LHD vehicles