Volkswagen Golf Service & Repair Manual: Removing and installing air conditioner compressor fuse -S355-
| Special tools and workshop equipment
required |
|
|
|
| |
|
Torque wrench -V.A.G 1783 |
| Torque wrench -V.A.G 1331- |
| – |
Observe safety precautions
→ Chapter „Safety precautions when handling refrigerants“. |
| – |
Comply with notes
→ Chapter „Working on refrigerant circuit“. |
| – |
Observe safety precautions when working on the high-voltage
system
→ Chapter „Safety precautions when working on high-voltage
system“. |
| – |
Observe safety precautions when working in the vicinity of
high-voltage components
→ Chapter „Safety precautions when working in the vicinity of
high-voltage components“. |
| – |
Observe the risk category of the high-voltage system
→ Rep. gr.00. |
Danger to life due to high voltage.There is a risk of severe or fatal
injury due to electric shock.The high-voltage system must be de-energised
by a suitably qualified technician.
| – |
Now de-energise the high-voltage system
→ Rep. gr.93. |
|
|
|
| – |
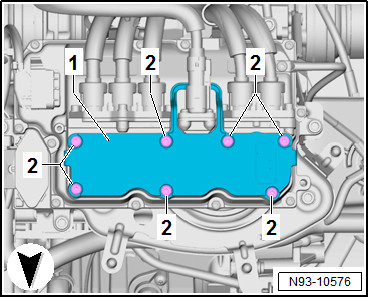
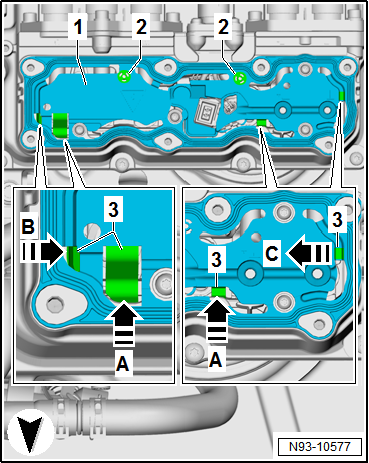
Unscrew bolts -2- from cover
-1-. |
|
|
|
| – |
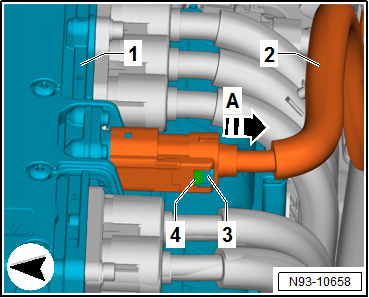
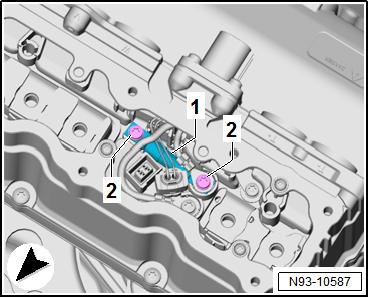
Pull out fuse -3- on
high-voltage cable connector -2-
for charging unit 1 for high-voltage battery -AX4- in
-direction of arrow A-. |
| – |
Pull high-voltage cable connector -2-
for charging unit 1 for high-voltage battery -AX4- off power and
control electronics for electric drive -JX1--1-. |
|
|
|
| – |
Release catches -3- in
direction of arrows -A-,
-B- and -C-. |
| – |
Unclip catches -2- upwards. |
| – |
Remove safety cover -1-. |
|
|
|
| – |
Remove air conditioner compressor fuse -S355--1-. |
| Installation is carried out in the reverse order. When
installing, note the following: |
On a previously installed safety cover the seal my be deformed.If the
seal is deformed, leaks may result. Leaks may cause damage in the
high-voltage system due to moisture.Renew safety cover of power and
control electronics for electric drive -JX1- after removal.
| Renew bolts for safety cover of power and control
electronics for electric drive -JX1- after removal. |
|
|
|
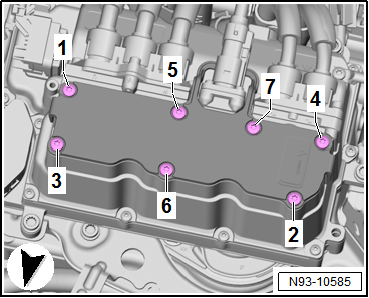
| Tightening sequence for cover |
| – |
Screw in bolts for cover. |
| – |
Tighten bolts in the sequence -5-,
-6- and -1-.
The remaining bolts can be tightened in any sequence. |
Danger to life due to high voltage.There is a risk of severe or fatal
injury due to electric shock.The high-voltage system must be brought
into operation by a suitably qualified technician.
| – |
Re-energise high-voltage system
→ Rep. gr.93. |
| Assembly overview - power and control electronics for
electric drive
→ Rep. gr.93 |
|
|
|
Special tools and workshop equipment
required
Torque wrench -V.A.G 1331- (5…50 Nm)
...
Checking
Function: protects refrigerant circuit against excessive
pressures.
–
Observe safety precautions ...
Other materials:
Moving mechatronic unit for dual clutch gearbox -J743- into removal position
by hand
Note
Only if you cannot set the mechatronic unit to removal position with
the vehicle diagnostic tester, you must set the unit by hand to removal
position.
Sometimes, the mechatronic unit cannot be removed. In this case, the
gear actuator for 6th gear ...
Blender
Designation:
Blender -LVE 013 100 A2-
Issued 10.2012
Product description
Blender was developed to guarantee easy blending-in of
2-pack clear coats and top coats.
...
Opening or closing the windows electrically
Fig. 39 In the driver door: buttons for
the front and rear electric windows
First read and observe the introductory information
and safety warnings Buttons in the driver door
Key for :
For the windows in the front doors.
For the windows in the rear doors.
Safety button.
...
© 2016-2026 Copyright www.vwgolf.org

 Removing air conditioner compressor from and installing to bracket, Golf GTE
 Checking high-pressure safety valve on air conditioner compressor