Volkswagen Golf Service & Repair Manual: Emptying fuel tank if it is less than 3/4
full
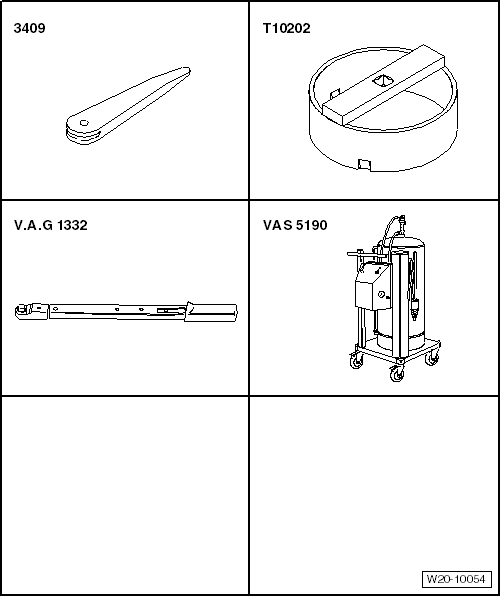
| Special tools and workshop equipment required |
| Torque wrench -V.A.G 1332- |
| Fuel extractor -VAS 5190- |
| Fuel extractor -VAS 5190 A- for E 85 fuel (not shown). |
 Note Note
| To extract E 85 fuel, use only fuel extractor -VAS 5190 A-! |
| – |
Observe safety precautions
→ Chapter. |
| – |
Observe rules for cleanliness
→ Chapter. |
| – |
Secure earth wire of fuel extractor to a bare metal part of
the body. |
| – |
Remove right rear seat
→ General body repairs, interior; Rep. gr.72. |
|
|
|
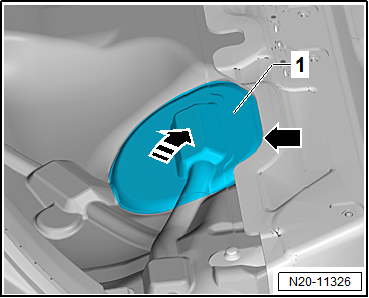
| – |
Partially detach cover -1- in
floor covering at parting line -arrow-. |
| – |
Do not detach cover completely from floor covering in order
to ensure it is reinstalled in the correct installation
position. |
| – |
Detach it just enough that the cover can be folded upwards. |
| – |
Fold up cover in -direction of arrow-. |
| – |
Remove rear bench seat
→ General body repairs, interior; Rep. gr.72. |
|
|
|
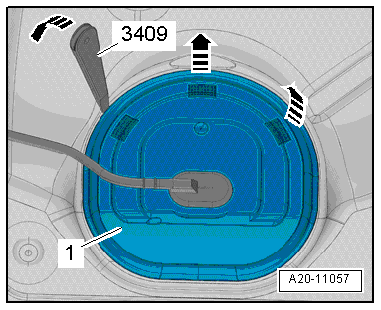
| Continuation for all vehicles: |
| – |
Unclip cover -1- for flange at
retaining tabs -arrows-, using
removal wedge -3409-. |
|
|
|
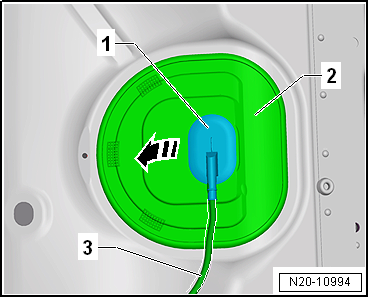
| – |
Unclip sealing grommet -1-
downwards from cover -2-. |
| – |
Push cover -2- back along
wiring harness -3-. |
|
|
|
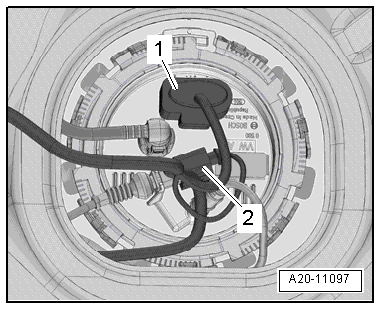
| – |
Release and pull off connector -1-
on sealing flange. |
| – |
If fitted, detach connector -2-
for metering pump -V54- of auxiliary heater on sealing flange
and lay connector aside. |
|
|
|
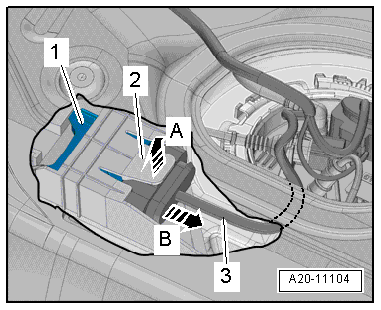
| – |
Push tab -2- upwards in
-direction of arrow A-. |
| – |
To do this, reach in with your finger between floor panel
and fuel tank. |
| – |
At the same time, carefully pull fuel pump control unit
-J538--1- out of mounting
-in direction of arrow B- by
grasping hold of wiring harness -3-. |
| – |
Guide fuel pump control unit -J538- out towards interior
between fuel tank and floor panel. |
| – |
Place fuel pump control unit -J538- together with wiring
harness to one side. |
|
|
|
| – |
Disconnect fuel line -1- on
sealing flange. Separate plug-in connectors
→ Chapter. |
The fuel system is pressurised.Risk of injury due to fuel which may
spurt out.Wear eye protection.Wear protective gloves.Release pressure:
place clean cloth around connection and carefully open connection.
| – |
If fitted, remove fuel line -2-
leading to metering pump -V54- for auxiliary heater from sealing
flange. |
| – |
To do this, loosen lower hose clip. |
|
|

|
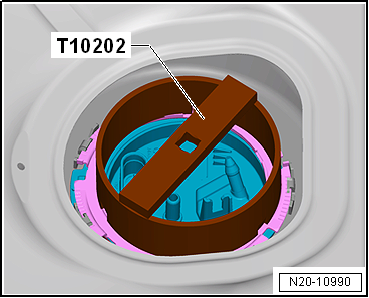
| – |
Open locking ring using wrench -T10202-. |
|
|
|
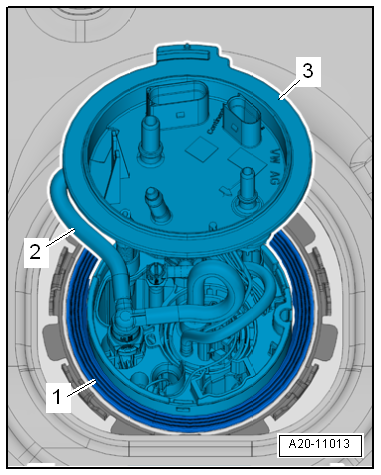
| – |
Carefully lift flange of fuel delivery unit
-3-. |
| – |
Remove gasket -1- and carefully
lift up the flange of the fuel delivery unit slightly more. |
| – |
Secure earth wire of fuel extractor to a bare metal part of
the body. |
| – |
Insert suction hose of fuel extractor -VAS 5190- as far as
possible into fuel tank. |
| – |
Extract fuel using fuel extractor -VAS 5190-. |
| If the fuel tank needs only to be emptied, reinstall fuel
delivery unit
→ Chapter. |
| → Chapter „Assembly overview - fuel delivery unit and fuel gauge
sender“ |
| → Auxiliary heater, supplementary heater; Rep. gr.82. |
|
|
 |
Special tools and workshop equipment
required
Fuel extractor -VAS 5190-
Fu ...
Special tools and workshop equipment required
Removal wedge -3409-
Wrench -T10202-
Torque wrench -V.A.G 1332-
Fuel extr ...
Other materials:
Removing and installing sun visor centre mount
Note
Removal and installation is described for the sun visor
centre mount on the driver side. Follow same instructions for
the front passenger side as appropriate.
Removing
...
O-ring
These O-rings seal the joints between the individual
components of the refrigerant circuit.
Use only seals that are resistant to refrigerant R134a and
its associated refrigerant oils. This is assured by using
genuine replacement parts.
...
Removing and installing activated charcoal filter
Removing
–
Observe safety instructions
→ Chapter.
–
Observe rules for cleanliness
→ Chapter.
–
Remove rear right wheel
→& ...
© 2016-2026 Copyright www.vwgolf.org

 Emptying fuel tank if it is more than 3/4
full
Emptying fuel tank if it is more than 3/4
full Emptying fuel tank with fuel tank more than 3/4
full, engine code CWVA
Emptying fuel tank with fuel tank more than 3/4
full, engine code CWVA