Volkswagen Golf Service & Repair Manual: Dismantling and assembling burner unit
| – |
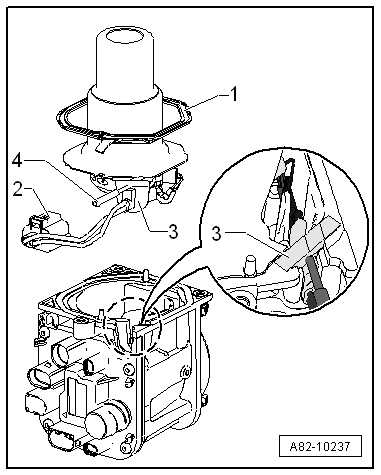
Remove auxiliary heater
→ Chapter. |
| – |
Dismantle auxiliary heater
→ Chapter. |
|
|
|
| – |
Detach gasket -1- from blower
housing. |
| – |
Release and detach connector -2-. |
| – |
Pull grommet -3- out of blower
housing onto combustion pipe -4-,
using only a little force, and at the same time lift burner unit
off vertically upwards. |
|
|
|
| Renew gasket -1- and grommet
-3-. |
| – |
Check sealing surfaces and clean if necessary. |
| Install in reverse order. |
| – |
Make sure gasket -1- is
positioned correctly and connector -2-
is engaged securely. |
 Note Note
| To prevent a short circuit at wiring/line connections to
glow plug with flame monitor -Q8- make sure that the seal/gasket
-1- is positioned correctly and
that the connector -2- is engaged
correctly. |
| → Chapter „Assembly overview - auxiliary heater attachments“ |
|
|
|
1 -
6-pin connector
Information on pin assignment can be found in the latest current
flow diagram → Current flow
diagrams, Electrical fau ...
Other materials:
Turn signal and main beam lever
Fig. 81 Turn signal and main beam lever
First read and observe the introductory information
and safety warnings Move the lever into the required position:
Right turn signal  . With ignition switched
off move from central position for right parking light   .
Left turn signal †...
Assembly overview - rear side airbag
1 -
Seat bolster
2 -
Electrical wiring
From rear side airbag igniter on driver side -N201-/rear side airbag
igniter on front passenger side -N202-
WARNING
Observe safety instructions for pyrote ...
Seam seals, front body
Note
Seam seals made during repair work must be identical in
appearance and thickness to the original seam seals.
To avoid damage or faulty operation, brush seam seals smooth
near attachments which must be attached.
...
© 2016-2024 Copyright www.vwgolf.org

 Connector pin assignment for auxiliary heater