Volkswagen Golf Service & Repair Manual: Charging battery with battery charger -VAS 5903
 WARNING
| Danger of injury! Observe warning notices and safety
regulations
→ Chapter! |
|
WARNING
| It is not permissible to test or charge batteries
whose magic eye shows light yellow. Do not slave/jump
start the vehicle! |
| Danger of explosion when checking and charging or
slave/jump starting. |
| These batteries must be renewed. |
|
| Special tools and workshop equipment
required |
|
|
|
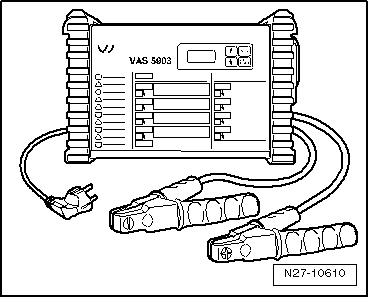
| Battery charger -VAS 5903- |
 Note Note
| The battery must have a temperature of at least 10°C. |
| – |
Switch off ignition and all electrical consumers. |
| – |
Connect charger plug to battery charger. The last selected
operating mode will appear on display
→ Chapter. |
|
|
|
| – |
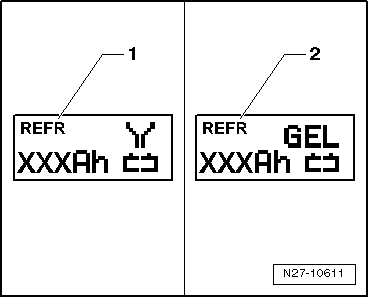
Set battery to respective operating mode with
INFO. |
| In the display the symbol -1-
for “standard charge for wet batteries” or symbol
-2- for “standard charge for
gel/absorbent glass mat batteries” will appear. |
| – |
Set battery capacity (Ah) of battery for charging using
respective button “Up”↑ or “Down”↓. |
| – |
Connect red terminal clamp “+” to positive terminal on
battery. |
Note
| In vehicles with start/stop function and battery monitor
control unit -J367- fitted, black terminal clamp must be
connected to body earth. Connecting it to battery negative
terminal will cause start/stop system to malfunction. |
| – |
Connect black terminal clamp “-” to negative terminal. |
| The charger unit recognises the voltage required for the
connected battery (6 V, 12 V or 24 V) and initiates the charging
sequence. |
|
|
|
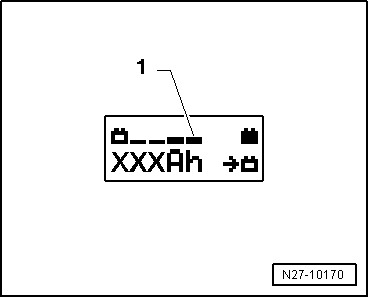
| At a charge condition of approx. 80 - 85% the battery
charger switches to the “final charge” mode. The fourth bar
appears in display -1-. The battery
is ready for use. |
|
|
|
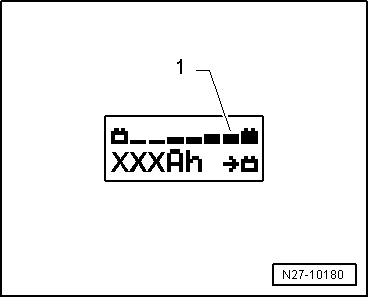
| At a charge condition of 100% all bars appear in display. |
Note
| In the battery type “standard charge” the parallel use of
consumers while charging is possible. The charging period will
be longer. |
| The battery charger will switch to maintenance mode after
about 1-7 hours, depending on type of battery. To achieve a 100%
charge the battery should remain connected for this period. |
| Possible faults and fault rectification: |
| 1 - |
Displayed battery voltage is not as per nominal voltage: |
| – |
Press respective button “Up”↑ or
“Down”↓ until charging sequence
starts. |
| 2 - |
Displayed battery voltage is not as per nominal voltage –
charging sequence already started: |
| – |
Press START / STOP twice. |
| – |
Press respective button “Up”↑ or
“Down”↓ until charging sequence
starts again. |
| 3 - |
Battery charger does not detect a battery, when battery
voltage is less than 2 V: |
| Display remains unchanged. |
| The battery type and ampere hours (Ah) as set is displayed. |
| Ending battery charging sequence: |
| – |
Disconnect black terminal clamp “-” of charger from negative
terminal. |
| – |
Disconnect red terminal clamp “+” of charger from positive
terminal on battery. |
| – |
Pull charger plug out of battery charger. |
|
|
|
The battery charger -VAS 5903- is suitable for charging all
12V batteries supplied by Volkswagen.
Battery cha ...
WARNING
Danger of injury! Observe warning notices and safety
regulations
→ Chapter!
...
© 2016-2024 Copyright www.vwgolf.org

 Description of battery charger -VAS 5903-
 Charging battery in refresh charge mode with battery charger -VAS 5903-