Volkswagen Golf Service & Repair Manual: Assembly overview - wheel housing trim, saloon
 Note
Note| The illustration shows the wheel housing trim on the left side. The right-hand side is similar (mirror image of left-hand side). |
| I: Vehicles without side padding |
| II: Vehicles with side padding |
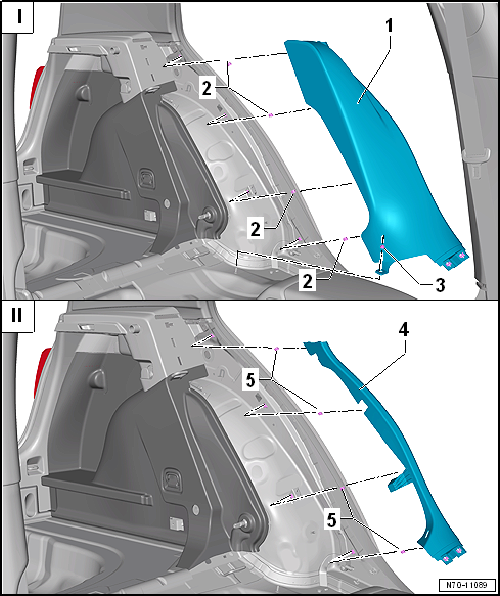
| 1 - | Wheel housing trim |
- Removing and installing → Chapter
| 2 - | Retaining clip |
- Insert into trim
- Remove any retaining clips left in body mountings using removal tool -T40280
- Renew any damaged or deformed retaining clips
| 3 - | Nut |
- 3.5 Nm
| 4 - | Wheel housing trim |
- Removing and installing → Chapter
| 5 - | Retaining clip |
- Insert into trim
- Remove any retaining clips left in body mountings using removal tool -T40280
- Renew any damaged or deformed retaining clips
 Assembly overview - side trim panel
Note
The illustration shows the side trim panel on the left side. The
right-hand side is similar (mirror image of left-hand side).
1 -
Side trim ...
 Assembly overview - wheel housing trim, estate
Note
The illustration shows the wheel housing trim on the left side.
The right-hand side is similar (mirror image of left-hand side).
I: Vehicles without side paddin ...
Other materials:
Checking child seat anchors after an accident
Points to check
Child seat anchors must be checked for damage and
deformation after an accident.
Child seat anchors welded to the body or the seats/backrests
or bolted in place may not be repaired or straightened.
...
Assembly overview - rear seat backrest
1 -
Rear seat backrest
Allocation
→ Electronic Parts Catalogue
Removing and installing
→ Chapter
2 -
Lock
For rear seat backrest
Assembly overview
→ Chapter
3 -
...
Loosening and tightening threaded connections of drive shaft
Special tools and workshop equipment
required
Socket, 24 mm -T10361A-
Angle wrench -V.A.G 1756 A-
...
