Volkswagen Golf Service & Repair Manual: Assembly overview - fuel tank, vehicles with multi-link rear suspension
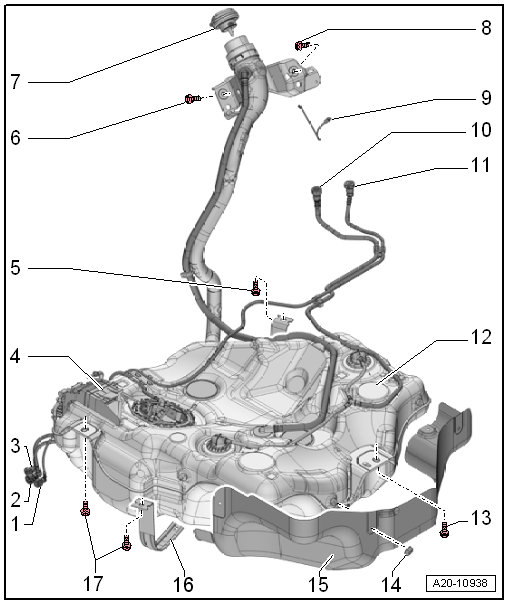
| Vehicles with auxiliary heater |
| To pull off, press release button on connection. |
| Plug-in connectors must engage »audibly«
when joined. |
| Ensure plug-in connector is secured properly by pulling it. |
| Disconnect plug-in connectors
→ Chapter |
| To pull off, press release button on connection. |
| Plug-in connectors must engage »audibly«
when joined. |
| Ensure plug-in connector is secured properly by pulling it. |
| Disconnect plug-in connectors
→ Chapter |
| To activated charcoal filter solenoid valve 1 -N80- |
| To pull off, press release button on connection. |
| Plug-in connectors must engage »audibly«
when joined. |
| Ensure plug-in connector is secured properly by pulling it. |
| Disconnect plug-in connectors
→ Chapter |
| For fuel pump control unit -J538-. |
| Removing and installing fuel pump control unit -J538-
→ Chapter. |
| Screw in until engages audibly |
| Secured to tank flap unit by means of retaining strap. |
| For securing fuel filler neck. |
| For diverting electrostatic charge |
| To activated charcoal filter |
| To pull off, press release button on connection. |
| Plug-in connectors must engage »audibly«
when joined. |
| Ensure plug-in connector is secured properly by pulling it. |
| Disconnect plug-in connectors
→ Chapter |
| To activated charcoal filter |
| To pull off, press release button on connection. |
| Plug-in connectors must engage »audibly«
when joined. |
| Ensure plug-in connector is secured properly by pulling it. |
| Disconnect plug-in connectors
→ Chapter |
| Removing and installing
→ Chapter. |
1 -
Cap
Screw in until engages audibly
Secured to tank flap unit by means of retaining strap.
2 -
Earth connecti ...
Other materials:
Removing and installing side padding
Special tools and workshop equipment
required
Torque wrench -V.A.G 1410-
Removing
Vehicles with side airbag
...
Overview of fitting locations - components inside of front passenger
compartment, RHD vehicles
1 -
Air recirculation flap control motor -V113-
Removing and installing
→ Chapter
2 -
Dust and pollen filter
Removing and installing
→ Chapter
3 -
Temperat ...
Description
First read and observe the introductory information
and safety warnings The full range of functions of the ProActive occupant
protection system will only be available if the function has been activated in the
infotainment system, the Sport driving mode is not active, and
there are no fault ...
© 2016-2024 Copyright www.vwgolf.org

 Fuel tank
 Assembly overview - fuel tank, vehicles with front-wheel drive and torsion
beam rear suspension
Assembly overview - fuel tank, vehicles with front-wheel drive and torsion
beam rear suspension