Volkswagen Golf Service & Repair Manual: Assembly overview - fuel delivery unit/fuel gauge sender, vehicles with
four-wheel drive
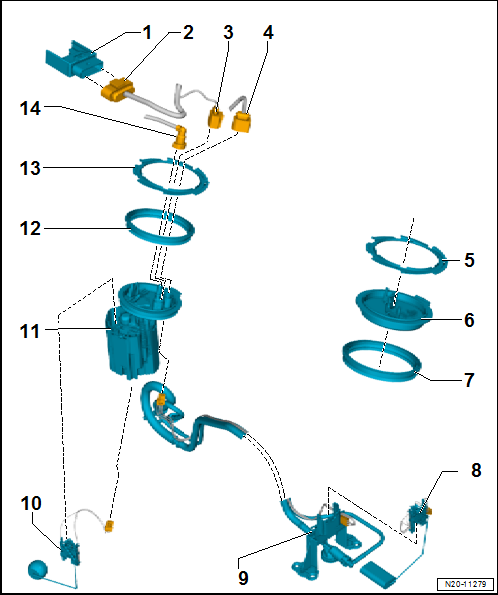
| 1 - |
Fuel pump control unit -J538- |
| Check with → Vehicle
diagnostic tester |
| Removing and installing
→ Chapter |
| For fuel pump control unit -J538-. |
| Make sure it is engaged properly; pull to check that plug-in
connector is correctly engaged |
| For fuel system pressurisation pump -G6-. |
| Make sure it is engaged properly; pull to check that plug-in
connector is correctly engaged |
| For fuel gauge sender -G- and fuel gauge sender 2 -G169- |
| Make sure it is engaged properly; pull to check that plug-in
connector is correctly engaged |
| Loosen and tighten with wrench -T10202-. |
| Removing and installing
→ Chapter |
| 8 - |
Fuel gauge sender 2 -G169- |
| Carry out electrical test → Vehicle
diagnostic tester |
| Removing and installing
→ Chapter |
| 9 - |
Mounting with suction-jet pump |
| No replacement part available |
| 10 - |
Fuel gauge sender -G- |
| Carry out electrical test → Vehicle
diagnostic tester |
| With fuel system pressurisation pump -G6-. |
| With integrated fuel filter |
| The fuel filter cannot be renewed individually |
| Carry out electrical test on fuel pump with → Vehicle
diagnostic tester |
| After installing, fill vehicle with at least 5 litres of fuel. |
| Removing and installing
→ Chapter |
| Remove and tighten with wrench -T10202-. |
| To disconnect from flange, press release tab on connection piece |
| Connect so it engages audibly |
| Press in again and then pull to check that plug-in connector is
correctly engaged |
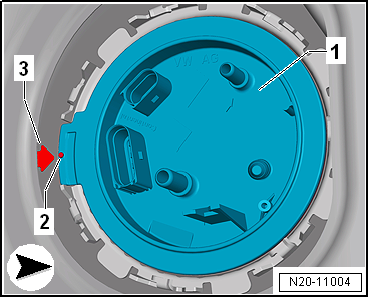
| Installation position of fuel delivery unit |
| The arrow -3- on the fuel tank
must line up with the mark -2- on
the sealing flange -1-. |
|
|
|
1 -
Fuel delivery unit
With fuel system pressurisation pump -G6-.
With integrated fuel filter; cannot be renewed individually.
...
1 -
Fuel delivery unit
With fuel system pressurisation pump -G6-.
With integrated fuel filter; fuel filter cannot be renewed
separately ...
Other materials:
Removing and installing window channel
Note
The removal and installation sequence is only for the
left window channel. Removal and installation of the right
window channel are similar.
Do not bend window channe ...
Vehicle identification data
Fig. 19 A: Vehicle data sticker: example
shows a vehicle with engine code CPTA ③ B: Type plate
Fig. 20 Vehicle identification number
First read and observe the introductory information
and safety warnings Vehicle identification number.
The vehicle identification number can be read from ...
Fitting single wire seals
Note
Single wire seals prevent the ingress of moisture and dirt
in the contact housing. They are installed, for example, in the
engine compartment and must always be reinstalled following
repairs.
As standard, ...
© 2016-2024 Copyright www.vwgolf.org

 Assembly overview - fuel delivery unit/fuel gauge sender, vehicles with
front-wheel drive
Assembly overview - fuel delivery unit/fuel gauge sender, vehicles with
front-wheel drive Assembly overview - fuel delivery unit/fuel gauge sender, vehicles with
auxiliary heater
Assembly overview - fuel delivery unit/fuel gauge sender, vehicles with
auxiliary heater