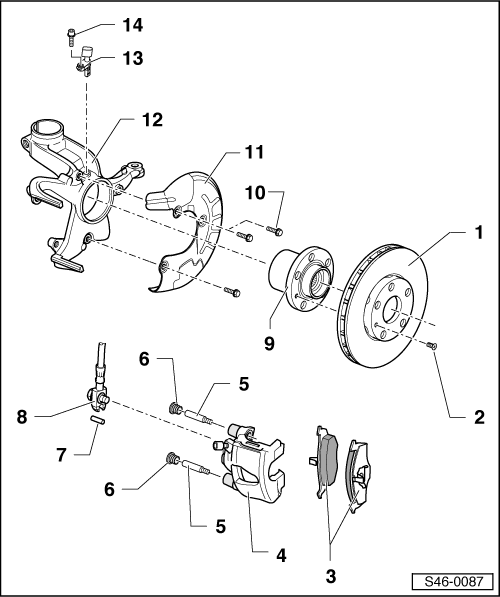
Volkswagen Golf Service & Repair Manual: Assembly overview - FS III front brake
 Note
Note
| After every brake pad change, depress brake pedal firmly several
times with vehicle stationary, so that brake pads are properly seated in
their normal operating position. |
| Use the brake filling and bleeding equipment -VAS 5234- to draw off
brake fluid from the brake fluid reservoir. |
| Before removing a brake caliper or disconnecting a brake hose, fit
brake pedal depressor -V.A.G 1869/2- (when doing this, release pressure
in system). |

| Always renew on both sides of an axle. |
| Unscrew brake caliper prior to removing. |
| Never remove brake discs from wheel hub by force. If necessary use
penetrating fluid, because otherwise brake discs can be damaged. |
| Thickness: 12 mm not including backplate. |
| Wear limit: 2 mm not including backplate. |
| Checking thickness
→ Booklet. |
| Always renew on both sides of an axle. |
| Removing and installing
→ Chapter |
| Do not disconnect brake hose when changing pads. |
| Removing and installing
→ Chapter |
| 8 - |
Brake hose with banjo union and banjo bolt |
| 9 - |
Wheel hub with wheel bearing |
| Removing and installing
→ Running gear, axles, steering; Rep. gr.40 |
| 12 - |
Wheel bearing housing |
| With integrated brake carrier. |
| Lightly grease guide surfaces with lithium grease -G 052 150 A2-. |
| Before inserting sensor, clean inner surface of hole and coat with
high-temperature paste -G 052 112 A3-. |
| 14 - |
Hexagon socket head bolt |
Note
After every brake pad change, depress brake pedal firmly
several times with vehicle stationary, so that brake pads are
properly seated in th ...
Other materials:
Other stowage compartments
Fig. 117 In the luggage compartment: side
compartment
First read and observe the introductory information
and safety warnings Stowage areas in the luggage compartment
Additional stowage compartments are located in the sides of the luggage compartment.
The side walls can be removed by pull ...
Assembly overview - park assist steering, RHD vehicles
1 -
Rear park assist steering senders
Rear left park assist steering sender -G716-
Rear right park assist steering sender -G717-
Removing and installing
→ Chapter
2 -
Park assist s ...
Removing and installing output module 2 for headlights,
»R«
WARNING
Risk of death due to high voltage! Risk of injury
and environmental pollution!
Observe operation and safety notes for gas discharge
bulbs
→ Chapte ...
© 2016-2024 Copyright www.vwgolf.org

 Note
Note
 Front brakes
 Assembly overview - front brakes PC57 and C60