Volkswagen Golf Service & Repair Manual: Assembly overview - centre armrest
- Allocation
→ Electronic Parts Catalogue
- Removing and installing
→ Chapter
- Removing and installing
→ Chapter
- For through-loading aperture
- Removing and installing
→ Chapter
- For lid catch
- Removing and installing
→ Chapter
- Clipped into rear seat backrest
- Removing and installing
→ Chapter
- For through-loading aperture
- Clipped into rear seat backrest.
- Removing and installing
→ Chapter
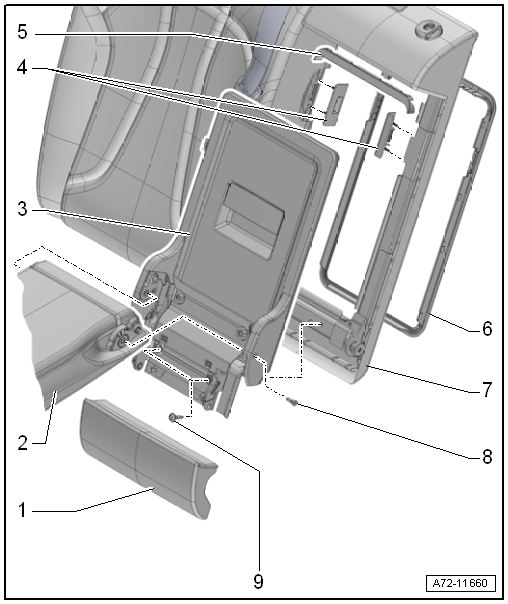
| 7 - |
Right rear seat backrest (2/3) |
- With through-loading aperture
- Allocation
→ Electronic Parts Catalogue
- Qty. 2
- Self-tapping
- Renew after removal
- 12 Nm
Note
The assembly overview shows the locking mechanism for left rear seat
back rest (1/3). The locking mechanism for the right rear seat backrest
(2/3) is similar.
...
1 -
Side padding
Allocation
→ Electronic Parts Catalogue
Removing and installing
→ Chapter
2 -
Mounting gromme ...
Other materials:
Flat connector systems
Note
If necessary, any housing catches in place (secondary
locking mechanisms) must be released or removed prior to
disengaging the contacts using the prescribed tool
→ Chapter.
...
Removing and fitting head restraints
Fig. 48 Removing the front head restraint
Fig. 49 Removing the rear head restraint
First read and observe the introductory information
and safety warnings Every seat is fitted with a head restraint. The front
head restraints are intended solely for use with the front seats, and the centr ...
General notes
Mobile online services are available only in conjunction
with a radio/RNS -RX1-.
For vehicles equipped with a telephone, the telephone
functions are integrated into the emergency call module control
unit and communication unit -J949-.
...
© 2016-2026 Copyright www.vwgolf.org

 Assembly overview - locking mechanism
 Assembly overview - side padding