Volkswagen Golf Service & Repair Manual: Assembly overview - A-pillar trim
 Note Note
|
| Upper A-pillar trim and trim for triangular window |
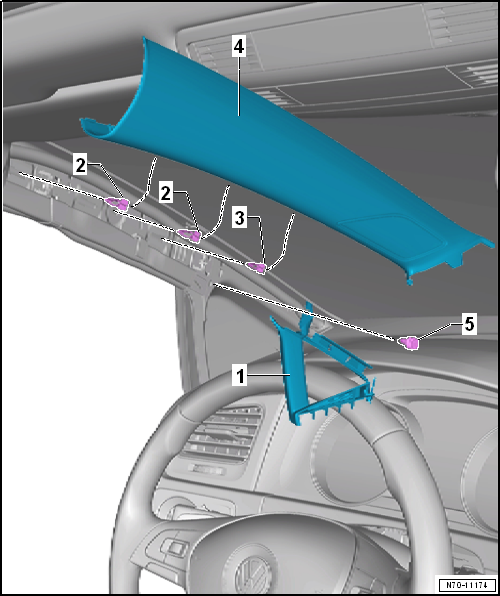
| 1 - | Trim for triangular window |
- Removing and installing → Chapter
| 2 - | Retaining clips |
- With barbs
- Insert into trim
- Remove any retaining clips left in body mountings using removal tool -T40280
- Always renew retaining clips
| 3 - | Retaining clip |
- Insert into trim
- Remove any retaining clips left in body mountings using removal tool -T40280-
- Renew any damaged or deformed retaining clips
| 4 - | Upper A-pillar trim |
- Removing and installing → Chapter
| 5 - | Clip |
- Remove and install together with trim for triangular window
- Insert into trim
- Renew clip if damaged or deformed
| Lower A-pillar trim, LHD vehicles |
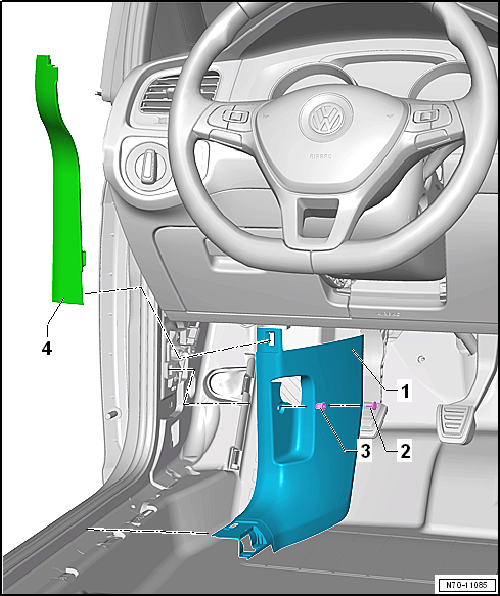
| 1 - | Lower A-pillar trim |
- Removing and installing → Chapter
| 2 - | Spreader clip |
| 3 - | Spreader plug |
| 4 - | A-pillar gap cover |
- Removing and installing → Chapter
| Lower A-pillar trim, RHD vehicles |
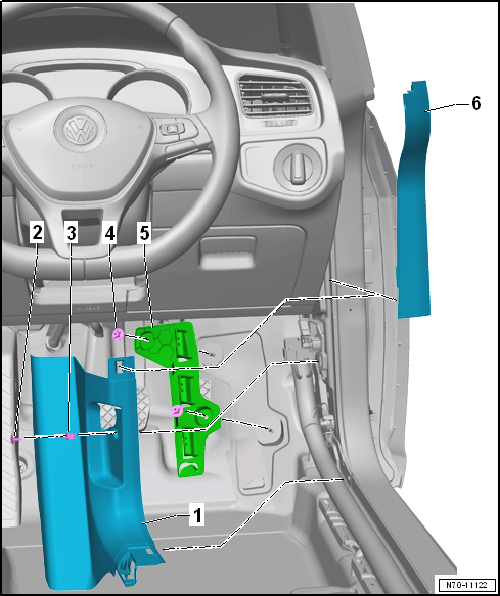
| 1 - | Lower A-pillar trim |
- Removing and installing → Chapter
| 2 - | Spreader clip |
| 3 - | Spreader plug |
| 4 - | Nut |
- Qty. 2
- 2 Nm
| 5 - | Bracket |
- Removing and installing → Chapter
| 6 - | A-pillar gap cover |
- Removing and installing → Chapter
 Assembly overview - sill panel moulding
Note
The illustration shows the sill panel moulding on the left side. The
right-hand side is similar (mirror image of left-hand side).
I: sill panel moulding, 4-door ...
 Assembly overview - B-pillar trim
Note
The illustration shows the B-pillar trims on the left side.
The right-hand side is similar (mirror image of left-hand side).
...
Other materials:
Checking holding pressure, engine code CWVA
Special tools and workshop equipment required
Pressure tester -VAS 6550-
Removal wedge -3409-
Connector cable -VAS 6550/3-3-
Connector cable -VAS 6550/3-4-
Vehicle diagnostic tester
...
Removing and installing rear centre console trim
Special tools and workshop equipment
required
Removing
–
Move front seats as far forwards as possible.
Front-end hook -3370-
...
Removing and installing turn signal switch -E2-, Valeo
Note
The turn signal switch -E2-, cruise control system switch
-E45- and intermittent wiper switch -E22- are combined to form
the steering column combination switch -E595-.
These switches cannot be separated.
...
