Volkswagen Golf Service & Repair Manual: Repairing trailing arm
| Special tools and workshop equipment required |
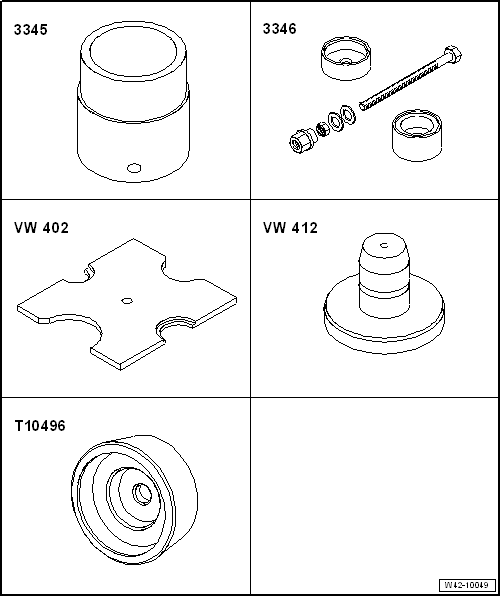
| Tube for wheel bearing -3345- |
| – |
Remove trailing arm with mounting bracket
→ Chapter. |
|
|
|
| – |
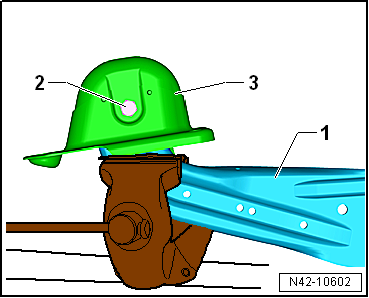
Clamp trailing arm -1- in vice
using protective jaw covers. |
| – |
Undo bolt -2- and remove
mounting bracket -3- from trailing
arm. |
|
|
|
| Pressing out bonded rubber bush |
| – |
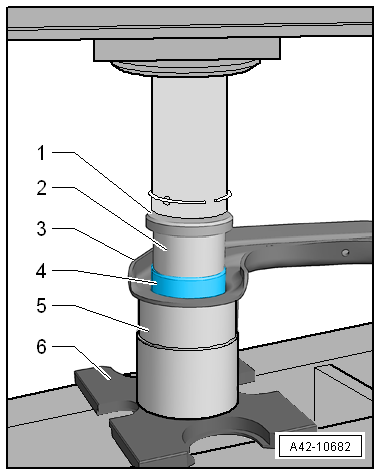
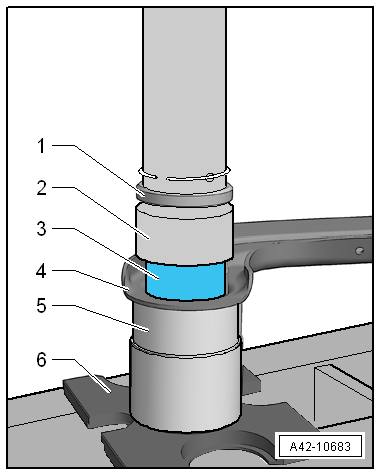
Fit tools as shown in illustration. |
| 2 - |
Tube -3346/1- from assembly tool -3346- (the deep recess
must face the bonded rubber bush) |
| 5 - |
Tube for wheel bearing -3345- |
| 6 - |
Thrust plate -VW 402- |
| – |
Press out bonded rubber bush. |
|
|
|
| Pressing in bonded rubber bush |
| – |
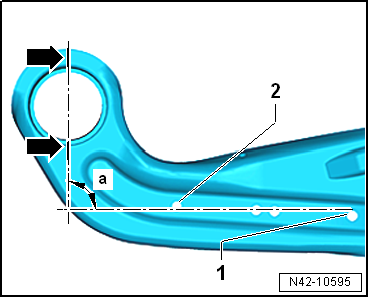
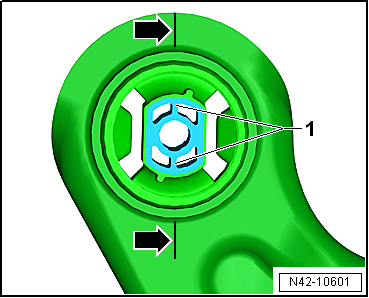
Mark position of bonded rubber bush on trailing arm using a
set square. |
| – |
Position outer edge of set square on upper radius of hole
-1- and on lower radius of hole
-2-. |
| – |
Make a mark above and below the trailing arm bush
respectively -arrows-. |
|
|
|
| Position bonded rubber bush on trailing arm so that marked
line -arrows- lies between the ribs
-1-. |
 Note
| Take great care to ensure that the installation position of
the bonded rubber bush is correct relative to the bush in the
trailing arm. |
|
|
|
| – |
Fit tools as shown in illustration. |
| 2 - |
Thrust piece -T10496- |
| 5 - |
Tube for wheel bearing -3345- |
| 6 - |
Thrust plate -VW 402- |
| – |
Pressing in bonded rubber bush. |
| Determining position of mounting bracket in relation to
trailing arm |
|
|
|
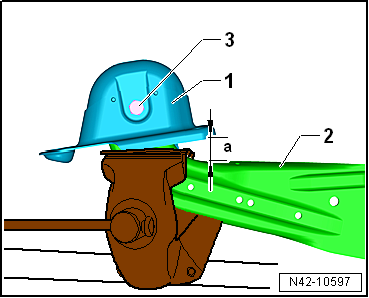
| – |
Clamp trailing arm -2- in vice
using protective jaw covers. |
| – |
Position mounting bracket -1-
on trailing arm -2-. |
| – |
Set dimension -a- to 37 mm and
tighten bolt -3-. |
| – |
Install trailing arm with mounting bracket
→ Chapter. |
|
|
|
Special tools and workshop equipment
required
Torque wrench -V.A.G 1332-
...
Other materials:
Overview of the driver door
Fig. 4 Overview of the controls in the
driver door (left-hand drive vehicles) The controls are mirrored for right-hand
drive vehicles
Key for :
Door release lever
Central locking buttons for locking
and unlocking the vehicle –
Switch for adjusting the exterior ...
Removing and installing fuel rail
Removing
The fuel system is under high pressure.Risk of injury due to fuel which
may spurt out.Release high pressure.
→ Chapter
Risk of functional impairment due to soiling
→ Chapter.
...
Layout - infotainment system, standard display version
Display unit for control device of front display and
information control panel -J685-
Features of infotainment system standard display
5-inch monochrome touch screen
Support for ...
© 2016-2024 Copyright www.vwgolf.org

 Removing and installing trailing arm with mounting bracket, except for
e-Golf
Removing and installing trailing arm with mounting bracket, except for
e-Golf Drive shaft