Volkswagen Golf Service & Repair Manual: Removing dual clutch

| Special tools and workshop equipment required |
| Engine bung set -VAS 6122- |
| -T10356/5- from assembly tool -T10356- |
| 1 x sealing cap -0AM 325 120 A- and 1 x sealing cap -02M 409 120-,
as an alternative to engine bung set -VAS 6122- |
| Gearbox removed and secured to engine and gearbox jack
→ Chapter. |
| Mechatronic unit for dual clutch gearbox -J743- is built
into gearbox. |
 Caution
| Risk of damage to gearbox. |
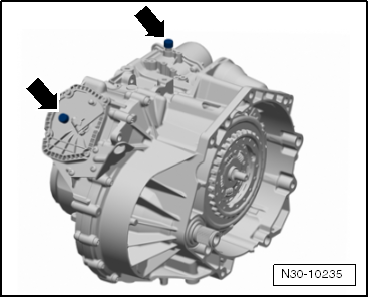
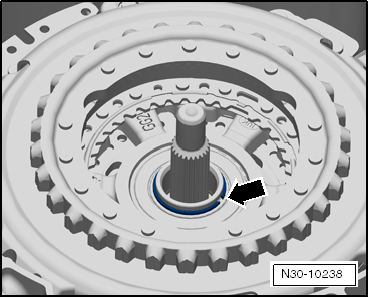
| When performing repairs, the breather opening on the
mechatronic unit for dual clutch gearbox -J743- (-rear
arrow-) and the gearbox breather (-front
left arrow-) must be sealed off to avoid loss of
fluid. |
| If any oil escapes from the hydraulic fluid section
of the mechatronic unit for dual clutch gearbox -J743-,
it is not possible to replenish it or check the level!
It is not possible to check the fill level of the
hydraulic fluid section of the mechatronic unit for dual
clutch gearbox -J743-. |
| If oil escapes from the gear oil section, it can
only be rectified by changing the gear oil. It is not
possible to check the fill level. |
| If the level of oil/fluid is too high or too low in
either of the parts, the function of the gearbox will be
impaired. |
| The breather cap on the mechatronic unit is
destroyed during removal and must be renewed. |
|
|
|
|
| – |
Pull off both breather caps -arrows-. |
| – |
Seal gearbox breather and breather of mechatronic unit for
dual clutch gearbox -J743- with clean sealing plugs from engine
bung set -VAS 6122- so that no oil can escape. |
 Note Note
| As an alternative to the engine bung set -VAS 6122- the
sealing cap -02M 409 120- can be used to seal the gearbox. The
mechatronic unit can be sealed using sealing cap -0AM 325 120 A-
as an alternative
→ Electronic Parts Catalogue (ETKA). |
| Once the gearbox has been installed in the vehicle, the
sealing plugs must be removed and the breather caps reinstalled,
or new ones must be fitted if necessary. |
|
|
|
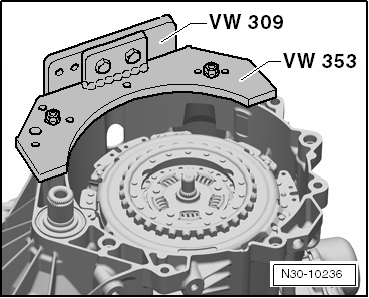
| – |
Turn gearbox on engine and gearbox jack upwards together
with clutch. |
Note
| The clutch is pulled off upwards. Mechatronic unit remains
fitted to the gearbox. |
|
|
|
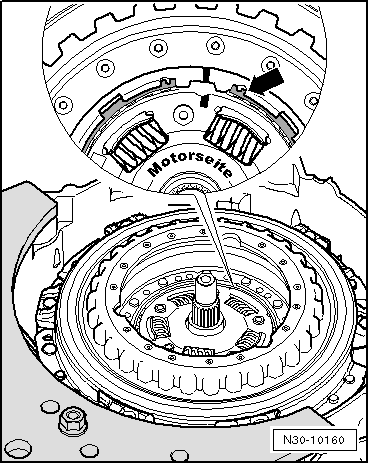
| – |
Remove retaining ring -arrow-
for hub. |
|
|
|
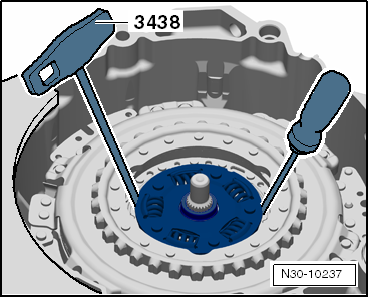
| – |
Remove hub with hook -3438- and a screwdriver. |
Note
| If parts of clutch are renewed, the position of engagement
bearings “K 1” and “K 2” must be set later. It is therefore
advisable to determine dimension “B” for the measurements now
→ Chapter. |
|
|
|
| – |
Remove circlip -arrow- for
clutch. |
| If retaining ring cannot be removed: |
Note
| If the retaining ring cannot be removed it is because the
clutch has »clamped« the retaining
ring at the bottom. |
| In this case, push the clutch down slightly (see following
description) and release the load on the retaining ring. Never
strike the clutch or shaft with a hammer! |
|
|
|
| – |
Remove retaining ring -arrow-
for clutch. |
Note
| It is not permissible to reuse the retaining ring. |
|
|
|
| Continuation once retaining ring has been removed: |
| – |
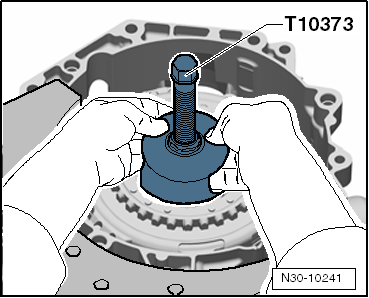
Insert puller -T10373- into clutch and bore out clutch. |
|
|

|
| – |
Remove clutch together with puller -T10373-. |
|
|
|
1 -
Hinge mounting
For large engaging lever “K 1”
Cannot be renewed.
2 -
Ball pin
For small ...
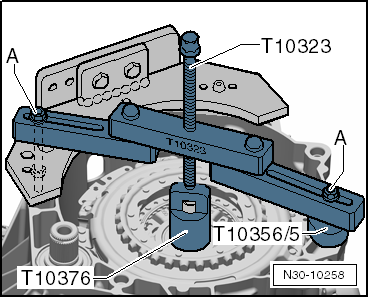
Special tools and workshop equipment
required
Support device -T10323-
...
Other materials:
Connections to valves for switches in the refrigerant circuit
WARNING
Danger of freezing injuries.
If refrigerant circuit has not been evacuated,
refrigerant will escape.
The refrigerant must be extracted before the va ...
Assembly overview - front brakes
Note
After every brake pad change, depress brake pedal firmly
several times with vehicle stationary, so that brake pads are
properly seated in their normal operating position.
Use the brake filling and bleeding equip ...
Rules for cleanliness
When working on the fuel supply and injection system,
observe the following “5 rules” for cleanliness:
Thoroughly clean all unions and surrounding areas before
disconnecting.
Place removed parts on a clea ...
© 2016-2024 Copyright www.vwgolf.org

 Assembly overview - dual clutch
 Installing dual clutch