Volkswagen Golf Service & Repair Manual: Removing and installing temperature flap control motor - V68-, RHD vehicles
| Heater and air conditioning system with electric/manual
controls |
| Special tools and workshop equipment
required |
| Vehicle diagnostic tester |
| – |
Remove baffle plate
→ Chapter. |
| – |
Remove centre console trim in footwell
→ General body repairs, interior; Rep. gr.68. |
|
|
|
| – |
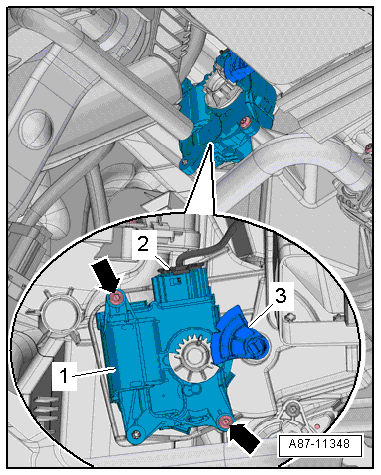
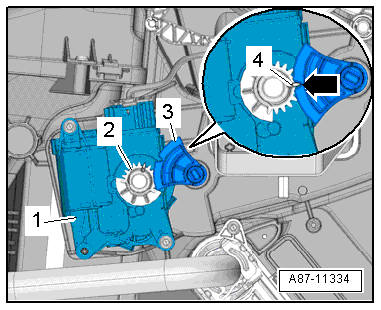
Pull actuating lever -3- off
heater unit. |
 Note Note
| The upper bolt can be accessed with a commercially available
bit ratchet. |
| – |
Unscrew bolts -arrows-. |
| – |
Disconnect electrical connector -2-. |
| – |
Remove temperature flap control motor -V68--1-. |
|
|
|
Heater and air conditioning system with electric/manual
controls
Special tools and workshop equipment
required
Veh ...
Special tools and workshop equipment
required
Vehicle diagnostic tester
First carry out the following work:
...
Other materials:
Removing and installing charge air cooling pump -V188-
Special tools and workshop equipment
required
Hose clamps up to 25 mm -3094-
Drip tray for workshop hoist -VAS 6208-
...
General
Perform a road test to determine whether a vehicle is
pulling to one side and if so, which side. If the vehicle pulls
to one side
→ Chapter.
When wheel alignment is checked, include the wheel alignment
test results in ty ...
Performance figures
First read and observe the introductory information
and safety warnings For reasons of vehicle registration and vehicle taxation,
the power output and performance of some engines may vary in some countries from
the information given in this booklet.
Petrol engines
...
© 2016-2024 Copyright www.vwgolf.org

 Removing and installing temperature flap control motor -V68-, LHD vehicles
 Removing and installing defroster flap control motor -V107- with
potentiometer -G135-, LHD vehicles
Removing and installing defroster flap control motor -V107- with
potentiometer -G135-, LHD vehicles