Volkswagen Golf Service & Repair Manual: Removing and installing selector mechanism with selector lever cable
| Special tools and workshop equipment
required |
|
|
|
| In the interior, the centre console must be removed. |
| The heat shield beneath the vehicle must be removed. |
| – |
Remove selector lever handle
→ Chapter. |
| – |
Remove centre console
→ General body repairs, interior; Rep. gr.68. |
| Golf, Golf Estate, Golf SV: |
| – |
Remove centre console vent
→ Heating, air conditioning; Rep. gr.87. |
| Continued for all vehicles: |
|
|
|
| – |
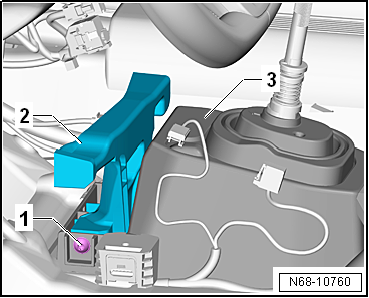
If fitted, remove mounting bracket -2-.
To do this, unscrew bolts -1- on
right and left. |
| – |
Separate electrical connector from selector mechanism to
vehicle wiring harness. |
| Golf, Golf Estate, Golf SV, Passat, Passat Estate only
diesel engine: |
| – |
Remove air filter housing
→ Rep. gr.23. |
| Continued for all vehicles: |
|
|
|
| – |
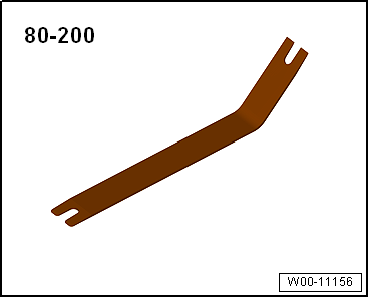
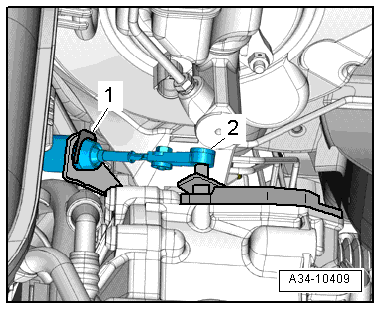
Using removal lever -80 - 200-, lever selector lever cable
-2- off gearbox selector lever. |
| – |
Remove securing clip -1-. |
| Use pliers to remove the securing clip on the cable support
bracket. Do not use a sharp-edged lever. The selector lever
cable could otherwise be damaged. |
| Securing clips for selector lever cable must always be
renewed. |
 Caution
| Risk of damage to selector lever cable. |
| Do not push selector lever cable backwards out of
cable support bracket. The selector lever cable is not
detached from the cable support bracket until the
selector mechanism is removed. |
|
| Securing clips for selector lever cable must always be
renewed. |
| – |
Remove heat shield for centre tunnel below selector
mechanism
→ General body repairs, exterior; Rep. gr.66. |
|
|
|
| – |
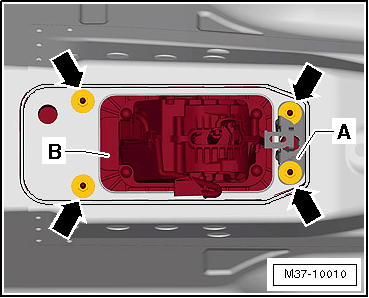
If fitted, remove bracket -A-. |
| – |
Remove nuts -arrows- inside
vehicle. |
| – |
Remove selector mechanism -B-
together with selector lever cable and selector housing
downwards. |
| Install in reverse order of removal. During this step,
observe the following: |
 Note Note
| Do not bend or kink selector lever cable. |
| Do not grease selector lever cable. |
| Following installation of selector mechanism, selector lever
cable must be checked for ease of movement and be adjusted. |
|
|
|
| – |
Secure selector lever cable with new securing clip
-1- to cable support bracket. |
| – |
Install heat shield below selector mechanism
→ General body repairs, exterior; Rep. gr.66. |
|
|
|
| – |
If present, install mounting bracket
-2-
→ General body repairs, interior; Rep. gr.68. |
| Golf, Golf Estate, Golf SV: |
| – |
Install centre console vent
→ Heating, air conditioning; Rep. gr.87. |
| Continued for all vehicles: |
| – |
Install centre console
→ General body repairs, interior; Rep. gr.68. |
| – |
Install selector lever handle
→ Chapter. |
| – |
Adjust selector lever cable
→ Chapter. |
| – |
Check selector mechanism
→ Chapter. |
| Golf, Golf Estate, Golf SV, Passat, Passat Estate only
diesel engine: |
| – |
Install air filter housing
→ Rep. gr.23. |
| Selector housing to body
→ Chapter |
|
|
|
Special tools and workshop equipment
required
Release tool -T10534-
If the push- ...
Brief description
In the interior, the centre console must be removed.
The heat shield beneath the vehicle must be removed.
...
Other materials:
Overview of fitting locations - seat variants
1 -
Driver seat
Configuration depends on vehicle equipment
Assembly overview - front seat
→ Chapter
Assembly overview - front backrest
→ Chapter
Assembly overview - seat pan
→ Chapter.
2 -
Fro ...
Removing and installing Bowden cable
Removing
WARNING
It is not permissible to loosen bolts other than
those specified.
Also, it is not permissible to perform any repair
work other than described ...
Introduction
This chapter contains information on the following subjects:
→ Petrol
→ Diesel
→ Bioethanol (Ethylalcohol)
Different engines require different fuels. The factory-fitted sticker on the
inside of the tank flap indicates the fuel type that is required for your ...
© 2016-2024 Copyright www.vwgolf.org

 Moving push button to installation position in the handle
 Removing and installing selector mechanism without selector lever cable,
manufacturer ZF
Removing and installing selector mechanism without selector lever cable,
manufacturer ZF