Volkswagen Golf Service & Repair Manual: Removing and installing reversing camera -R189-
| Reversing camera and swivel motor are each installed in
individual housings together in swivel badge of rear lid. To
remove camera housing, remove first both components together
with swivel badge from rear lid. Afterwards, camera housing
together with swivel motor can be removed from swivel badge and
then camera housing separated from swivel motor. Removal of
camera from camera housing is not provided for. |
| Removing and installing swivel badge with reversing camera
housing and swivel motor from rear lid
→ Anchor |
| Removing and installing reversing camera housing with swivel
motor out of swivel badge
→ Anchor |
| Separate reversing camera housing from swivel motor
→ Anchor |
| Removing and installing swivel badge
with reversing camera housing and swivel motor from rear lid |
| Special tools and workshop equipment
required |
|
|
|
| Torque wrench -V.A.G 1783- |
| – |
Switch off ignition and all electrical loads, and pull out
ignition key. |
| – |
Remove rear lid trim
→ General body repairs, interior; Rep. gr.70. |
|
|
|
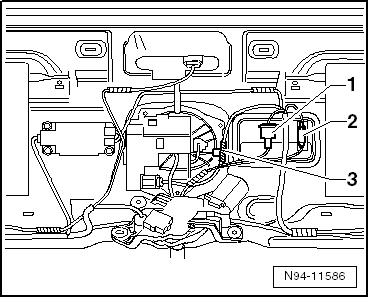
| – |
Release and detach connectors -1-
and -2- from their holders. |
| – |
Release and detach connectors -1-
and -2-. |
| – |
Release cable from the cable retainer
-3-. |
|
|
|
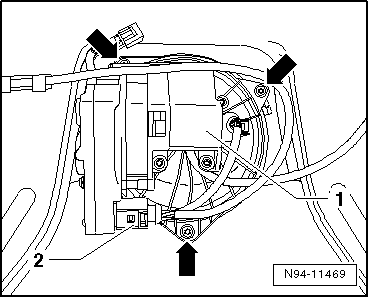
| – |
Release connector -2- and
disconnect. |
| – |
Remove securing bolts -arrows-
of swivel badge. |
| – |
Turn swivel badge together with reversing camera and swivel
motor -1- to the right until stop
and push inwards out of mounting in rear lid. |
| – |
Pull drain hose out of hose nozzle on underside of swivel
badge. |
| – |
Remove swivel badge with reversing camera housing and swivel
motor. |
| Install in the reverse order of removal. When doing this,
note the following: |
 Caution
| Twisted or not properly positioned seals may result
in danger of water ingress into the luggage compartment. |
| Check that installed seals are in good condition and
in proper installation position. |
|
|
|
|
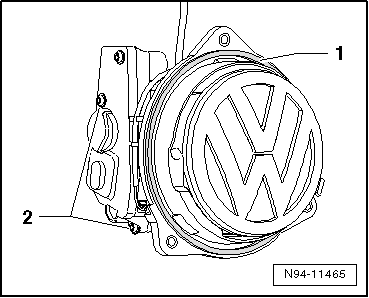
| – |
Check circumferential rubber seal -1-
of swivel badge and ensure that it is completely inserted in
groove. |
| – |
Attach drain hose to hose nozzle on underside of swivel
badge. |
| – |
Insert swivel badge turned to the right into rear lid. |
| – |
Engage swivel badge in rear lid by turning it to the left. |
|
|
|
| – |
Screw in bolts -arrows- of
swivel badge without tightening. |
| – |
Align the swivel badge centrally in relation to body opening
in rear lid and tighten the 3 bolts
-arrows- to 4 Nm. |
| – |
Secure wires and connectors again with wiring retainers to
prevent rattling. |
| – |
After installation, clean reversing camera lens with a
lint-free cloth. |
| → Chapter „Assembly overview - reversing camera system“ |
| Removing and installing reversing
camera housing with swivel motor out of swivel badge |
| Special tools and workshop equipment
required |
|
|
|
| Torque wrench -V.A.G 1783- |
| – |
Remove swivel badge with reversing camera and swivel motor
housing out of rear lid
→ Anchor |
|
|
|
| – |
Release connector -5- and
disconnect. |
| – |
Remove securing bolts -arrows-. |
| – |
Remove reversing camera housing -2-
together with swivel motor -3- from
swivel badge -4-. |
| Install in the reverse order of removal. When doing this,
note the following: |
Caution
| Twisted or not properly positioned seals may result
in danger of water ingress into the luggage compartment. |
| Check that installed seals are in good condition and
in proper installation position. |
|
| – |
Check seal between camera and swivel badge and make sure
that it has not come off or been twisted. |
|
|

|
| – |
Insert swivel motor wire into wire guide
-1- of reversing camera housing
-2-. |
| – |
Insert reversing camera housing -2-
together with swivel motor -3- into
swivel badge -4-. |
Caution
| Swivel mechanism may become stuck. |
| The securing bolt in swivel motor, which is
difficult to reach, -bottom right
arrow-, can drop into reversing camera housing
during positioning. |
| To position screws, swivel badge needs to be turned
so that swivel motor -3- is
underneath. |
|
| – |
Screw in securing bolts -arrows-. |
| – |
Installing swivel badge with reversing camera and swivel
motor housing into rear lid
→ Anchor |
| → Chapter „Assembly overview - reversing camera system“ |
| Separate reversing camera housing
from swivel motor |
| Special tools and workshop equipment
required |
|
|
|
| Torque wrench -V.A.G 1783- |
| – |
Removing reversing camera with swivel motor from swivel
badge
→ Anchor. |
|
|
|
| – |
Remove securing bolts -2-. |
| – |
Carefully separate reversing camera housing and swivel
motor. |
| Install in the reverse order of removal. When doing this,
note the following: |
| – |
Check if release lever and sliding surface on swivel motor
are greased. |
| – |
Connect reversing camera housing and swivel motor. |
| – |
Screw in securing bolts arrows. |
| – |
Installing reverse camera housing with swivel motor into
swivel badge
→ Anchor |
| → Chapter „Assembly overview - reversing camera system“ |
|
|
|
1 -
Bolt
Qty. 4
2.5 Nm
2 -
Swivel motor
Removing and installing
→ Anchor.
...
© 2016-2024 Copyright www.vwgolf.org

 Assembly overview - reversing camera system