Volkswagen Golf Service & Repair Manual: Removing and installing rear side airbag with rear side airbag igniter
-N201-/-N202-
 WARNING
| |
Observe safety instructions for pyrotechnic
components
→ Chapter. |
| |
Observe the additional safety regulations for the
side airbag
→ Chapter. |
| |
Observe disposal regulations for pyrotechnic
components
→ Chapter. |
|
|
|
|
| – |
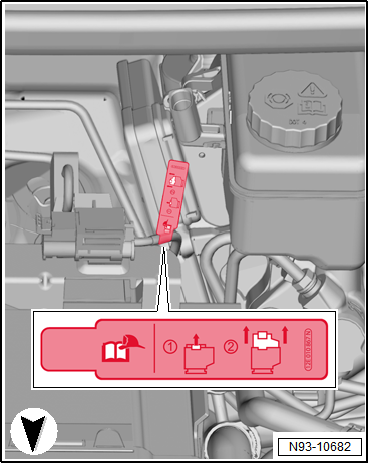
For “e-Golfs” or “Golf GTEs”, disconnect the maintenance
connector for high-voltage system -TW-. |
| – |
Disconnect battery earth cable with ignition switched on
→ Electrical system; Rep. gr.27. |
| – |
Remove side padding
→ Chapter. |
|
|
|
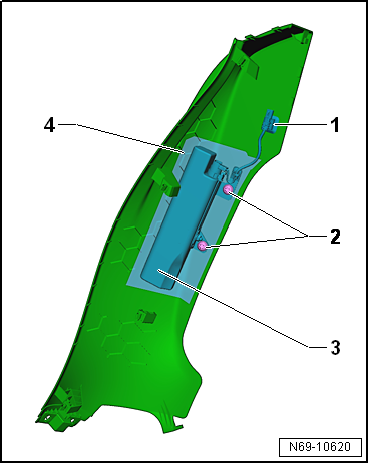
| – |
Remove the 2 bolts -2-. |
| – |
Unclip connector -1- from seat
bolster. |
| – |
Remove side airbag -3- from
airbag pocket -4-. |
| – |
Install in reverse order of removal. |
WARNING
| Ensure that nobody is in vehicle. |
|
|
|
|
| – |
For “e-Golfs” or “Golf GTEs”, connect the maintenance
connector for high-voltage system -TW-. |
| – |
Connect vehicle battery
→ Electrical system; Rep. gr.27. |
WARNING
| If the ignition has not yet been switched on after
the battery has been reconnected “warning lamps in dash
panel insert are off”, the ignition (key or button) must
only be switched on while sitting on the driver seat and
with the seat set to rearmost position. |
|
| |
→ Chapter „Assembly overview - rear side airbag“ |
|
|
|
Removing
WARNING
Observe safety instructions for pyrotechnic
components
U ...
Other materials:
Renewing LSU Lambda probe (6-pin)
Note
If necessary, replace attachment parts, cable ties or
marking rings to match the uniform probe to the defective probe
as specified.
The wires should not be crimped or cut as otherwise the
function of the L ...
Warning lamp
Fig. 57 Warning lamp in the instrument
cluster
Fig. 58 Seat belt status for the rear seats
in the instrument cluster
First read and observe the introductory information
and safety warnings
Lights up or flashes
Possible cause
Solution
...
Run-flat tyre system PAX, support ring
Dimensions
Overview of important dimensions:
Codes/designations
Example: 90-500(35) CLI A 1 876107
90 -
Nominal width in millimetr ...
© 2016-2024 Copyright www.vwgolf.org

 Removing and installing front side airbag with side airbag igniter
-N199-/-N200-
Removing and installing front side airbag with side airbag igniter
-N199-/-N200- Curtain airbags