Volkswagen Golf Service & Repair Manual: Removing and installing rear lid
| Special tools and workshop equipment
required |
|
|
|
|
|
|
Torque wrench -V.A.G 1331- |
| – |
Remove upper rear lid trim
→ General body repairs, interior; Rep. gr.70. |
| – |
Remove lower rear lid trim
→ General body repairs, interior; Rep. gr.70. |
| – |
Remove high-level brake light
→ Electrical system; Rep. gr.94 |
| – |
Remove connectors of all installed electrical components. |
| – |
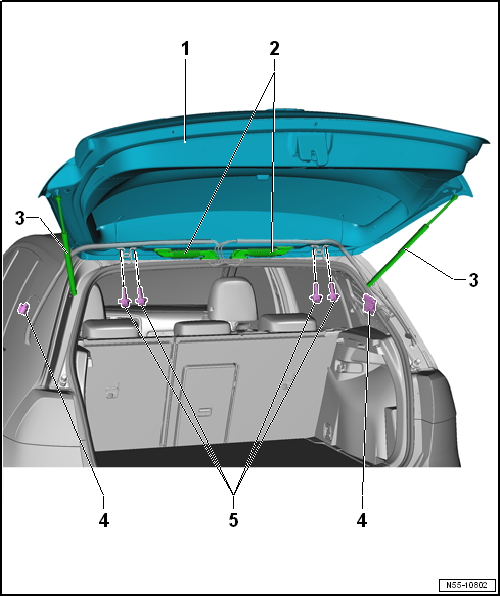
Thread electric cables/wire together with rubber grommet
-2- out of rear lid. |
 Note
Note
| The connectors -4- for wires
-2- are located on left C-pillars. |
| – |
Loosen bolts -5- on left and right
hinges (do not unbolt completely). |
| Further dismantling requires the assistance of a second mechanic. |
| – |
Remove gas struts -3-
→ Chapter. |
| – |
Now, remove bolts -5- completely and
then remove rear lid -1-. |
| – |
Install rear lid -1- with the aid of a
2nd mechanic. |
| – |
Install gas struts -3-
→ Chapter. |
| – |
Guide wires -2- into rear lid and
attach rubber grommet. |
| – |
Connect connectors of all installed electrical components. |
| Further installation is performed in the reverse order of removal. |
| – |
Before closing rear lid, check function of lid release components. |
| – |
Adjusting rear lid
→ Chapter. |
1 -
Rear lid
Removing and installing
→ Chapter
Adjusting
→ Chapter
2 -
Bonnet lock
Removing and insta ...
Special tools and workshop equipment
required
Torque wrench -V.A.G 1331-
...
Other materials:
Removing and installing reversing light bulb
Note
Removal and installation are described for the left side.
Removal and installation on the right side are carried out in
the same way.
Removing
–
Turn light switch to “0” position.
...
Introduction
This chapter contains information on the following subjects:
→ The dangers of assuming an incorrect sitting position
→ Correct sitting position
→ Mechanical controls on the front seat
→ Electrical controls on the front seats
→ Adjusting ...
Assembly overview - speed sensor on rear axle
1 -
ABS speed sensor
Before inserting sensor, clean inner surface of fitting hole and
coat it with high-temperature paste -G 052 112 A3-.
Removing and installing
→ Chapter
2 -
Bolt
...
© 2016-2024 Copyright www.vwgolf.org

 Assembly overview - rear lid
 Adjusting rear lid