Volkswagen Golf Service & Repair Manual: Removing and installing rain and light sensor, vehicles with front camera
for driver assist systems
 Note Note
| The rain and light sensor has a silicon layer (coupling pad)
which forms the contact surface to the windscreen. |
| The rain and light sensor has been designed so that it can
be used again. A prerequisite for re-use is that the coupling
pad is not damaged or dirty (check!). |
| If a rain and light sensor -G397- is renewed with a rain and
light sensor -G397- having a different part number, the new rain
and light sensor -G397- has to be coded
→ Anchor. |
| The rain and light sensors -G397- cannot be fitted
arbitrarily. Determine the correct rain and light sensor -G397-
using the Electronic Parts Catalogue (ETKA). |
| – |
Switch off ignition and all electrical consumers. |
| – |
If ignition key is present, disengage in position 0
(locked). |
|
|
|
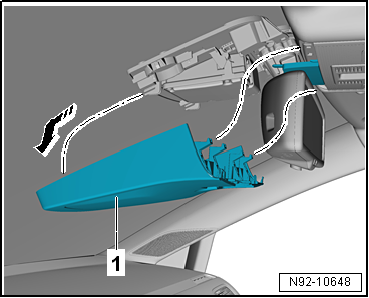
| – |
Remove cover -1- in direction
of arrow -A-. |
Note
| Wait at least 1 minute after releasing the retaining clip.
This is necessary to ensure that the silicone coating is
relieved of tension and will not be damaged during removal. |
|
|
|
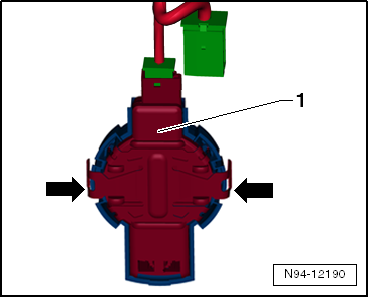
| – |
Release retaining clip on left and right
-arrows-. |
| – |
Starting from top, carefully lever rain and light sensor
-G397--1- out of retaining frame on
windscreen. |
|
|
|
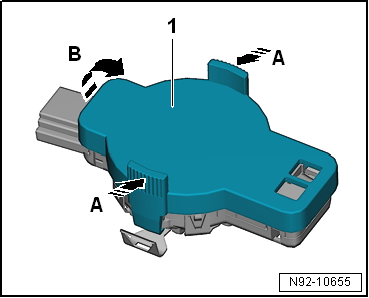
| – |
If necessary, remove protective cap
-1- from new rain and light sensor -G397-. |
| – |
Press grip in direction of arrow -A-. |
| – |
Remove protective cap -1- in
direction of arrow -B-. |
|
|
|
The windscreen wiper system is equipped with an APP function
(alternating park position).
With the APP function, the wiper is moved up slightly once ...
Note
The rain and light sensor has a silicon layer (coupling pad)
which forms the contact surface to the windscreen.
The r ...
Other materials:
Removing and installing bulbs for cornering light -L148-/-L149-
Note
Left cornering light bulb -L148- and right cornering light
bulb -L149- are only fitted on gas discharge headlights.
Removal and installation are described for the left side.
Removal and installation on the right ...
Seat heating
Fig. 53 In the centre console: buttons
for the front seat heating
First read and observe the introductory information
and safety warnings The seat cushions and backrests can be heated electrically
when the ignition is switched on. Some seat versions have heated backrests.
Do not switch o ...
Renewing bonded rubber bush
Special tools and workshop equipment required
Tensioning strap -T10038-
Assembly tool -T10263-
Assembly tool -T10356-
Engine and gearbox jack -V.A.G 1383 A-
Hydraulic press -VAS 6178- and thrust piece - ...
© 2016-2024 Copyright www.vwgolf.org

 Caution
 Deactivating APP function of wiper motor
 Removing and installing rain and light sensor, vehicles without front camera
for driver assist systems
Removing and installing rain and light sensor, vehicles without front camera
for driver assist systems