Volkswagen Golf Service & Repair Manual: Removing and installing radiator, Golf, Golf SV, Golf Estate
 Note Note
| Radiator and water radiator for charge air cooling circuit
are removed together. |
| – |
Drain coolant
→ Chapter. |
| – |
Remove radiator cowl
→ Chapter. |
| – |
Remove front bumper cover
→ General body repairs, exterior; Rep. gr.63. |
|
|
|
| – |
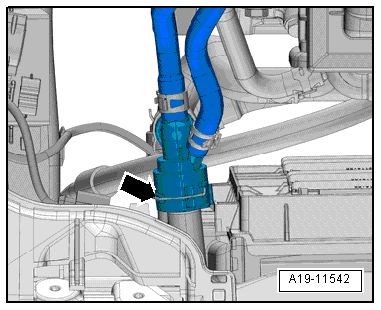
Lift retaining clip -arrow- and
disconnect coolant hose (top right) from water radiator for
charge air cooling circuit. |
|
|
|
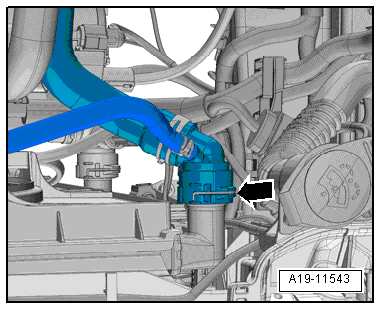
| – |
Lift retaining clip -arrow- and
disconnect coolant hose (top left) from radiator. |
|
|
|
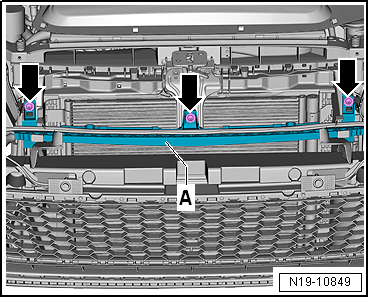
| – |
Remove centre guide profile -A-
from lock carrier -arrows-. |
|
|
|
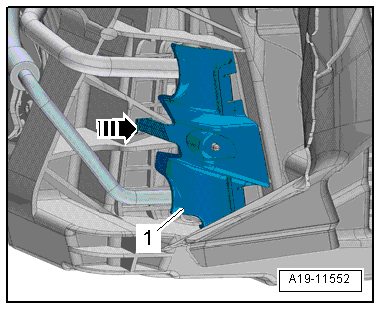
| – |
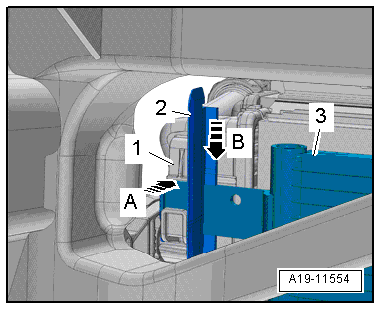
Release fastener -arrow- and
remove cover -1- towards front. |
|
|
|
| – |
Unclip air duct -2- downwards
on both sides -arrow B-. |
| – |
Release catches on both sides -arrow
A- and detach condenser -3-
from water cooler for charge air cooling circuit
-1-. |
| – |
Tie up condenser to lock carrier. |
|
|
|
| – |
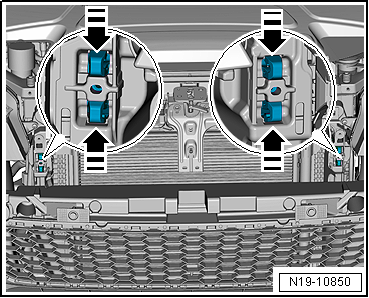
Using diagonal pliers, pinch off fasteners
-arrows- for radiator mounting on
left and right. Push radiator with water radiator for charge air
cooling circuit (top) slightly towards the rear. |
Note
| The radiator mounting will be reused when reinstalling the
radiator. It will then be bolted to lock carrier. Bolts
→ ETKA (Electronic Parts Catalogue). |
| – |
Detach radiator with water radiator for charge air cooling
circuit. |
|
|
|
| – |
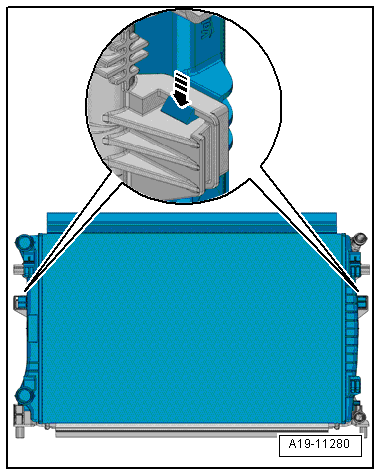
Press locking tabs on left and right sides of radiator
simultaneously -arrow-, and detach
radiator from water cooler for charge air cooling circuit. |
| Installation is carried out in the reverse order; note the
following: |
Note
| If there are minor dents in the fins, refer to
→ Chapter. |
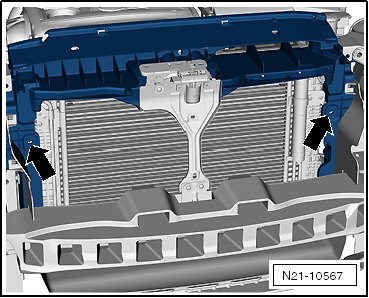
| – |
Use bolts to secure radiator mountings, whose fasteners have
been pinched off, to lock carrier -arrows-.
Bolts
→ ETKA (Electronic Parts Catalogue). |
|
|
|
| – |
Install front bumper cover
→ General body repairs, exterior; Rep. gr.63. |
| – |
Install radiator cowl
→ Chapter. |
| – |
Connect coolant hose with plug-in connector to radiator
→ Fig.. |
| – |
Replenish coolant
→ Anchor. |
Note
| Do not reuse coolant which has been drained off. |
| → Chapter „Assembly overview - radiator and radiator fan“ |
|
|
|
1 -
Bolt
5 Nm
2 -
Radiator cowl
Removing and installing
→ Chapter
3 - ...
Removing
–
Release hose clip -1- and
detach air hose.
–
Un ...
Other materials:
Wiring harness repair set -VAS 1978A-
The new wiring harness repair set -VAS 1978A- allows optimal
repair quality to be achieved in the area of vehicle electrics.
Using the new pliers, repairs to connectors and wiring open
circuits can be carried out. To do this, complete repair wire
section ...
Checking
Switch off ignition.
–
Connect manifold gauge (air conditioner service station).
–
Read pressure gauge. It may display two results, A and B.
Ambie ...
Removing and installing headlight range control motor -V48-/-V49- (gas
discharge headlights)
Note
Removal and installation are described for the left side.
Removal and installation on the right side are carried out in
the same way.
Removing
–
Remove headlight
→ Chapt ...
© 2016-2024 Copyright www.vwgolf.org

 Assembly overview - radiator cowl and radiator fan
 Removing and installing radiator cowling