Volkswagen Golf Service & Repair Manual: Removing and installing headlight
| Special tools and workshop equipment
required |
|
|
|
| Torque wrench -V.A.G 1783- |
|
|
|
| – |
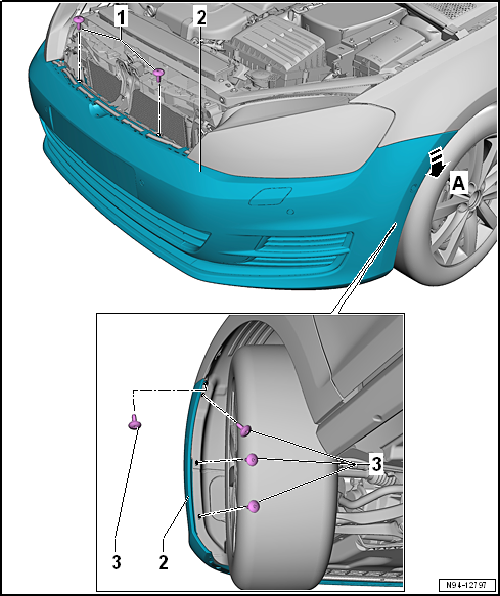
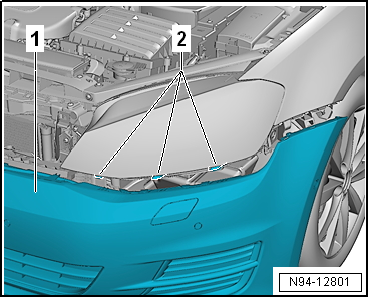
Unscrew bolts -3- from front wheel
housing liner. |
| – |
Unscrew bolts -1- if present. |
| – |
Release bumper -2- from wing and pull
it off in direction of arrow -A-. |
| – |
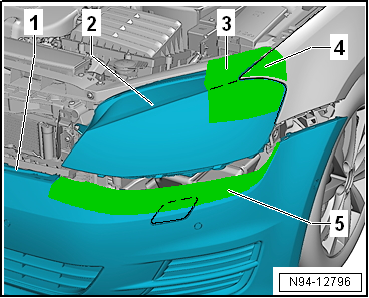
Mask off marked area -3- on
headlight -2-. |
| – |
Mask off underside of wing tip -4-. |
| – |
Mask off marked area -5- on
bumper -1-. |
|
|
|
| – |
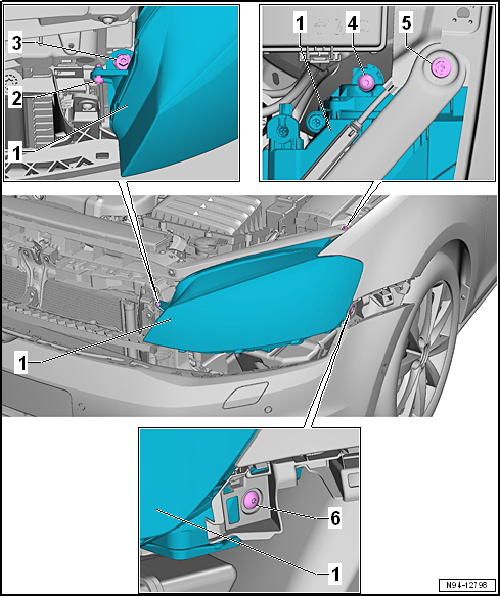
Unscrew bolts -3, 5 and 6-. |
| – |
Disconnect electrical connector. |
| – |
Pull headlight -1- forwards to remove. |
| Install in the reverse order of removal, observing the
following: |
| – |
Press headlight into bumper guide. |
| – |
Ensure uniform gap all around headlight
→ Chapter. |
|
|
|
| – |
Insert bumper -1-. When doing
this, ensure that bumper is being guided into mountings
-2- beneath headlight. |
| – |
Check headlight setting and adjust headlight if necessary
→ Booklet36.1 |
| → Chapter „Assembly overview - headlight“ |
|
|
|
| Adjusting dual halogen headlight |
| Adjusting dual halogen headlight
→ Booklet36.1. |
|
|
|
| Adjusting gas discharge headlights |
| Adjusting gas discharge headlights
→ Booklet36.1. |
|
| Adjusting LED headlights
→ Booklet36.1. |
|
| Adjusting fog lights
→ Booklet36.1 |
|
|
|
| Adjusting auxiliary headlights |
| Retrofitted auxiliary headlights of other systems must be
checked and adjusted according to valid guidelines. |
|
|
|
1 -
LED module for daytime running light and side light
Left LED module for daytime running light and side light -L176-
Right LED module fo ...
Special tools and workshop equipment
required
Torque wrench -V.A.G 1783-
...
Other materials:
Charging battery in maintenance mode with battery charger -VAS 5903-
Note
When a battery is being charged in the maintenance mode and
an electrical consumer draws current from the battery, the
battery charger -VAS 5903- automatically compensates the charge.
The maintenance mode can be ...
Locking the front passenger door and rear doors manually
Fig. 210 In the end face of the right-hand
door: manual lock covered by a rubber seal
Fig. 211 Manually locking the vehicle with
the vehicle key
First read and observe the introductory information
and safety warningsThe front passenger door and the rear doors can be locked
manually. This ...
Charging, replacing, disconnecting and connecting the vehicle battery
First read and observe the introductory information
and safety warnings Charging the battery
The vehicle battery should be charged by a qualified workshop, as the technology
used in factory-fitted batteries requires voltage-limited charging . Volkswagen
recommends using a Volkswagen deal ...
© 2016-2024 Copyright www.vwgolf.org

 Note
Note WARNING
 Caution
 Assembly overview - daytime running lights
 Adjusting headlight installation position