Volkswagen Golf Service & Repair Manual: Removing and installing hazard warning light switch -EX3-
| – |
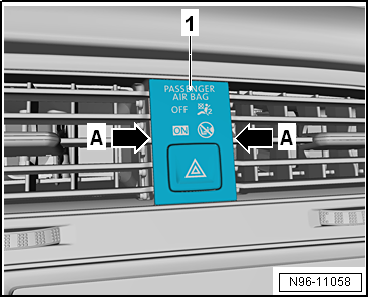
Grasp front passenger side airbag deactivated warning lamp
-K145--1- at sides
-arrows A- and pull it out of dash
panel. |
| – |
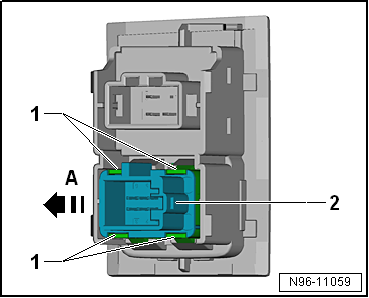
Disconnect electrical connectors. |
|
|
|
| – |
Release fasteners -arrows-. |
| – |
Press hazard warning light switch -EX3--2-
out of front passenger side airbag deactivated warning lamp
-K145- in direction of arrow -A-. |
| Installation is carried out in the reverse sequence. |
|
|
|
| Removing and installing buttons for seat
heating -E653-/-E654- |
 Note Note
| Buttons for seat heating are integrated in the operating and
display unit (heater control unit -J65-/air conditioning system
control unit -J301-/Climatronic control unit -J255-). These
components cannot be renewed separately if defective. |
| – |
Removing and installing -J65-/-J301-/-J255-
→ Heating, air conditioning; Rep. gr.87. |
|
|
|
Special tools and workshop equipment
required
Removal wedge -3409-
...
Note
The removal and installation procedures are described for
LHD vehicles. Removal and installation for RHD vehicles are
similar.
...
Other materials:
Removing and installing ambient temperature sensor -G17-
Removing
–
Remove radiator grille
→ General body repairs, exterior; Rep. gr.66.
–
Remove ambient temperature sensor -G17--1-
from bracke ...
Introduction
This chapter contains information on the following subjects:
→ Displays  
→ Radar sensor  
→ Operating the area monitoring system (Front Assist)  
→ Temporarily switch off the area monitoring system (Front Assist) in the
following situations  
â ...
Assembly overview - assembly mountings
1 -
Bolt
Renew
Tightening sequence → Fig.
2 -
Engine support
Specified torque and tightening sequence
→ Fig.
3 -
Engine mounting
...
© 2016-2024 Copyright www.vwgolf.org

 Removing and installing switch module in centre console -EX23-/-EX30-
 Removing and installing glove compartment light switch -E26-