Volkswagen Golf Service & Repair Manual: Removing and installing gas discharge bulb -L13-/-L14-
 WARNING
| Risk of death due to high voltage! Risk of injury
and environmental pollution! |
| Observe operation and safety notes for gas discharge
bulbs
→ Chapter. |
|
 Note Note
| Removal and installation are described for the left side.
Removal and installation on the right side are carried out in
the same way. |
| – |
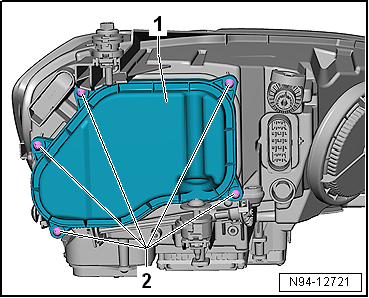
Remove headlight
→ Chapter. |
|
|
|
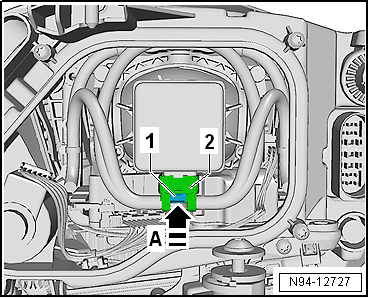
| – |
Unscrew bolts -2- from housing
cover -1-. |
| – |
Remove housing cover -1-. |
|
|
|
| – |
Press locking lug -1- in
direction of arrow -A- to
disconnect connector -2-. |
|
|
|
| Removing and installing side light bulb
-M1-/-M3- (dual halogen headlights) |
Note
| The left side light bulb -M1- or right side light bulb -M3-
is integrated in the left headlight main beam bulb -M30- or
right headlight main beam bulb -M32-, respectively. |
| – |
Removing and installing side light bulb -M1-/-M3-
→ Chapter „Removing and installing headlight main beam bulb
-M30-/-M32- (dual halogen headlights)“. |
|
|
|
| Removing and installing side light bulb
-M1-/-M3-, gas discharge headlights |
| The left side light bulb -M1- or right side light bulb -M3-
is integrated in the left daytime running light bulb -L174- or
right daytime running light bulb -L175-, respectively. |
| – |
Removing and installing side light bulb -M1-/-M3-
→ Chapter „Removing and installing daytime running light bulb
-L174-/-L175-, gas discharge headlights“. |
|
|
|
| Removing and installing daytime running
light bulb -L174-/-L175- (dual halogen headlights) |
Note
| The left daytime running light bulb -L174- or right daytime
running light bulb -L175- is integrated in the left headlight
main beam bulb -M30- or right headlight main beam bulb -M32-,
respectively. |
| – |
Removing and installing daytime running light bulb
-L174-/-L175-
→ Chapter „Removing and installing headlight main beam bulb
-M30-/-M32- (dual halogen headlights)“. |
|
|
|
Special tools and workshop equipment
required
Front-end hook -3370-
...
Note
Removal and installation are described for the left side.
Removal and installation on the right side are carried out in
the same way.
...
Other materials:
Vehicle-specific weight ratings
First read and observe the introductory information
and safety warnings All data in the official vehicle documents take precedence
over these data. All data in this manual apply to the basic German model. The vehicle
data sticker in the service schedule and the official vehicle documents sho ...
Saw-tooth wear
Saw-tooth wear is a stepped wear pattern on the individual
tread blocks → Fig.
that can cause increased tyre noise. The saw tooth is caused by
uneven deformation of the tread blocks in the tyre's contact
patch. Saw-tooth wear is more pronounce ...
Suction feed spray-gun -V.A.G 1538
Designation:
Suction feed spray-gun -VAG 1538-
Product description:
Tool for sealing cavities in all new and used cars and for
applying underbody sealant.
Design, features an ...
© 2016-2024 Copyright www.vwgolf.org

 Caution
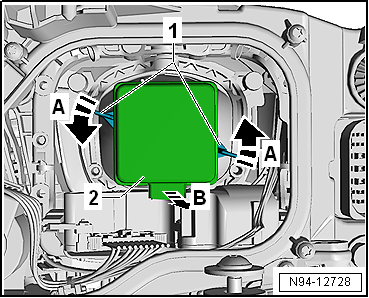
 Removing and installing headlight main beam bulb -M30-/-M32- (LED)
 Removing and installing daytime running light bulb -L174-/-L175-, gas
discharge headlights
Removing and installing daytime running light bulb -L174-/-L175-, gas
discharge headlights