Volkswagen Golf Service & Repair Manual: Removing and installing front 3-point seat belt, 4-door model and estate
 WARNING
| |
Observe safety instructions for pyrotechnic
components
→ Chapter. |
| |
Observe disposal regulations for pyrotechnic
components
→ Chapter. |
|
|
|
|
| – |
For “e-Golfs” or “Golf GTEs”, connect the maintenance
connector for high-voltage system -TW-. |
| – |
Disconnect battery earth cable with ignition switched on
→ Electrical system; Rep. gr.27. |
| – |
Remove lower B-pillar trim
→ Chapter. |
| – |
Remove front belt end fitting, 4-door model and estate
→ Chapter. |
| – |
Removing and installing front belt guide, 4-door model and
estate
→ Chapter. |
|
|
|
| – |
Remove belt guide fitting -2-
with belt webbing. |
WARNING
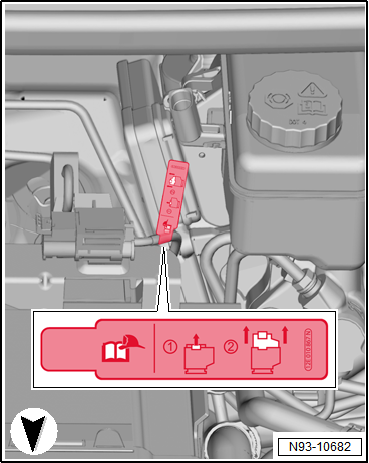
| Before handling pyrotechnic components (e.g.
separating the electrical connector), the person
handling them must ensure that he/she is “electrically
discharged”. To do this e.g. briefly touch the door
striker plate. |
|
|
|
|
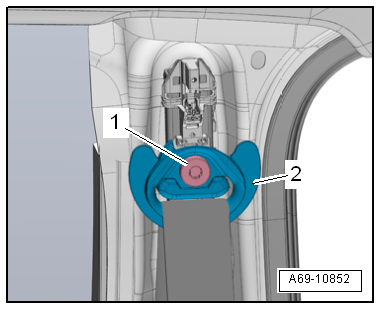
| – |
Release connector locking device
-arrow- using a small screwdriver and pull off connector
for seat belt tensioner igniter 1 -item 1-. |
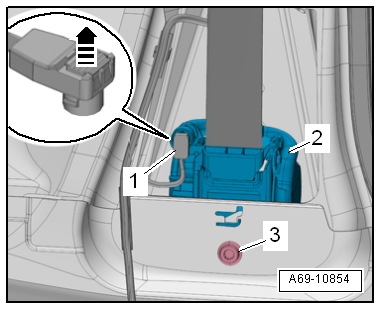
| – |
Unscrew bolt -3- and remove
belt inertia reel -2- from
mounting. |
WARNING
| |
Observe safety instructions for pyrotechnic
components
→ Chapter. |
| |
Before handling pyrotechnic components (e.g.
connecting the electrical connector), the person
handling them must ensure that he/she is “electrically
discharged”. To do this e.g. briefly touch the door
striker plate. |
|
| Install in reverse order, but note the following: |
| – |
If parts of the belt system are removed because of an
accident, the belt system bolts must be renewed. |
 Note Note
| Ensure that the electrical connectors are pushed fully
onto stop and engage audibly. |
|
|
|
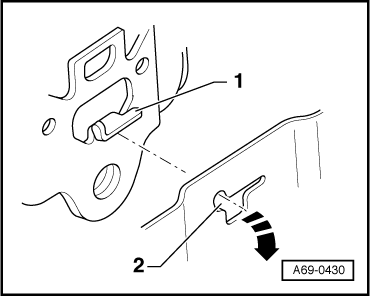
| – |
Fit belt inertia reel ensuring that anti-rotation tab
-1- engages in mounting
-2--arrow- and tighten bolt. |
|
|
|
| – |
Connect connector -1- to
igniter -arrow A-. |
| – |
Press in connector lock -2--arrow B-.
Doing so, the connector will be fully inserted into igniter and
locked at the same time. |
WARNING
| Battery must be connected with ignition switched on.
If pyrotechnic components (e.g. airbag, seat belt
tensioners) are repaired incorrectly, undesired
triggering may occur after the battery is connected.
Ensure that nobody is in vehicle when connecting
battery. |
|
|
|

|
| – |
For “e-Golfs” or “Golf GTEs”, disconnect the maintenance
connector for high-voltage system -TW-. |
| – |
Connect battery earth cable with ignition switched on
→ Electrical system; Rep. gr.27. |
WARNING
| If the ignition has not yet been switched on after
the battery has been reconnected “warning lamps in dash
panel insert are off”, the ignition (key or button) must
only be switched on while sitting on the driver seat and
with the seat set to rearmost position. |
|
| |
→ Chapter „Assembly overview - front three-point seat belt,
4-door model and estate“ |
| For vehicles with control unit for front left belt tensioner
-J854- or control unit for front right belt tensioner -J855-,
the airbag control unit -J234- must be adapted in
→ Guided fault finding after renewing the seat belt.
If the
→ Guided fault finding is already running, then
refresh test plan “15 - Airbag”. |
|
|
|
Removing
WARNING
Observe safety instructions for pyrotechnic
components
...
Removing
–
Remove rear shelf support
→ Chapter.
–
Remove outer rear seat belt guide anc ...
Other materials:
Preparatory measures for calibration
Extensive preliminary work is required before the actual
calibration can be carried out using → Vehicle
diagnostic tester.
Prerequisites:
Position vehicle on a firm and level surface.
...
Removing and installing headlight range control regulator -E102-
Note
The removal and installation procedures are described for
LHD vehicles. Removal and installation for RHD vehicles are
similar.
Removing
–
Remove rotary light switch -EX1-
→&n ...
Assembly overview - subframe
1 -
Anti-roll bar with rubber bush
Removing and installing
→ Chapter
2 -
Nut
When tightening, counterhold on multipoint socket of joint stub.
Renew after removing
...
© 2016-2024 Copyright www.vwgolf.org

 Removing and installing front 3-point seat belt, 2-door model
 Removing and installing rear 3-point seat belt, 2-door model, without belt
tensioner
Removing and installing rear 3-point seat belt, 2-door model, without belt
tensioner