Volkswagen Golf Service & Repair Manual: Removing and installing engine control unit -J623- (with metal locking
plate)
| Special tools and workshop equipment
required |
|
|
|
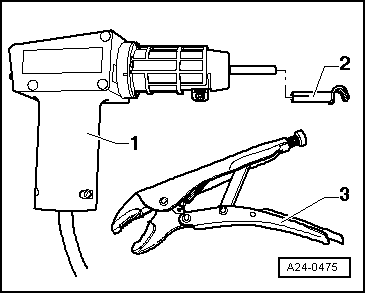
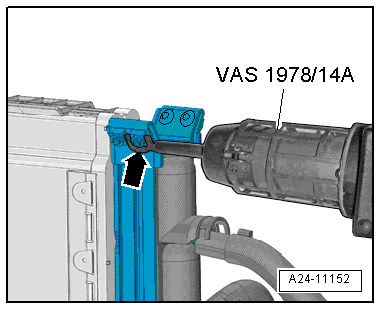
| Hot air blower -VAS 1978/14A--1-
with nozzle -2- from wiring harness
repair set -VAS 1978 B- |
| Small grinder (commercially available) |
| Vehicle diagnostic tester |
| – |
If engine control unit is renewed, select test
sequence/function Replace engine control unit on “vehicle
diagnostic tester” in “Guided functions” mode. |
| – |
Switch off ignition and remove ignition key. |
 Note Note
| If the engine control unit comes into contact with the
positive battery terminal, the engine control unit will be
destroyed. |
| Therefore, the battery must be disconnected before the
engine control unit is removed
→ Electrical system; Rep. gr.27. |
|
|
|
| – |
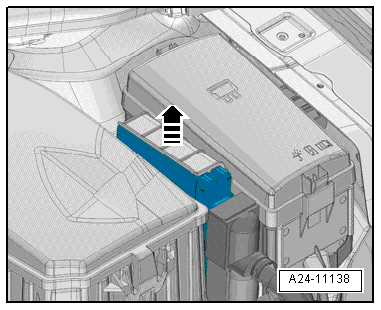
Release retaining clip -arrow-
and take out engine control unit -J623-. |
Note
| Cover the area around the engine control unit, and protect
it from flying sparks. |
|
|
|
| – |
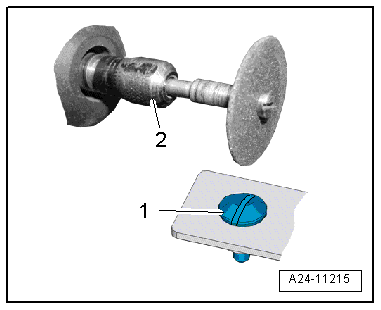
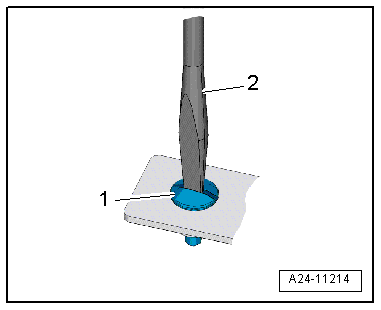
Make groove (for a screwdriver) in head of shear bolt
-1- using a small grinder
-2-. |
Note
|
|
|
| The threads of the shear bolts are secured with locking
fluid. To unscrew these bolts, the threads must therefore be
heated with the hot air blower. |
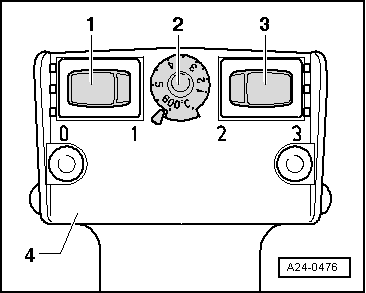
| – |
Select settings on hot air blower as shown in illustration,
i.e. set temperature potentiometer -2-
to maximum heat output and two-stage air flow switch
-3- to position 3. |
Risk of damage to adjacent components caused by hot air blower. Risk of
overheating.If necessary, cover adjacent components. |
|
|
| – |
Hold hot air blower -VAS 1978/14A- with nozzle attachment
-arrow- to thread of shear bolt and
heat thread for about 20 to 30 seconds. |
|
|
|
| – |
Unscrew shear bolt -1- using
screwdriver -2-. |
| – |
Detach metal locking plate from connectors for engine
control unit -J623-. |
| – |
Release and unplug connectors. |
| Installation is carried out in the reverse order; note the
following: |
| – |
The metal locking plate must always be re-fitted on the
engine control unit -J623-. |
| – |
Remove any locking compound residues from the threaded holes
for the shear-head bolts. Threads can be cleaned using a tap
(thread cutter). |
| – |
Use new shear-head bolts. |
| After having installed the new engine control unit, the
following work must be carried out: |
| – |
Connect battery
→ Electrical system; Rep. gr.27. |
| – |
Connect vehicle diagnostic tester. |
| – |
Switch on ignition and select the following menu options on
vehicle diagnostic tester: |
| 01 - Renew engine control unit |
|
|
|
Special tools and workshop equipment
required
Hot air blower -VAS 1978/14A--item 1-
with nozzle - ...
© 2016-2024 Copyright www.vwgolf.org


 Removing and installing engine control unit -J623- (with protective housing)