Volkswagen Golf Service & Repair Manual: Removing and installing condenser
| Special tools and workshop equipment
required |
|
|
|
| – |
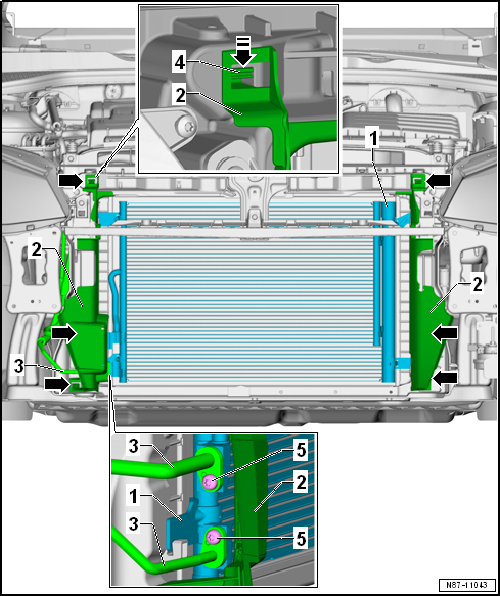
Release air ducts -2- from
upper mountings -arrow-. |
| – |
Press down locking device -4-
in -direction of arrow- and pull
air duct -2- towards front. |
| – |
Remove air duct downwards. |
Risk of freezing injury caused by escaping pressurised refrigerant.There
is a risk of injury to the skin and parts of the body due to
freezing.Always wear safety gloves.Always wear safety goggles.Extract
refrigerant, and open the refrigerant circuit immediately afterwards.If
more than 10 minutes passed since the refrigerant has been extracted, do
not open the refrigerant circuit prior to extracting refrigerant anew.
Due to re-evaporation, pressure will be built up in the refrigerant
circuit.
| – |
Extract refrigerant with air conditioning service station. |
| – |
Remove refrigerant lines -3-
from connection on condenser. |
|
|
|
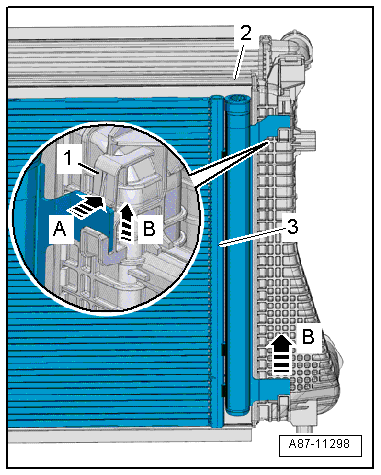
| – |
Have a second mechanic release retaining clips
-1- on left and right in
-direction of arrow A- and remove
condenser -3- upwards out of
mountings -arrows B-. |
| – |
Remove condenser -3- downwards. |
| Installation is carried out in the reverse order. When
installing, note the following: |
| → Chapter „Assembly overview - condenser“ |
| Front bumper; Assembly overview - front bumper
→ General body repairs, exterior; Rep. gr.63. |
|
|
|
Special tools and workshop equipment
required
Torque wrench -V.A.G 1331-
C ...
Special tools and workshop equipment
required
Torque wrench -V.A.G 1331/- (5…50 Nm)
...
Other materials:
Acoustic and optical ParkPilot signals
Fig. 150 ParkPilot display of the area
around the vehicle (colour)
Fig. 151 Mini ParkPilot display of the
area around the vehicle (colour)
First read and observe the introductory information
and safety warnings
Key
and
Meaning
...
Removing and installing emblems at rear
Note
The emblem cannot be removed without damage.
Removing
–
Use a screwdriver -3- to carefully
lever manufacturer emblem -1- off swivel
badge -2- in
-direction of arrow A-.
Installing
–
Pres ...
Assembly overview - Lambda probe
Note
New lambda probes are coated with an assembly paste. This
paste must not get into the slots on the Lambda probe body.
In the case of a used Lambda probe grease only the thread
with high-temperature paste. This p ...
© 2016-2024 Copyright www.vwgolf.org

 Note
Note
 Removing and installing refrigerant circuit pressure sender -G805
 Removing and installing damper weight for refrigerant line, low-pressure
side
Removing and installing damper weight for refrigerant line, low-pressure
side