Volkswagen Golf Service & Repair Manual: Removing and installing charge pressure sender -GX26-
| Charge pressure sender -GX26- consists of |
| Charge air pressure sender -G31- |
| Intake air temperature sender -G42- |
|
|
|
| – |
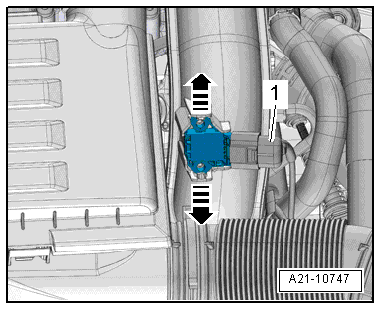
Disconnect electrical connector -1-. |
| – |
Release fasteners -arrows-, and
remove charge pressure sender -GX26-. |
| Installation is carried out in the reverse order; note the
following: |
 Note Note
| If the retaining tabs broke off during removal, the sender
can be secured using two securing bolts as per
→ Electronic Parts Catalogue. Specified torque:
→ Anchor |
|
|
|
| Component |
Specified torque |
| Charge air pressure sender
-GX26- |
3 Nm |
Note
Check all air hoses and pipes for firm seating and leaks before
carrying out tests or repairs.
Observe rules for cleanliness
→ Chapter.
...
Special tools and workshop equipment
required
Hose clamps up to 25 mm -3094-
...
Other materials:
Notes on releasing and dismantling contact housings
Note
Observe the general notes on repairs to the vehicle
electrical system
→ Chapter.
To release, always use the correct release tools. Under no
circumstances should the contacts be pulled out of the ...
Removing and installing rear 3-point seat belt, 4-door model, with belt
tensioner
Removing
WARNING
Observe safety instructions for pyrotechnic
components
→ Chapter.
Observe disposal regulations for p ...
Evaporator
The liquid refrigerant evaporates in the tubes of the
evaporator. The latent heat of evaporation is taken from the air
streaming past the evaporator fins. The air cools. The
refrigerant evaporates and is drawn into the air conditioning
system compressor ...
© 2016-2024 Copyright www.vwgolf.org

 Assembly overview - charge air system
 Removing and installing charge air cooler